
Fly Classic Tuning Continued
FRONT AXLE ASSEMBLY
Time to work on the front axle area. The old debate over independent or solid front axle is one I will not get into.
I will show a solid front as that is what I like to work with and it also helps resolve issues that we see at times with the Fly models.
What issues? One of the most common is the chassis mold for the original fronts is off center. The second is that they can crack over time.
*Our model has both a bad mold & a crack. Even if there were no issues present, this is the modification I would use.

If the mold is off center, if you drill it to make a better independent system it is difficult to set the wheel straight. I would say most of the earliest classics in my collection have this issue. Easy to spot now that I know what to look for.
The modification I like to do is making a solid front axle system. I start by using 3/32nd piano wire as it works well enough for the front. Once I cut it, I check it to make sure it is straight and true by rolling it across a flat surface.

I cut the length to around 48 or 49 MM. You will need to adjust this for the model you are working on.

Next, use a 1/8th drill bit and drill out the existing holes so you can insert the brass tubing we will use. I use a pin vise and take my time doing it by hand.

Now we can insert the tubing. If you have a bad molding (which we do) then take a small rat tail file or milling bit and make the hole as wide as possible so you can set the tubing straight and true.
Use a marker and mark the end of the tube while it is in the chassis. Cut the tubing and clean off any burrs with fine grit sandpaper. Clean the inside of any flash with your hobby knife or small file.

Remember to double check your measurements.

This tubing works well for creating a sleeve for your 3/32nd size axles.

Install the system and test fit. Tubing too long? Sand the ends of the tubing until you get the desired width. Too short? You guessed it. Cut a new one.

This is the critical test. Install the body and make sure the front tires are not rubbing. If you are ok then remove the body and add a light drop of glue on each wheel if needed. I use Testors for this along with a toothpick.

Now place your chassis on a flat surface. If you have a set up block, it's a good time to use it. Make sure your axle assembly is where you want it and apply some hot glue to hold it in place. Hot glue works great and you can remove it with a hobby knife if you make a mistake.
FRONT GUIDE
Our new guide is a Slot.it brand wood track guide that is very popular in our hobby. it works well with Fly classics and really improves the overall handling of the model.
We will use the SET SCREW METHOD for connecting the lead wire to the guide and braid. I prefer this method over using the ferrules. Many times the stock ferrule (brass eyelet) will protrude from the bottom and can cause bad vibration and sometimes even catch on track joints. The set screw method prevents that and it a tighter fit than press-in eyelets.

Cut your braid about 1 inch. This allows you to insert the braid easily and you can trim off excess if desired.

Insert the braid from the top of the guide and feed it through, leaving just enough to curl over at the top.
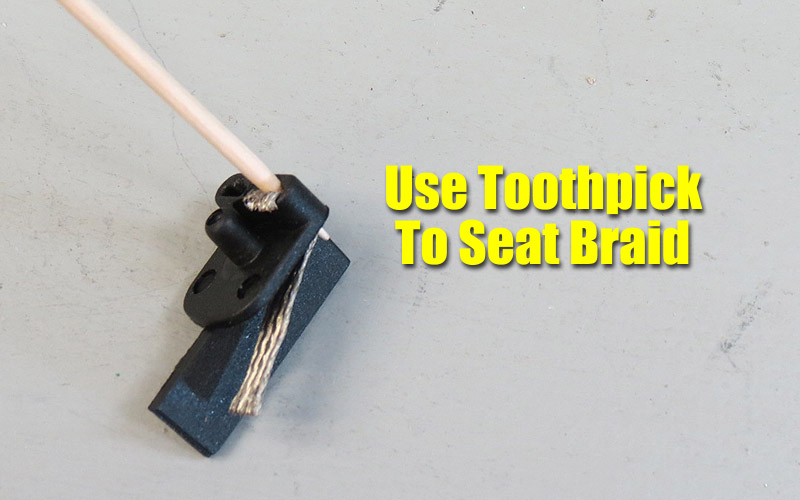
Using a toothpick helps seat the braid and forms a conical depression that the lead wire and set screw to fit into.

Use a 3 or 4 MM set screw. Cut your lead wire about 4 1/2 to 5 inches long then strip one end 6 MM or so.

Insert the lead wire into the guide and then press the set screw on top with your wrench. You will need to add pressure as you twist your wrench clockwise. I like to install the screw almost flush with the top of the guide.

Install some shims to start your set up process. Now you are ready to install the guide and check your front axle height.

Make sure your braid is FLAT with no bends or kinks. Install the guide and press down on the front of the chassis to fully seat it. Check to see if your front tires are just touching or slightly above the surface. Install the screw to hold the guide snugly, yet still maintains free motion. Remove or add shims to adjust your ride height.
*If your track has slightly raised rails or braid, it is always best to test the car on the track it will race on. Take a few laps and observe the action.

Since we had to install a solid front sleeve, you will want to route the wires under it. The body work has an area that will rub on the wires. You still have great flexibility due to the wires used.


Sometimes the interior of some classics can pinch the lead wires at the edge of the pod. Use a rat tail file or your Exacto blade and create a notch for the wire to lay into. This reduces pinching and helps prevent any binding. Run your wires in the sides and use a little hot glue on them to keep them secure. Finally, solder your wires in place.

Lubricate your bushings and your front axle housing. Also a drop of oil on each end of the motor. On the gears use a light coat of grease. I use white lithium and apply it lightly with a toothpick.
NOW you can test your chassis. It is also time to glue in your bushings if they need it. Just a drop of hot glue works for me. I like hot glue as it is safe and you can remove the bushings if you ever need to. HOWEVER, I can honestly say that once you install quality bushings like this I cannot see why you would need to remove them. If you are comfortable with Super Glue, then by all means use it. I would advise putting some on a toothpick and then applying it.

The end results are worth it, at least for me. This car has been apart of our collection for many years and deserved to be pampered. The way it performs on our track is exactly what I hoped and more. Very smooth and quiet with plenty of power.

There is plenty of work to get it here and also the investment of parts. Only you can decide if it is worth it.
This is just one of many original Fly Classics that will see these upgrades. It is FUN for me and that is always the bottom line.
- Harry
As always feel free to contact me about this article or just the hobby in general at harry@homeracingworld.com.
Better yet, drop into our Message Forum and share your thoughts with other enthusiasts!
Copyright © 2013 HomeRacingWorld.com All Rights Reserved