
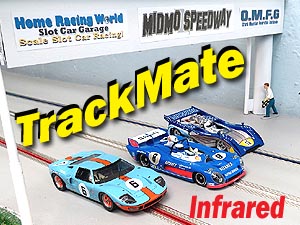
Perfect Timing?
TrackMate Slot Car Lap Timing
(Infrared Detection)
If you were looking for a comparison of all the lap timing options in our hobby, this is not it. Like anything else in our hobby, personal preference is going to dictate what features you are looking for and how much time and money you are willing to invest in it. This is simply a look at the choice we made for our home track and why.
But I will share with you that over the years I have tested just about every timing option out there. From homemade to after-market there are a lot of options. I can also share that if you truly want a reliable system then you are going to have to invest in it.
What I wanted is what most any enthusiast would want: A system that is easily installed and that I know will work. Like other aspects of this hobby, some investment in time and money is required. I looked at a timing system choice like I look at other parts of my layout. I want quality but I also want value.
And compared to other options Trackmate offers a lot of both.
So if you are looking for a fairly simple approach that gives you a rock solid platform to start racing with, then read on.
Hardware System Criteria:
1. A virtual plug and play system.
Sensor and computer interface cables are fully assembled and ready to be mounted in the track. As with any system there is some installation to do but not much. I also had to build a bridge to house the overhead infrared LED's. The important thing was that the electronic hardware was ready to go.
2. System that could use an overhead infrared interface.
Since braiding our track I did not want to cut the braid to use a dead strip system. I knew infra-red systems were just as reliable as any other detection method and Trackmate fully supports it.
3. Solid customer service.
With well over a decade in this hobby, Trackmate has become one of the standards in our hobby. One of the reasons is good customer service. A couple phone calls and prompt email responses verified that I had made the right choice.
Software System Criteria:
1. Software Simplicity. - Easy setup with minimal system requirements.
We just want a simple program that allows us to race with lane rotation. Also one that does not need a higher end computer. This program accomplishes both.
I do not need a database for all my slot cars or a track design program. We do not utilize pit stops or desire simulated fuel consumption. Some of you do like these options and with the Trackmate hardware you can always download other programs you feel has the features you want. So even if you want more bells and whistles when it comes to software, the Trackmate system is still a good choice.
Our System Configuration
What we purchased:

If you are looking for a Dead strip or Reed switch solution this is the kit you need. Or if you want to do infrared but can't use any of the bridges available in the other kits.
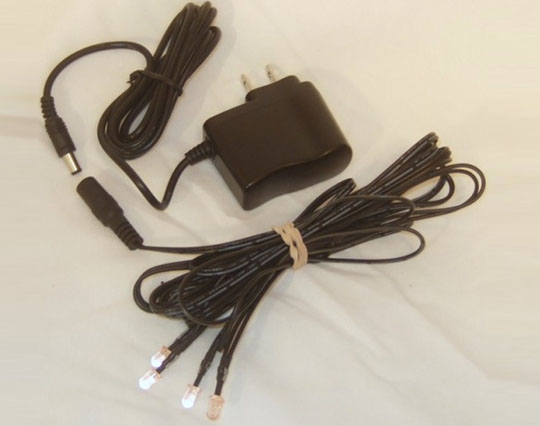
You could get the components and wire/solder it up yourself. I did not want to. Saving me time and effort was worth the extra cost easily.
REMEMBER - This is not a light source. You do not need a light source for the infrared to function using these LED's. The LED's are also INVISIBLE to the naked eye when turned on. So do not think they are broken.
Total cost was $197.00 before shipping. For my budget that is reasonable enough and even when you figure in the computer this entire system was under $250.00.
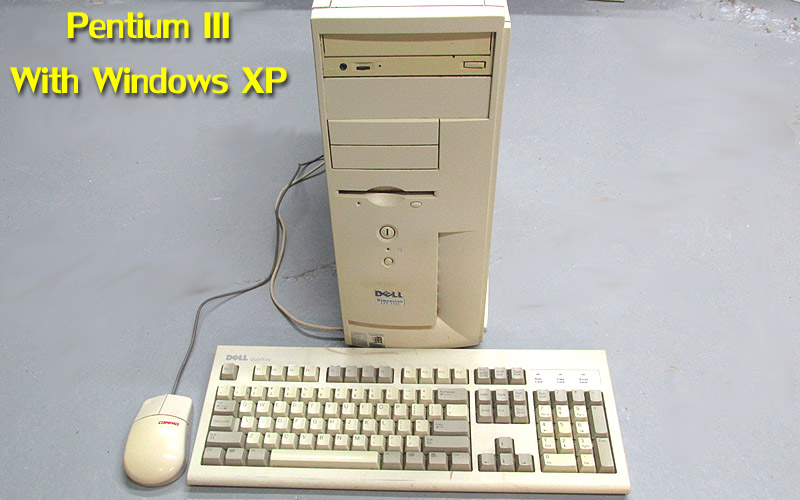
The computer is actually one of the more budget-friendly parts of it. One of the nice things about this system is that can use old/outdated PC's. This system was taken from the trash bin at a local Salvation Army and I just plugged it in and it booted up. After some clean up of the files it was ready to go. I also looked for other PC's and found many older systems like this are easily had for around $50-$100.00 depending on where you look. I found that places like the Salvation Army I mentioned and old fashioned yard sales the best places. The second PC I have that will be used for our oval was purchased at a yard sale for $40.00. You can also search EBay and even your local Craigslist & find some really great deals as well. So do not think because a timing system needs a PC that the cost will become out of your budget.
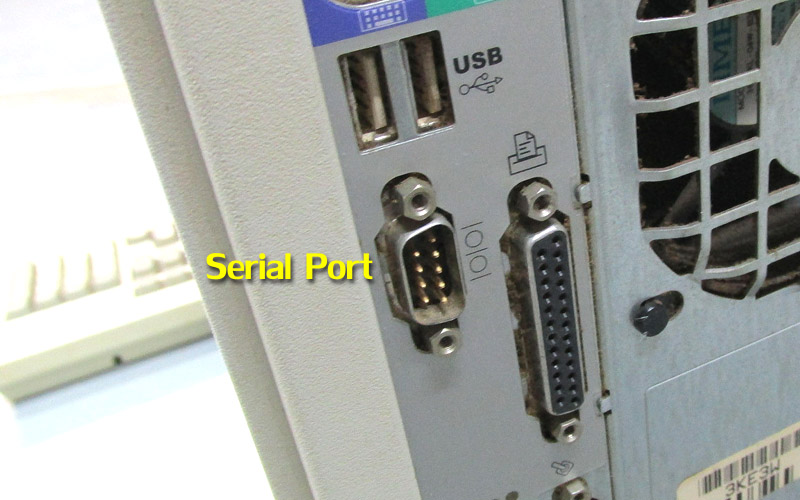
Trackmate uses the serial port as an interface. If you have a computer that does not have this port, they have a USB to Serial adaptor that will work as well. These ports are only found on older machines so getting that cheap PC has the added benefit of these ports.
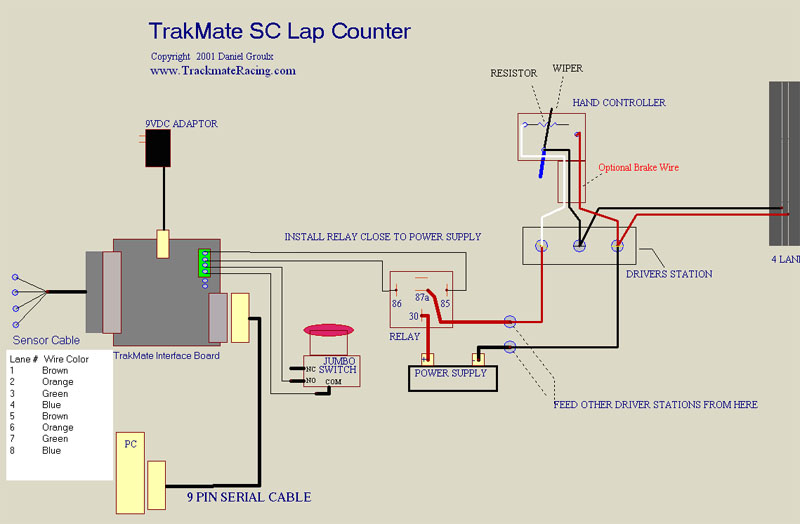
Here is the wiring diagram Trackmate provides. It is very easy to follow. If I can do it, so can you. I mounted mine to a board under our track.
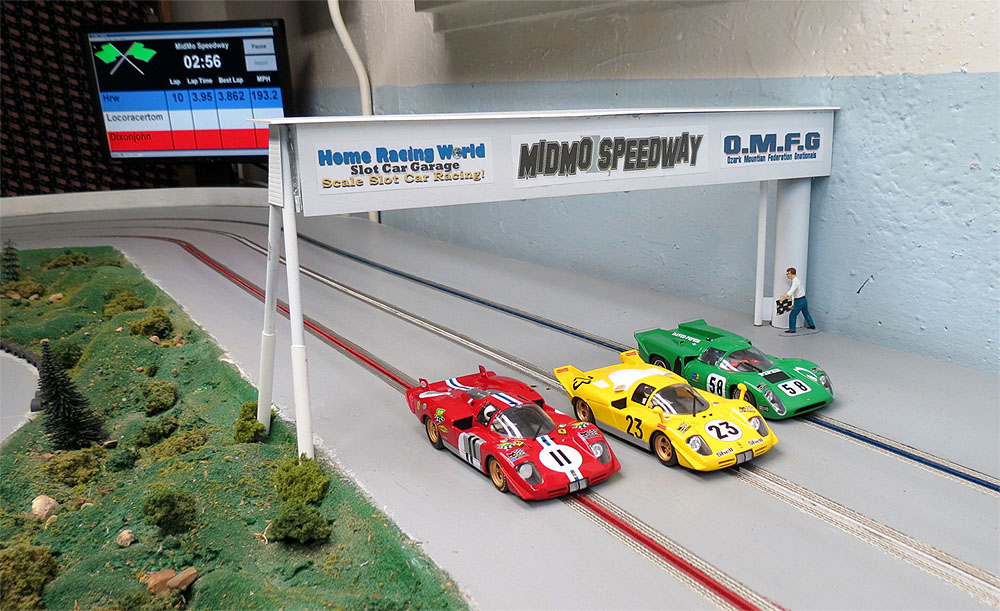
Building Bridges
Having a system like this still requires some work on your part. In our case we needed to build a overhead bridge to mount the pre-wired LED kit.
I used some sheet plastic (styrene) that I had on hand. Don't have any? That's ok. You can use Elmer's Foam board found at Wal-Mart or any craft store. I have built an almost identical bridge with it and it lasted for years. If you have a Dollar General they have board identical to it for about a $1.00 a sheet.
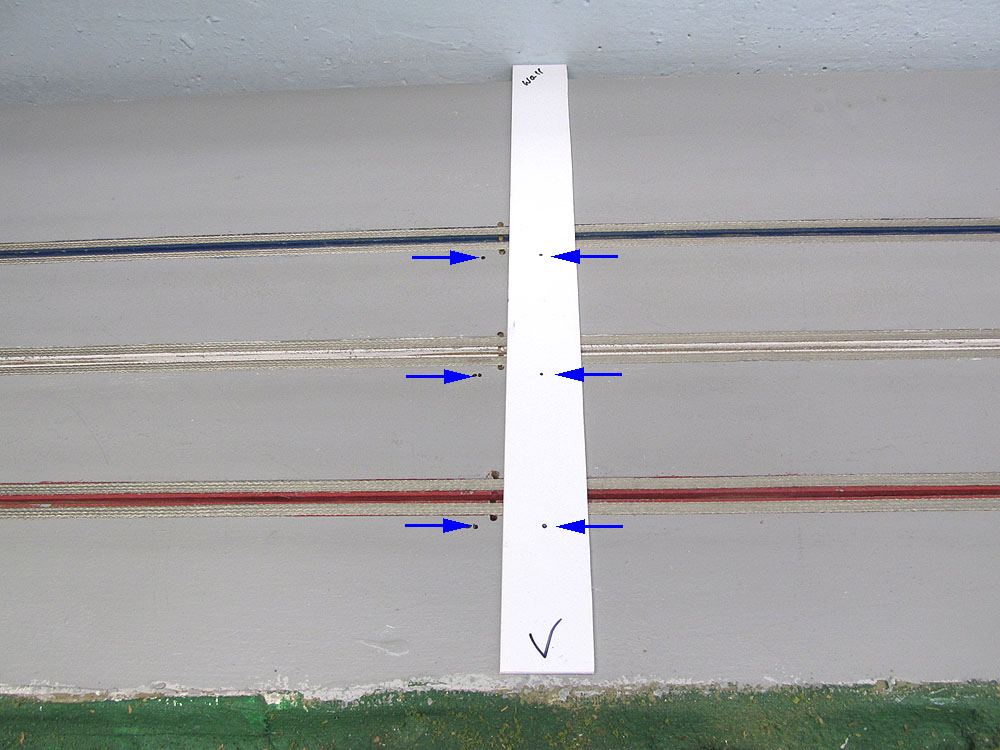
I cut a strip about 1 & 1/2 inches wide. I measured the distance from my wall to the outer edge of the track and cut to fit. I marked where I wanted the holes in the track and then marked the strip.

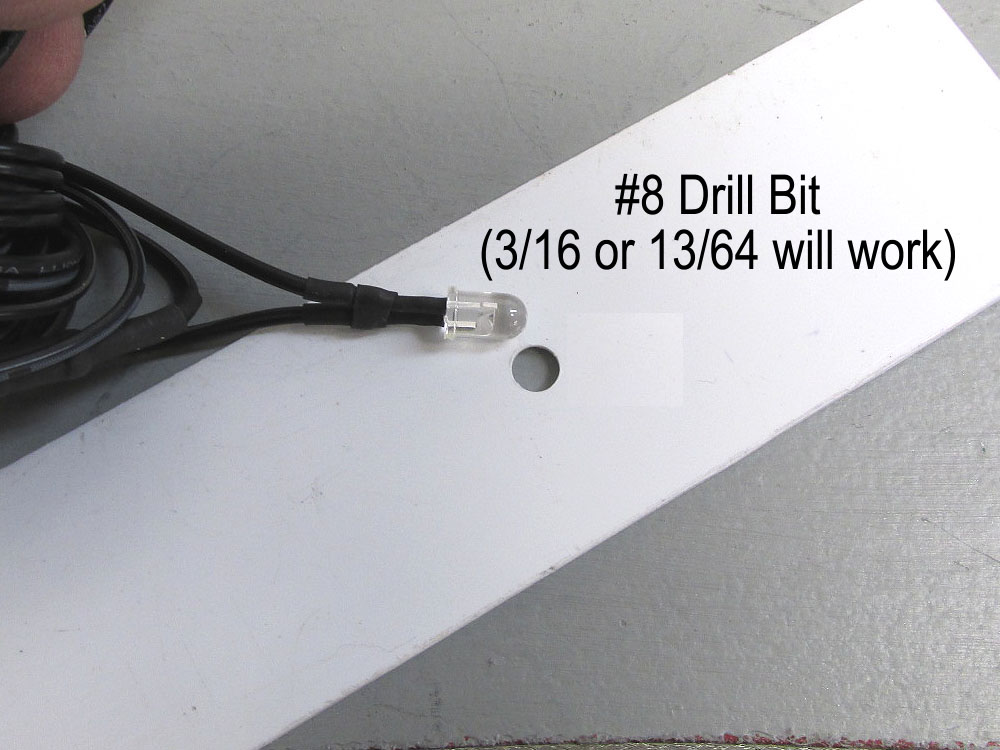
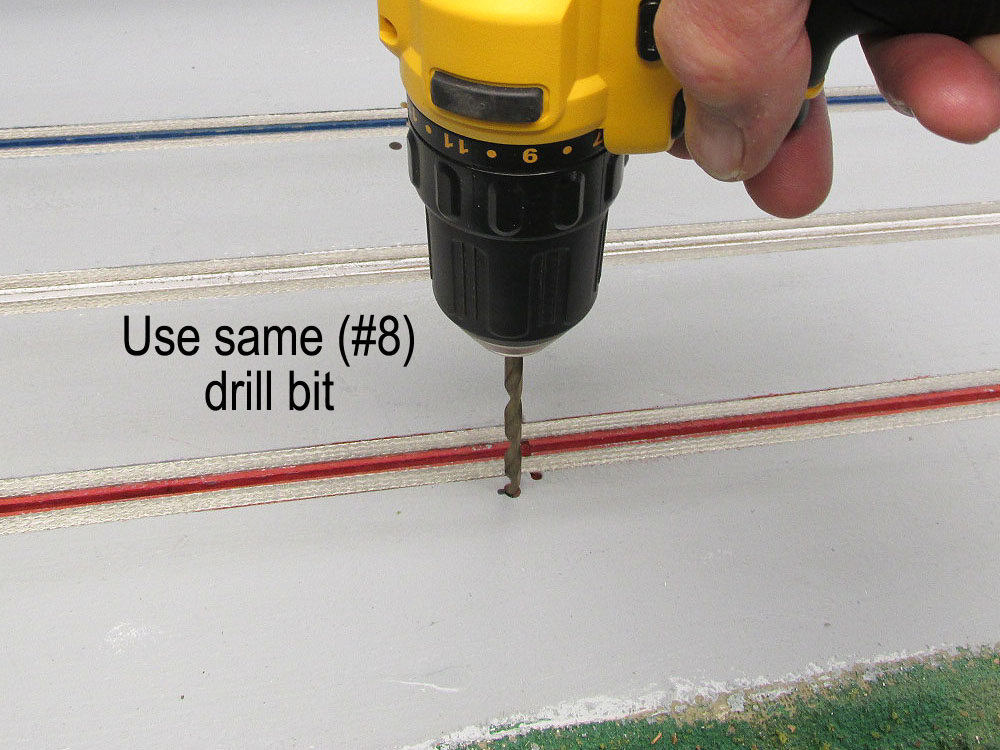
Using a #8 (3/16") drill bit I drilled the holes for the LED's in the strip. I then slid the strip over where I had marked the areas in the track to make sure they lined up as close as possible. I then re-marked the track using the holes in the strip as a guide.
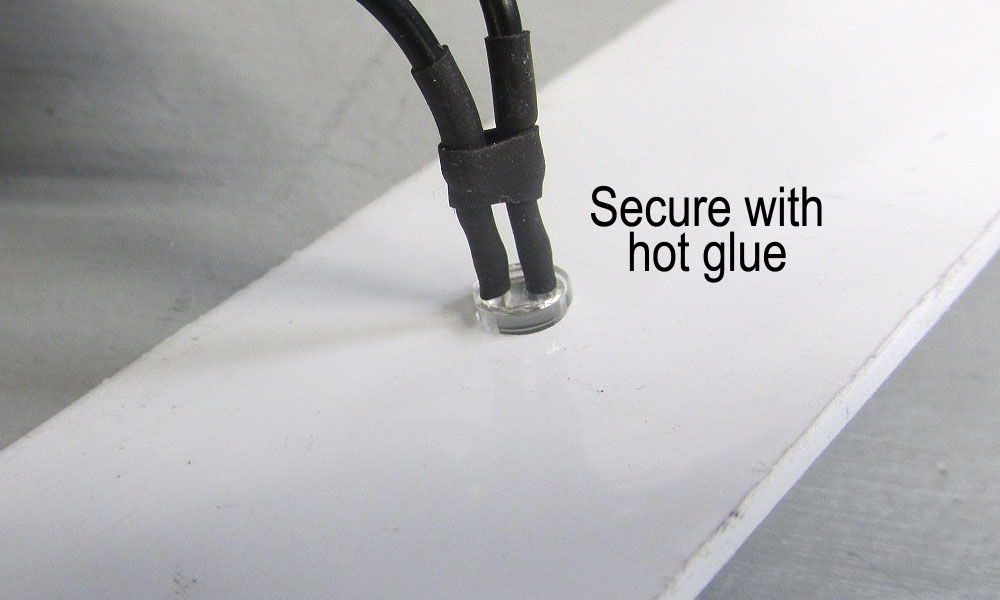
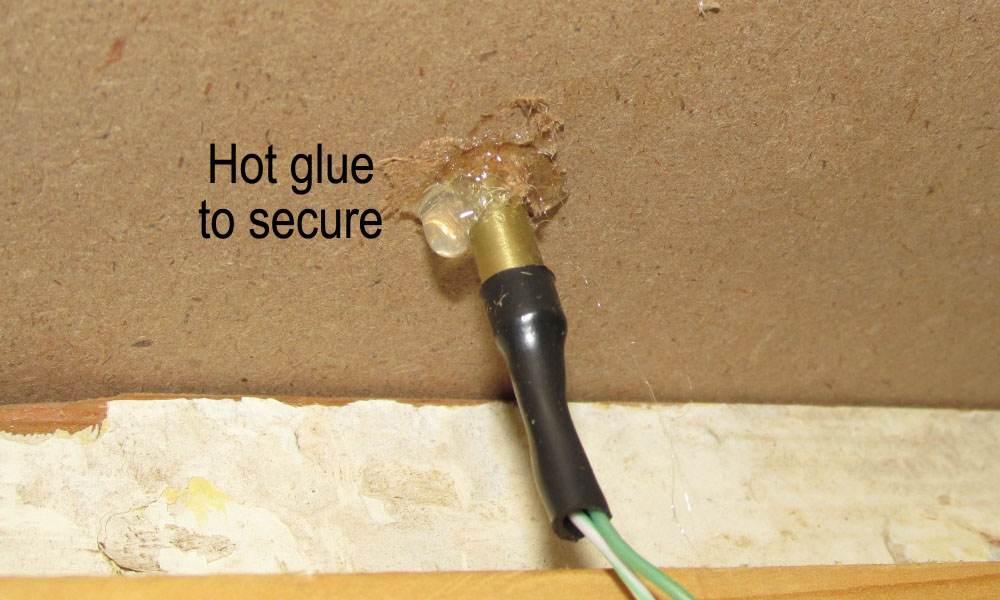
The LED's has a small flange so that when you mount them, they will sit flush and are easily glued in place.
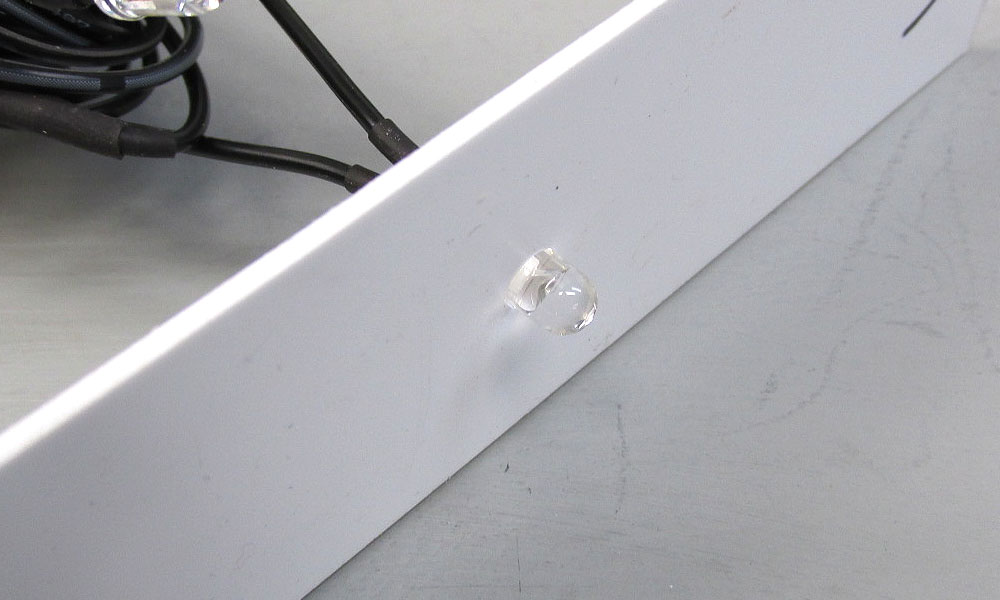
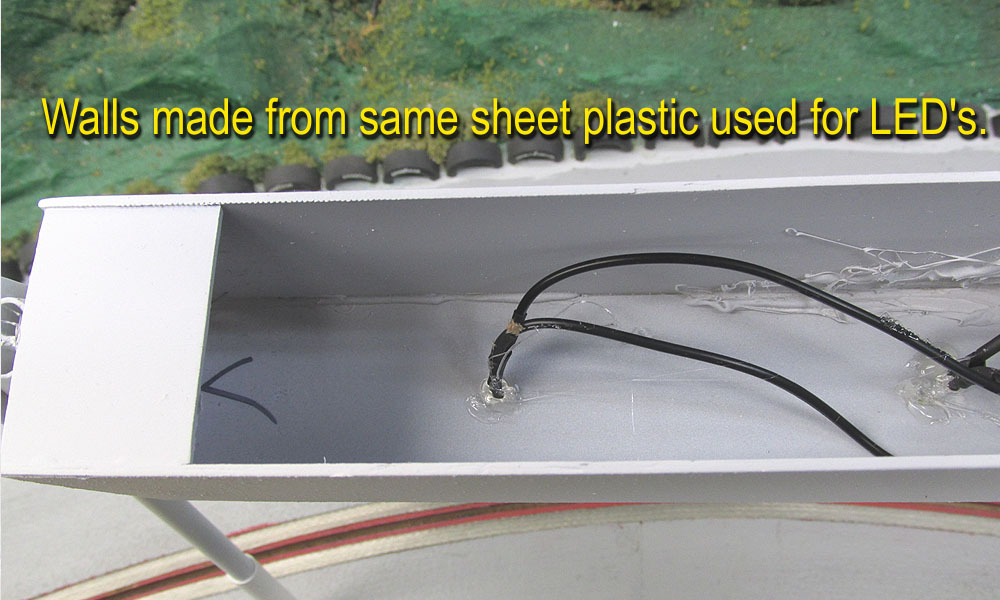
After the LED harness was glued I made simple walls to enclose everything. You can get as creative as you want to here. I am not trying to win any scale awards with our scenery, but still wanted it to look somewhat pleasing.

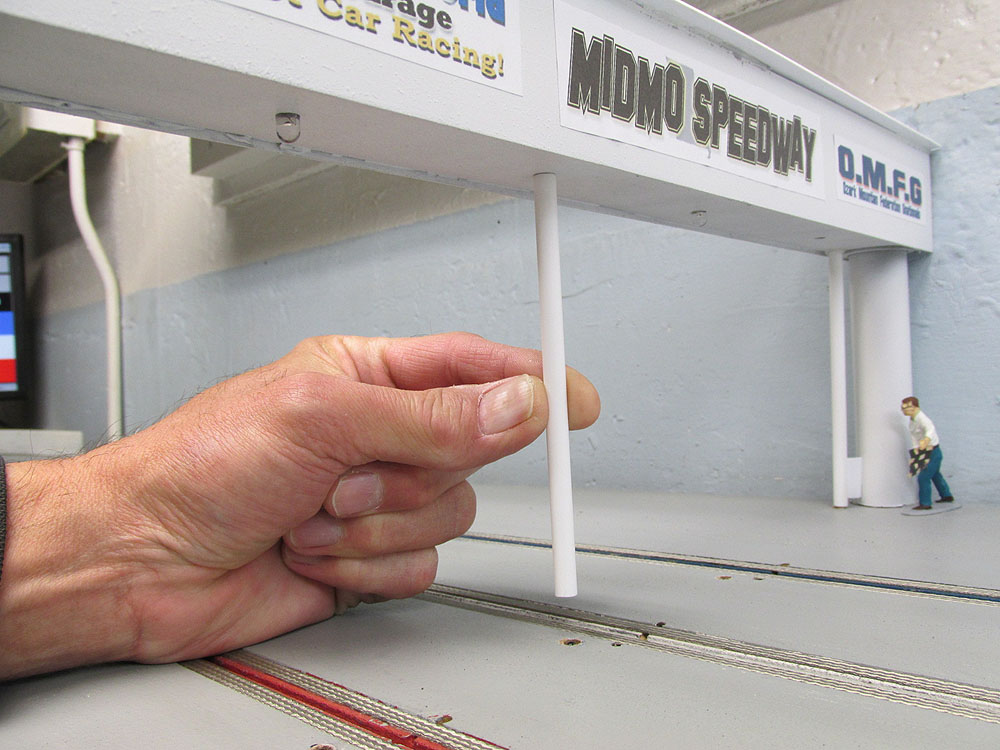
I measured the pipe so the bridge sits about 5 1/2 inches above the track. That is 1/2 inch over the distance advised for the LED's but it works perfectly. This is tall enough for any model we will race on this particular layout.
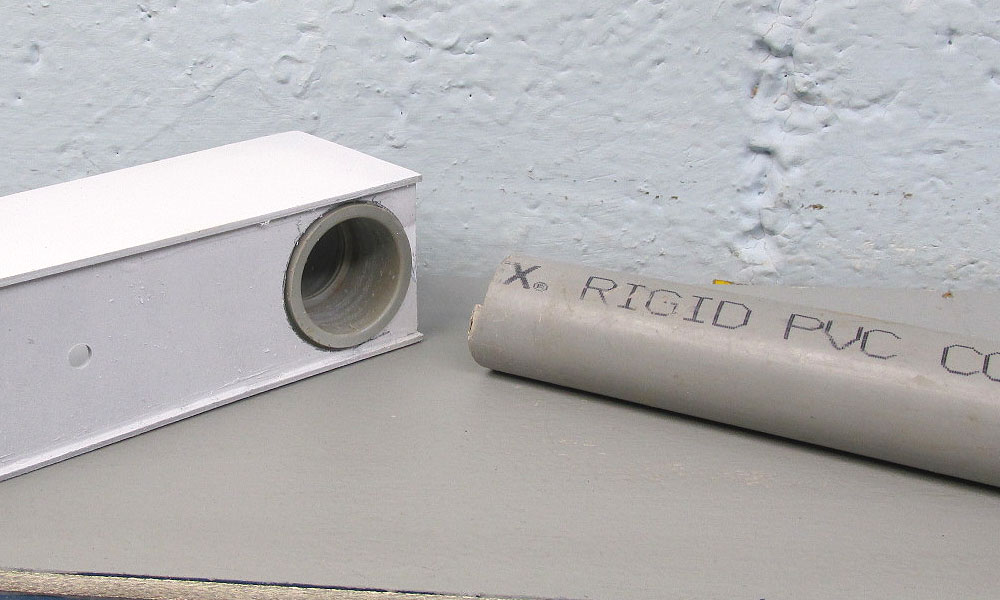
I decided to use 1" plastic electrical conduit for one end of the bridge. Could you use smaller? Yes. I used what I had. Here is a tip: go to your local Lowe's or Home Depot and check the scrap bin if they have one. I found a 2 foot section there and it was free. I just bought a coupling for the inside of the bridge for mounting the pipe.
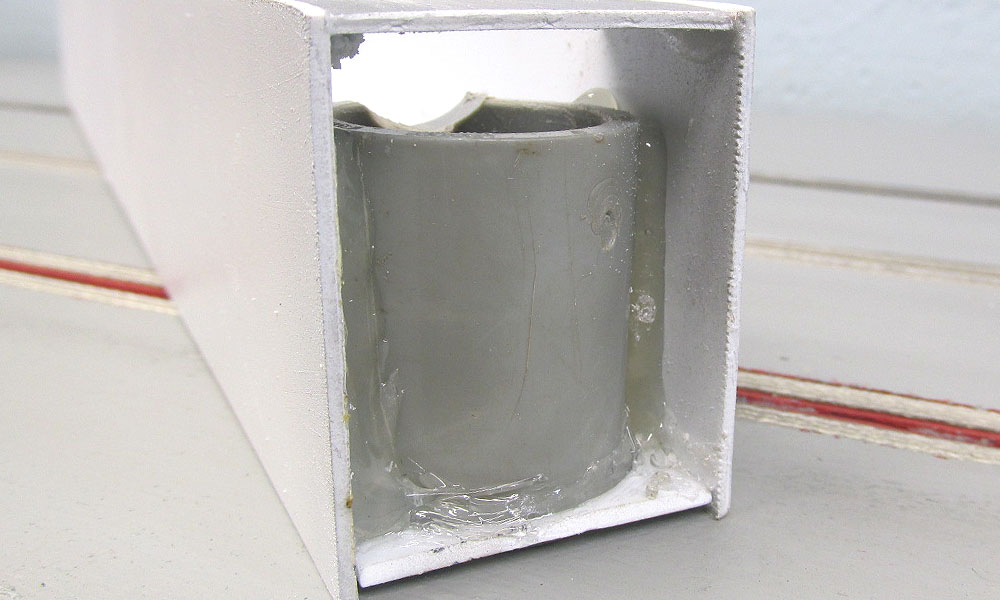
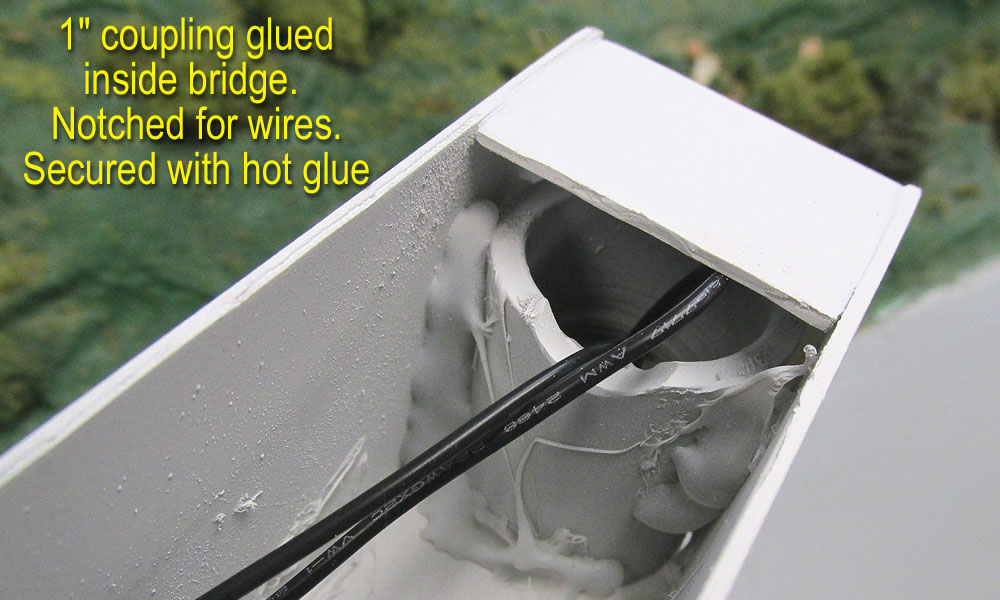
I placed the coupling over the strip and traced around it, and simply cut the hole to allow it to slide up. I sanded a small notch in the coupling for easier wire routing. Hot glue on both sides of the coupling holds it very well. No need to glue the pipe to the coupling, it is tight enough. Could you do it without this coupling? Yes, but I found it made a stronger base for the bridge.
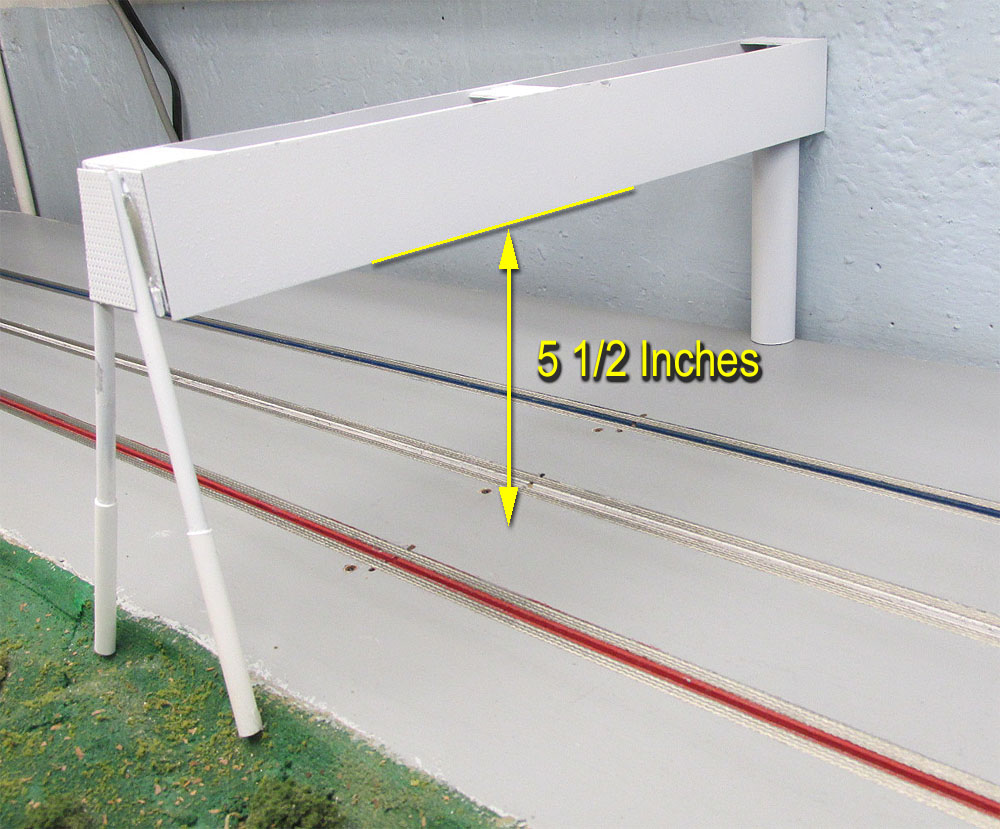
I created a sliding tube system for the other end of the bridge for support. I made it like this so I could use a small bubble level and easily adjust it. Once it was set I just added a drop of Testors model glue on the tubes. The one support at the large end is actually enough to hold it easily. But I did not want any more mounting hardware on that end as it is not easy to get to.
Sensor Installation
IMPORTANT NOTICE!
Please pay attention to the color of the wires. The chart provided by Trackmate (shown at top or article) has the legend of the colors and how they correspond to the lanes.
For example:
Lane #1 Brown
Lane #2 Orange
Lane #3 Green
Lane #4 Blue
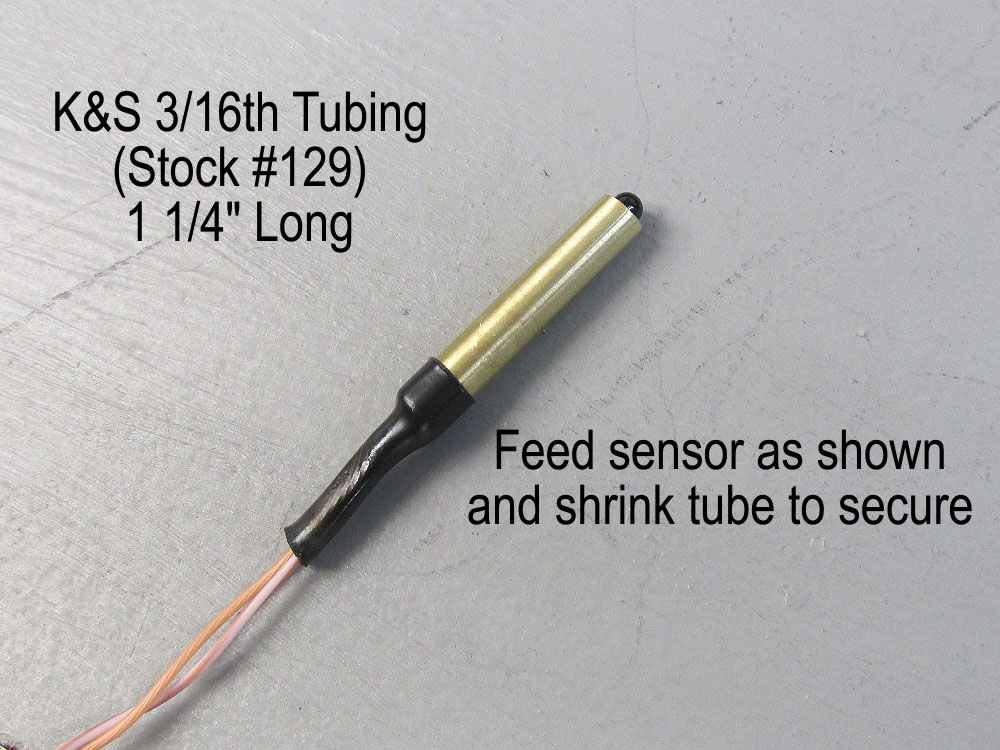
This method of installation is NOT required. You can just mount the sensors into a hole directly. But I found using a sleeve for the sensors made it easier for installation. It slides into the hole easy enough, but still tight enough to hold itself in place while you glue it. It is also a good way to increase the durability if you ever have to move them to another track.
Using the same drill bit as for the LED's, carefully drill the holes through. Just try and keep the drill as straight as possible and it will be just fine. There is a little wiggle room when you mount the sensors, so do not worry about it being perfect.

I test fit the tubes before installing the sensor inside.
Once you have the sleeve mounted, you can go under the track and install it.
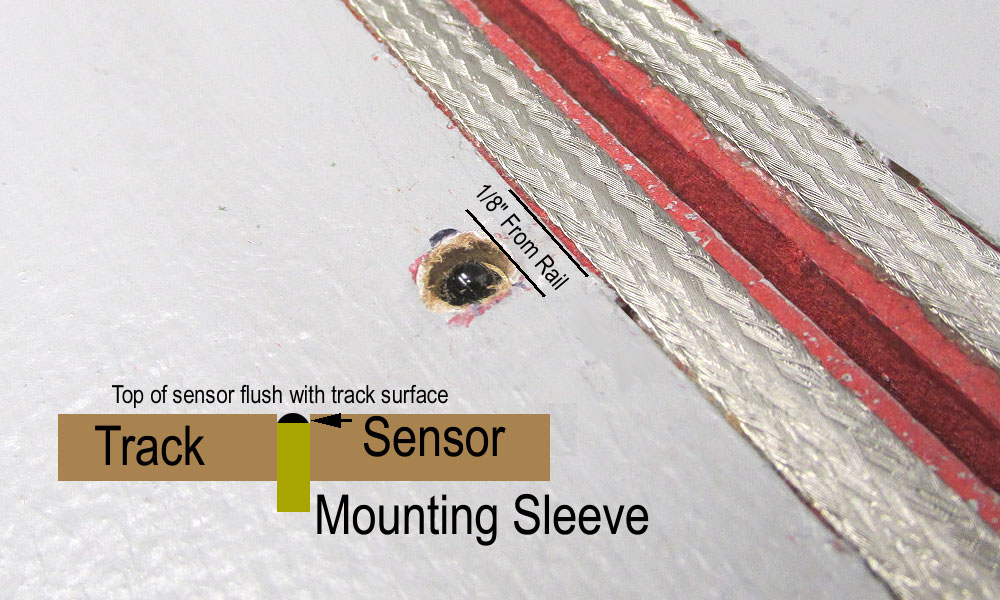
I placed a scrap section of plastic over the hole and pushed the sensor assembly up until the top of the sensor touched the plastic. Basically keeping the sensor flush or just slightly recessed from the track surface.
Testing
Time to install your bridge and begin testing. Just align the bridge by sight and it will be fine, no need to try and perfectly match the sensors.
But you say you want to make sure? Ok, try this.
Using a 1/4" tube, slip it over the end of the LED. This will let you know if you are where you need to be.
All set to fire up the system now.
Turn your computer on and make sure your sensor and LED power supplies are hooked up.
Install the software and follow the instructions, very easy. Just click on the link below and read each section that applies to you.
HERE IS A LINK TO THE ONLINE MANUAL
When you auto test your com port you should see a screen like this:
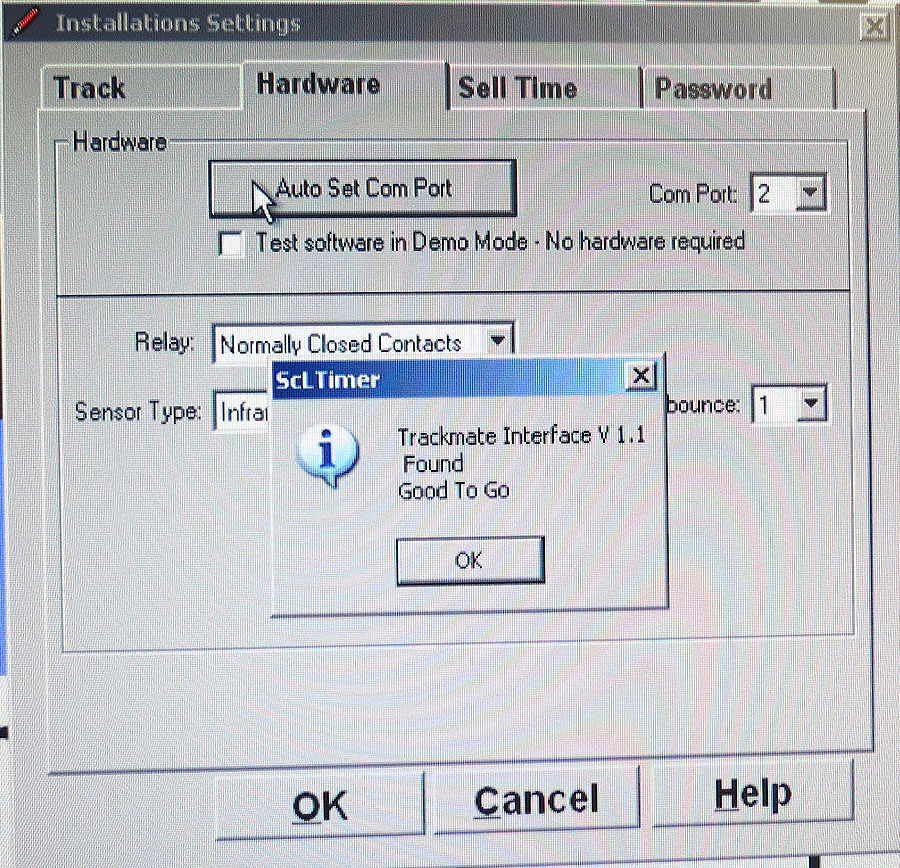
Pretty self-explanatory.

Inside your TRACK tab is where you can make changes to match your track. I set the lane colors to match our track along with the name. There are also options for scale speed and lane length.
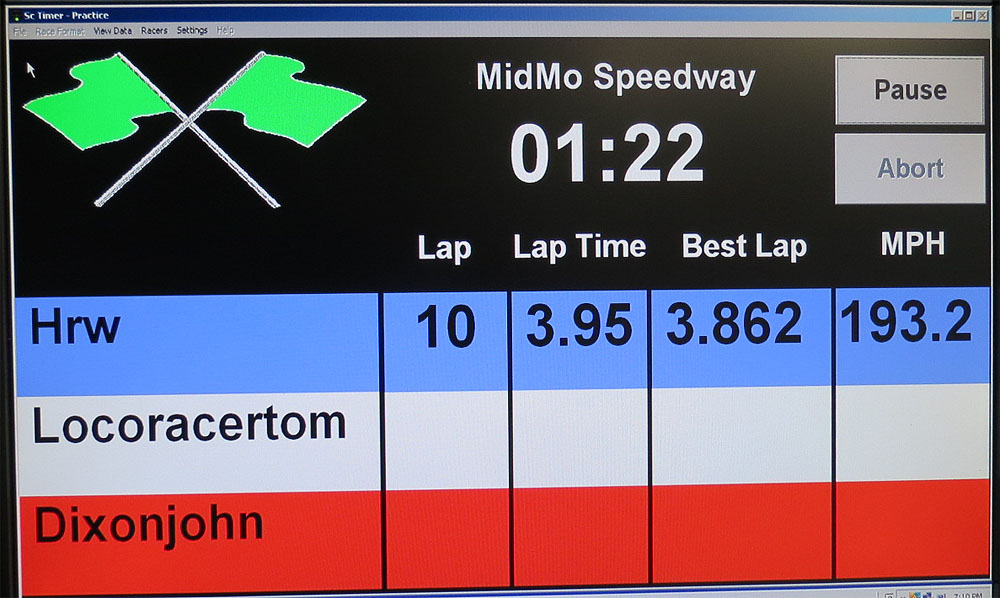
Among the actual racing options the PRACTICE mode is where we spend most of our time. This is a fun way to enjoy your models if you are a lone wolf racer as well. This screen has what I really want to know: Lap times and the best lap. It is a lot of fun to try and best yourself and we have spent many hours just challenging each other in this way.
Maybe you want more options? PC Lap Counter is a great program that just about everything you could ask for. It is not free, but it is fair priced and has very solid customer support. I still have it installed and it works perfectly with the Trackmate interface.
Having a good lap timing system adds more to your hobby than you might think. We have made many laps without one for the past couple of years but we did miss it. Now that we have one back the fun factor has been more than doubled. From just solo racing and trying to break that track record, to seeing just how close we are running in a pack. A good timing system adds so much to your home racing and is well worth investing in.
I feel this system is an excellent choice for any home racer or club and was well worth the investment.
-Harry
Quick List Of The System Ordered
Copyright © 2014 HomeRacingWorld.com All Rights Reserved