Buick Short Tracker - Finished!
Buick Short Tracker - Finished!
![]() by HomeRacingWorld » Sun May 15, 2016 8:05 pm
by HomeRacingWorld » Sun May 15, 2016 8:05 pm
-

HomeRacingWorld - HRW Janitor
- Posts: 15569
- Joined: Wed Aug 08, 2012 2:05 pm
- Location: HRW Skunkworks
Re: Buick Short Tracker - WIP
![]() by Gameover » Sun May 15, 2016 8:35 pm
by Gameover » Sun May 15, 2016 8:35 pm
I have one of these bodies too. Cant wait to see what you do :)
-

Gameover - Mr. Hubcaps
- Posts: 2998
- Joined: Thu Mar 06, 2014 9:23 pm
- Location: Magless in Minnesota

Re: Buick Short Tracker - WIP
![]() by DManley » Sun May 15, 2016 9:27 pm
by DManley » Sun May 15, 2016 9:27 pm
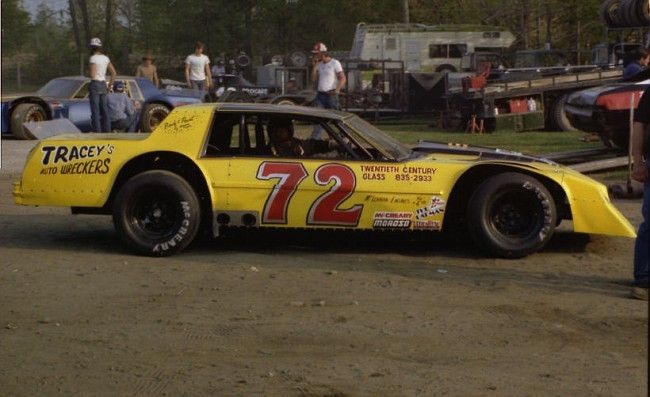
This is going to be sweet! A guy up here in the old model club built a 1/24 scale static model of a very similar shorttrack car from Auto City speedway. Auto City is in Clio, a suburb of Flint, so Buicks were extra popular. He used the Monogram NASCAR Buick, and he did a ton of work to get it sitting correctly on a Late Model chassis. He had to move the wheel wells way up to shorten the nose, and get the rear axle right up to the driver's compartment. The whole proportion of the car had to be fudged. The cowl had to go back a bit, and the roof was a few scale inches shorter from front to back, as well as being lowered in the front. The car was slammed, requiring the wheel arches to be moved all the way up above the body line, and the bottom of the window opening. He had to scratch the whole nose and hood, as the hood and fenders bulged to clear the motor and tires. The good thing about making a slot car, is you don't have to scratch build a frame, suspension, driveline, fuel cell and do all of the plumbing and wiring that he did. By the time he had all that work into it, he ended up making a casting of it, and sold a few of them. I still see a new one appear at the I.P.M.S. show in Bay City every few years. I almost bought one at the swap meet, but it was way too pricey for my budget.
Here is another cool one for inspiration. These things were mostly glass, back in the day. A buddy of mine who ran all metal bodies back in the eighties referred to them as "Tupperware" cars. That's why I always chuckle when I hear references to the older Scalextric resistant cars as "Tupperware slot cars" Man I miss the old days of short track racing.
I am following this build. I sense major coolness on the way! :music-rockout:
- DManley
- Posts: 79
- Joined: Wed May 28, 2014 10:32 am
- Location: Houghton Lake MI
Re: Buick Short Tracker - WIP
![]() by CrockettNZ » Mon May 16, 2016 1:46 am
by CrockettNZ » Mon May 16, 2016 1:46 am
nice one Harry
as Dave said great period of racing
looking forward to following this one
as Dave said great period of racing
looking forward to following this one
-

CrockettNZ - HRW SlotCar Veteran!
- Posts: 475
- Joined: Sat Oct 17, 2015 2:11 pm
- Location: Napier New Zealand
Re: Buick Short Tracker - WIP
![]() by HomeRacingWorld » Mon May 16, 2016 5:33 am
by HomeRacingWorld » Mon May 16, 2016 5:33 am
Thanks guys. And great reference photo Mr. Manley. Thank you. This might take longer as this body will go under the knife.
But this was just what I like to see, more ideas :)
But this was just what I like to see, more ideas :)
-
HomeRacingWorld - HRW Janitor
- Posts: 15569
- Joined: Wed Aug 08, 2012 2:05 pm
- Location: HRW Skunkworks
Re: Buick Short Tracker - WIP
![]() by bill from nh » Mon May 16, 2016 8:06 am
by bill from nh » Mon May 16, 2016 8:06 am
In the early 80s,this Regal body was also the favorite GM body in NASCAR racing for a couple years. It also was the base of Buick's hot turbocharged V-6 street car called the Buick Grand National. Most were black.
- bill from nh
- HRW SlotCar Veteran!
- Posts: 373
- Joined: Wed Sep 05, 2012 5:32 pm
- Location: New Boston, NH
Re: Buick Short Tracker - WIP
![]() by strangebrew » Mon May 16, 2016 9:57 am
by strangebrew » Mon May 16, 2016 9:57 am
Only suggestion I have is to drop the nose just a little bit with a heat gun. I didn't do that to the Showdown entry, but I do it now
to some of the boxier models. A close observation of the 1:1 shows the nose dropped to some degree.
to some of the boxier models. A close observation of the 1:1 shows the nose dropped to some degree.
-

strangebrew - HRW SlotCar Veteran!
- Posts: 1097
- Joined: Mon Jan 27, 2014 1:50 pm
- Location: Southern Illinois
Re: Buick Short Tracker - WIP
![]() by HomeRacingWorld » Sun May 22, 2016 7:16 pm
by HomeRacingWorld » Sun May 22, 2016 7:16 pm
Been awhile since the last installment because I decided to try and accomplish a little more.
I wanted to recreate the fiberglass body/nose as best I could as well as lengthen the entire front.
Not much of an expert on such things, but with the help of a couple hotshot experts like Doc and Shotgun, I went for it.

Ok, too late now.

Not only is Hard As Nails great for tire gluing, it's excellent for filling in small pin holes. This casting had PLENTY to fill. I coated the worst areas to try and give them a good base seal. Worked out ok.

To create the new nose I needed to cut and remove the lower sides of the front and replace with new plastic. Just good old measure and cut. All the while I had printed out the photo Mr. Manley posted and used it as a guide.

I attached those with super glue and also glued sections behind it for strength. Then I traced the area on the front section and started cutting and filing to fit.
Tiny files are wonderful tools.

Ok, roughed in. I will emphasize rough :)

On the advice of Doc from RMS, I mixed small amounts of resin and secured the section at the right angle. The using a toothpick, I flowed the resin into all the areas.
This step alone was solid gold. It might not work for all mods, but in this case it worked perfectly.

First pour was good.

I needed another so this time I used the Smooth-ON resin. For no other reason than to try it. Works just fine is easier to feather light edges IMHO.

I finally sanded and used just a light amount of glazing putty. I used a toothpick again and worked fine. Then it was wet sanding time.

As I said, all this time I have been following the photo. I didn't make it spot on, but close enough for me :)

So the "late model" nose is finished. Time to glue it back on the car and begin this phase.
Must say this was a LOT of fun. Yes, it's tedious sometimes. But well worth it.
I wanted to recreate the fiberglass body/nose as best I could as well as lengthen the entire front.
Not much of an expert on such things, but with the help of a couple hotshot experts like Doc and Shotgun, I went for it.
Ok, too late now.
Not only is Hard As Nails great for tire gluing, it's excellent for filling in small pin holes. This casting had PLENTY to fill. I coated the worst areas to try and give them a good base seal. Worked out ok.
To create the new nose I needed to cut and remove the lower sides of the front and replace with new plastic. Just good old measure and cut. All the while I had printed out the photo Mr. Manley posted and used it as a guide.
I attached those with super glue and also glued sections behind it for strength. Then I traced the area on the front section and started cutting and filing to fit.
Tiny files are wonderful tools.
Ok, roughed in. I will emphasize rough :)
On the advice of Doc from RMS, I mixed small amounts of resin and secured the section at the right angle. The using a toothpick, I flowed the resin into all the areas.
This step alone was solid gold. It might not work for all mods, but in this case it worked perfectly.
First pour was good.
I needed another so this time I used the Smooth-ON resin. For no other reason than to try it. Works just fine is easier to feather light edges IMHO.
I finally sanded and used just a light amount of glazing putty. I used a toothpick again and worked fine. Then it was wet sanding time.
As I said, all this time I have been following the photo. I didn't make it spot on, but close enough for me :)
So the "late model" nose is finished. Time to glue it back on the car and begin this phase.
Must say this was a LOT of fun. Yes, it's tedious sometimes. But well worth it.
-
HomeRacingWorld - HRW Janitor
- Posts: 15569
- Joined: Wed Aug 08, 2012 2:05 pm
- Location: HRW Skunkworks
Re: Buick Short Tracker - WIP
![]() by chris » Mon May 23, 2016 5:01 am
by chris » Mon May 23, 2016 5:01 am
What a fabulous job! That's gonna be one great looking race-car.
Chris.
Chris.
- chris
- HRW SlotCar Veteran!
- Posts: 220
- Joined: Fri Sep 07, 2012 3:22 am
Re: Buick Short Tracker - WIP
![]() by TuscoTodd » Mon May 23, 2016 5:17 am
by TuscoTodd » Mon May 23, 2016 5:17 am
WOW! That is a heck of a transformation! :o
Thank you for sharing the pictures of the steps / methods used - VERY slick!
:text-bravo:
Thank you for sharing the pictures of the steps / methods used - VERY slick!
:text-bravo:
-

TuscoTodd - HRW Bouncer
- Posts: 7145
- Joined: Sat Aug 17, 2013 11:25 am
- Location: Rural Ohio
Re: Buick Short Tracker - WIP
![]() by Gameover » Mon May 23, 2016 9:17 am
by Gameover » Mon May 23, 2016 9:17 am
Loots great boss man! Cant wait to see more!!
-
Gameover - Mr. Hubcaps
- Posts: 2998
- Joined: Thu Mar 06, 2014 9:23 pm
- Location: Magless in Minnesota
Re: Buick Short Tracker - WIP
![]() by HomeRacingWorld » Mon May 23, 2016 11:09 am
by HomeRacingWorld » Mon May 23, 2016 11:09 am
Thanks guys. Not perfect, but getting there :)
-
HomeRacingWorld - HRW Janitor
- Posts: 15569
- Joined: Wed Aug 08, 2012 2:05 pm
- Location: HRW Skunkworks
Who is online
Users browsing this forum: No registered users and 7 guests

Powered by phpBB® Forum Software © phpBB Group