I have several Monogram Lola t70's and McLarens in my Can-Am series with minimal tuning. Would you please post a list of all the new parts you've put on these cars? I don't have a truing machine so don't do that for wheels or tires, and I don't glue tires on either because if I decide to switch type (silicone to urethane, or reverse) it's a nightmare.
One of the McLarens had a badly warped chassis so after seeking advice on HRW I stuck it to a flat piece of metal with super strong magnets and left it in a cooling pan of hot water overnight. The next day it was flat, but between reinstalling the motor and putting the body back on the car was warped again and I couldn't get the right front tire to touch the track when the other 3 did. I ended up having to leave the 2 back body mount screws out, but that did the trick and all 4 tires were back on the track. Yes, the rear end of the body is 1/4" - 1/2" higher up than it should be, but it's much more stable on the track. For this car at this point, I think it's the body that is doing the warping and I don't know how to fix that.
Also, what is the value of changing wires if using the same motor? And, is there a specific replacement guide (part #) you are using?
Thanks.
Taking an old car and making it work
11 posts
• Page 1 of 1
Taking an old car and making it work
![]() by dreinecke » Wed Feb 13, 2019 10:33 am
by dreinecke » Wed Feb 13, 2019 10:33 am
-

dreinecke - King of the Dum-Dums!
- Posts: 7360
- Joined: Wed Aug 08, 2012 5:39 pm
- Location: Colorado
Re: Taking an old car and making it work
![]() by slothead » Wed Feb 13, 2019 11:55 am
by slothead » Wed Feb 13, 2019 11:55 am
-

slothead - The Doctor is IN!
- Posts: 1560
- Joined: Sun Mar 17, 2013 7:04 pm
Re: Taking an old car and making it work
![]() by WB2 » Wed Feb 13, 2019 12:37 pm
by WB2 » Wed Feb 13, 2019 12:37 pm
I used the parts of this article with respect to lowering the body: https://www.electricdreams.com/monogram ... 0-rebuild/.
I used tires from Dart Hobbies made to fit this car.
It sure helped.
Electric Dreams also had a two part article on the M6. Again, I referenced the bits pertaining to lowering the car.
OK, not exactly Slot.It or Thunderslot performance, but you can make cars run better without spending a lot of money.
Same goes for the HSRR McLarens.
I have a Fly Porsche 935 K3 on the bench now. I’d rather try making it a better performer than resorting to a 3D chassis right off the bat.
Speaking of warpage, has anyone else encountered warped Carrera Torino bodies?
I had a Petty that was terribly bad and a Yunick that wasn’t quite as bad. When I tightened the mounting screws, the warpage would rack the chassis and lift a tire off the ground. Even had the problem with the screws backed off.
I finally resorted to a spacer between the body and chassis at one mounting location.
- WB2
- HRW SlotCar Veteran!
- Posts: 582
- Joined: Tue Nov 27, 2012 10:35 am
Re: Taking an old car and making it work
![]() by dreinecke » Wed Feb 13, 2019 1:19 pm
by dreinecke » Wed Feb 13, 2019 1:19 pm
Slothead - the parts are:
Tires: PGT 21126XD Tires
Guide: SC-1603 Universal guide from Slot Car Corner
I also used wire and braid I had in my box from SCC leftover from other projects.

I will say you can (and should!) true wheels and tires even without a machine. A simple emery board on the track while the car is under power or using a 9v battery will make a HUGE improvement. Wheels have lots of flashing typically and the tires also need better rounding. Doesn't take much at all.
Gluing is also essential in my book - I use Hansens nail polish as the tires come off easily later. Likewise I do the superglue in the bushing trick to remove all slop. Read on that one, but chatter goes right away.
The wires are due to the removal of the resistors on top of the motor and not having enough length once that is done. While not necessary on the T70 - it is critical on the M6 since they cause major interference with the body.
WB2 - that's pretty much exactly what I did. I didn't realize they did a write-up.
As for warped chassis on the M6...I cannot straighten mine out to save my life.
My goal is ALWAYS to use stock parts where possible and not spend $75 on a car. I'm usually pretty good at getting the cars to run well (See my T/A and stocker tuning articles) but with some...well, they may be too far gone.
We shall see how the other 3 T70's go and then the M6's. I'll pick up the TS if I can't get them running to my satisfaction without a million dollars and months of time. I just want a car that drives well.
Tires: PGT 21126XD Tires
Guide: SC-1603 Universal guide from Slot Car Corner
I also used wire and braid I had in my box from SCC leftover from other projects.
I will say you can (and should!) true wheels and tires even without a machine. A simple emery board on the track while the car is under power or using a 9v battery will make a HUGE improvement. Wheels have lots of flashing typically and the tires also need better rounding. Doesn't take much at all.
Gluing is also essential in my book - I use Hansens nail polish as the tires come off easily later. Likewise I do the superglue in the bushing trick to remove all slop. Read on that one, but chatter goes right away.
The wires are due to the removal of the resistors on top of the motor and not having enough length once that is done. While not necessary on the T70 - it is critical on the M6 since they cause major interference with the body.
WB2 - that's pretty much exactly what I did. I didn't realize they did a write-up.
As for warped chassis on the M6...I cannot straighten mine out to save my life.
My goal is ALWAYS to use stock parts where possible and not spend $75 on a car. I'm usually pretty good at getting the cars to run well (See my T/A and stocker tuning articles) but with some...well, they may be too far gone.
We shall see how the other 3 T70's go and then the M6's. I'll pick up the TS if I can't get them running to my satisfaction without a million dollars and months of time. I just want a car that drives well.
-
dreinecke - King of the Dum-Dums!
- Posts: 7360
- Joined: Wed Aug 08, 2012 5:39 pm
- Location: Colorado
Re: Taking an old car and making it work
![]() by War Eagle River » Wed Feb 13, 2019 1:31 pm
by War Eagle River » Wed Feb 13, 2019 1:31 pm
One of the things I enjoy most about this hobby! Taking a car and doing the little things to make it run better. Though it may not be competitive with the higher end high performance brands, I get satisfaction out of bringing these out of the depths! And for us here, we have classes which can accomadate such ventures.
-

War Eagle River - HRW SlotCar Veteran!
- Posts: 234
- Joined: Sun Jul 16, 2017 7:56 am
- Location: Tampa, FL
Re: Taking an old car and making it work
![]() by waaytoomuchintothis » Wed Feb 13, 2019 1:39 pm
by waaytoomuchintothis » Wed Feb 13, 2019 1:39 pm
For what its worth, I bought a remnant piece, 18" by 18", of blank circuit board (no contact layer), and cut out a rectangular ring shape to screw down on a warped chassis, and that flattened out even the worst I have encountered. It doesn't add much weight, and using screws, you can custom set the flattness. It still flexes all it needs to.
Us oldtimers remember fondly bringing gorgeous Fly cars home and reaching for the same tools to work on every one of them. At least you didn't usually have to buy new parts, just tires and a few simple tune up things to do.
Us oldtimers remember fondly bringing gorgeous Fly cars home and reaching for the same tools to work on every one of them. At least you didn't usually have to buy new parts, just tires and a few simple tune up things to do.
-

waaytoomuchintothis - "Seasoned SlotRacer"
- Posts: 7576
- Joined: Wed Aug 29, 2012 7:16 pm
- Location: Chesterfield, Virginia
Re: Taking an old car and making it work
![]() by olskoolslotz » Wed Feb 13, 2019 2:15 pm
by olskoolslotz » Wed Feb 13, 2019 2:15 pm
I saw this and had a good chuckle. I spent most of my morning in the basement working on 50+ year old slot cars, Cox Dino roadster, Nichimo Ferrari 156 and AMT McLaren Elva. Spent a good amount of time straightening and tweaking the brass AMT chassis, that thing was bent in several locations. It's all in the details still to this day.
- olskoolslotz
- "THE Champ"
- Posts: 231
- Joined: Thu Sep 06, 2012 9:22 am
Re: Taking an old car and making it work
![]() by Czar » Wed Feb 13, 2019 2:24 pm
by Czar » Wed Feb 13, 2019 2:24 pm
"...It's all in the details still to this day."
That is for sure. Sometimes you have to get back into the nooks and crannies to find the fun.
That is for sure. Sometimes you have to get back into the nooks and crannies to find the fun.
-

Czar - HRW SlotCar Veteran!
- Posts: 1080
- Joined: Fri Sep 07, 2012 7:05 pm
- Location: Paris of the south
Re: Taking an old car and making it work
![]() by chrisguyw » Wed Feb 13, 2019 2:58 pm
by chrisguyw » Wed Feb 13, 2019 2:58 pm
Hello Folks, One of our fellow site members is a huge CanAm fan, and loves the Monogram McLaren M6, but, unfortunately, has not managed to make one work to his satisfaction. He contacted me and asked if I would be willing to take a stab at overhauling one, with the objective to have it run with his other CanAm cars.
Having done a few Monograms in the past (Lola and McLaren) and being very pleased with the way they turned out, I agreed to build one for him.
This may well be more (time and cost) than many of you wish to invest, but, may give some folks some ideas.
Unfortunately. I did not take pictures of every step. but, I should be able to describe them well enough.
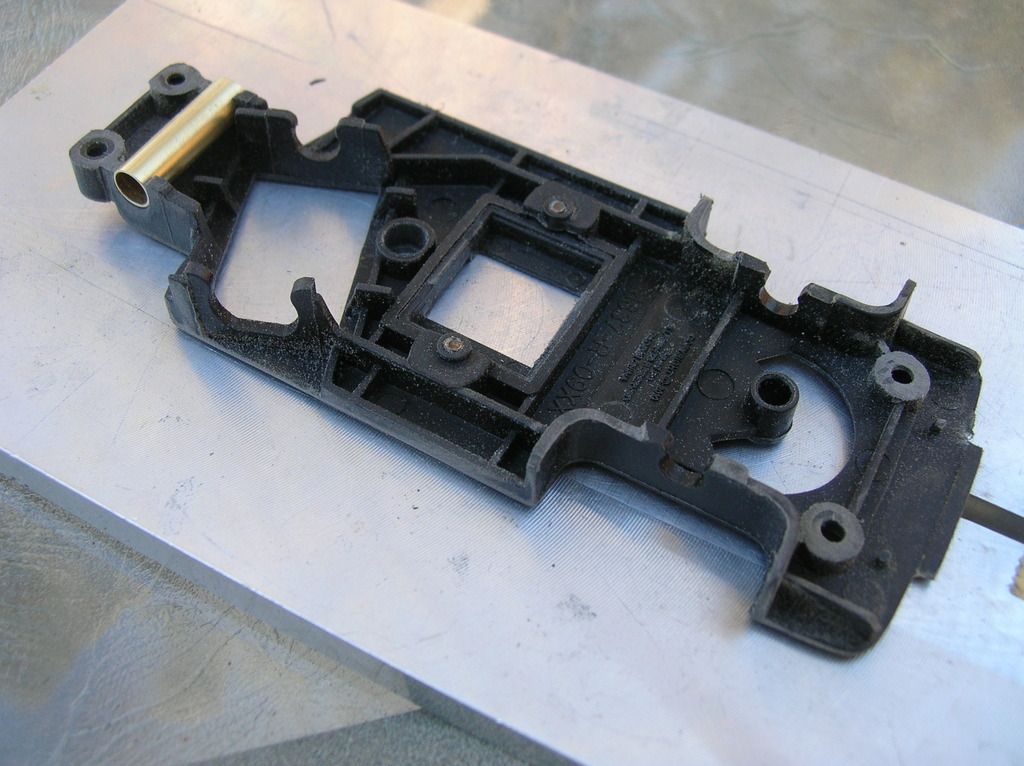
The first pic. is of the bare chassis......it is in the process of being filed/sanded to clear the inside of the body, and allow some body movement. It is important to file/sand off the raised "cups" on the chassis body mounts, to allow the body posts free movement on the chassis posts....in the pic, you can see where this has been mostly finished....it still needs a final clean up.
On the rear axle mounts, you can see where I have temporarily inserted a brass tube (3/16" id.) which will hold some 3/16" od. single flange oilites. By positioning the tube at a slightly higher position in the rear axle uprights, It will raise the position of the rear axle, effectively reducing the ride height, and lowering the cg. (The bottom of the stock chassis bushing cups has not been touched....this will let the axle tube sit higher in the chassis, and therefore reduce the ride height/cg.
The motor mount locating holes were also filed/sanded a few thou. on their bottom edges, to allow the motor to sit slightly lower in the chassis (the bottom edge of the motor now protrudes just below the bottom surface of the chassis)......not much, but, "everything counts..in small amounts" !!
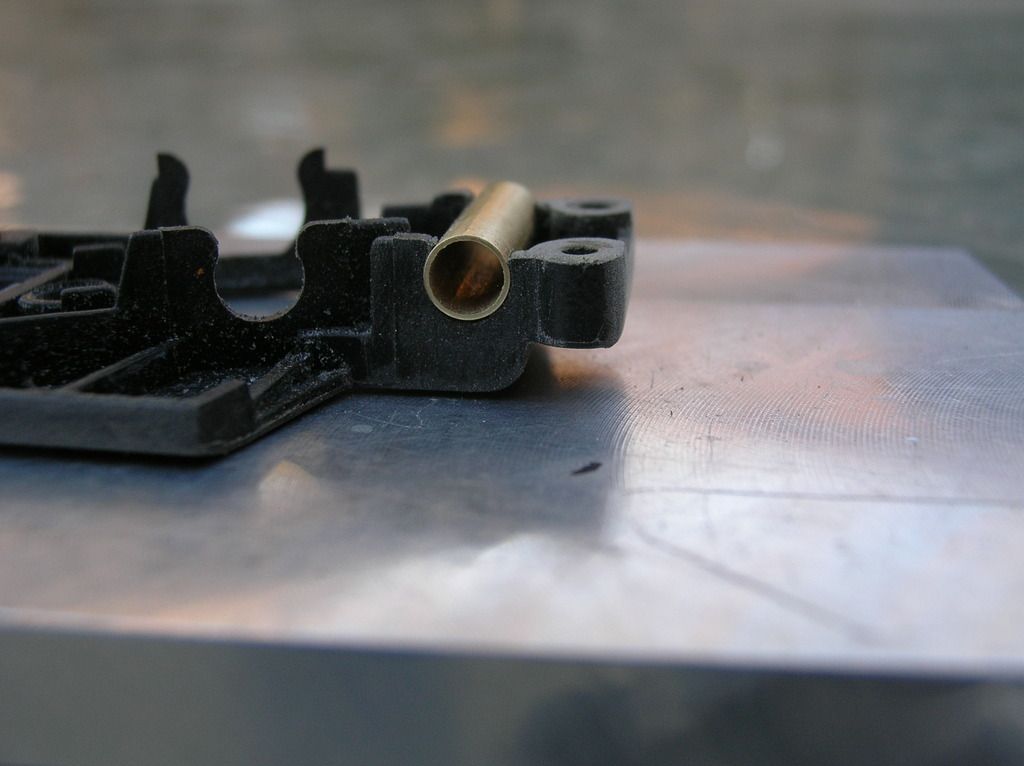
The second photo, shows the axle tube from a side profile.....I have enlarged the rear axle cups to accept the tube, but, have tried to maintain a "C" shape to the cups, which holds the tube from moving upwards...this really helps hold the tube in place. Try to achieve a very small tolerance between the mating surfaces as most CA glues are terrible gap fillers..(read weak!!)
I have slightly enlarged the front axle bushing holders to accept a 1/8" od. tube. "U" shaped cutouts are just fine here as the tube will be held with styrene plates glued to the outside of the chassis and the tube. (I used some 30 thou. styrene with a 1/8 hole drilled into it for the side plates).
When securing both the front and rear axle tubes, I used a jig with set up blocks to ensure that both axles will be parallel, and, on the same horizontal plane.......this is critical for a good handling car, and by doing this you eliminate any small variances in the depth of the bushing cups. and negate any minor chassis twists. (You can "bake" the chassis, but, the Monogram chassis is very thick and difficult to straighten, and, most chassis' made of plastic do have a memory, and over time minor twists can reoccur. As well, you are then relying on the bushing cups to be identical in height left to right........this is where the adjustable front ride height systems (slot-its set screw etc.) are worth their weight in gold, as these systems permit minor left to right adjustments to overcome these issues.
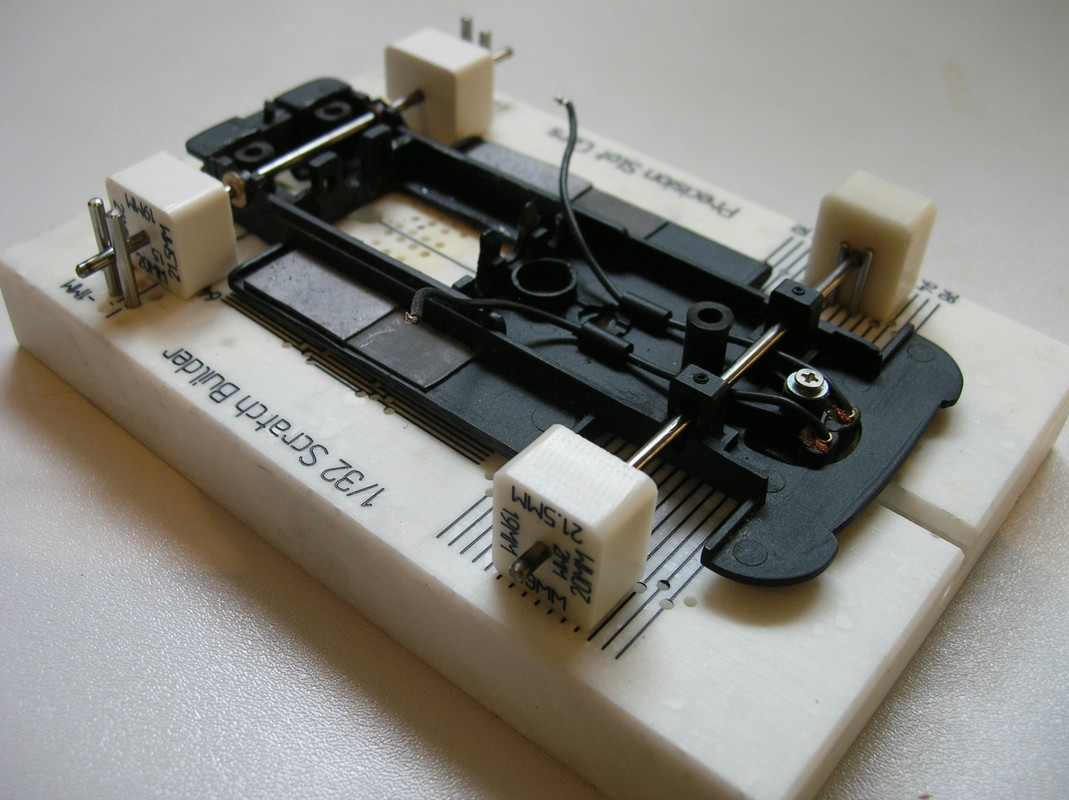
(the following pic. is not the Rev/Mono chassis, but, it illustrates the use of a jig/blocks to set axle tubes.....by using blocks/gears/wheels that are just large enough to lift the chassis off the block, then securing the front axle tube, you will eliminate any chassis twist.
A new guide was installed, and a small piece of square styrene tubing was glued in to route the lead wires through.
In this shot, you can see the styrene bits I have cut/drilled and glued to the outside of the chassis to reinforce the front axle tube.

The finished rolling chassis........a 7.5mm NSR pinion and an 18mm Slot-it spur fit perfectly, meshed very well, and allowed good clearance for the spur/track.....(the 7.5mm pinion/18mm spur is a very good option for any folks looking to improve these cars......it lets you use a slightly smaller rear tire diameter and still allows reasonable spur/track clearance).
A quick coat of Tamiya flat black spray made it purdy!!, and small urethane washers were glued to the tops of the chassis body mount tabs...these really help eliminate vibration/noise.
A chunk of lead was added to the pocket where the magnet originally lived.
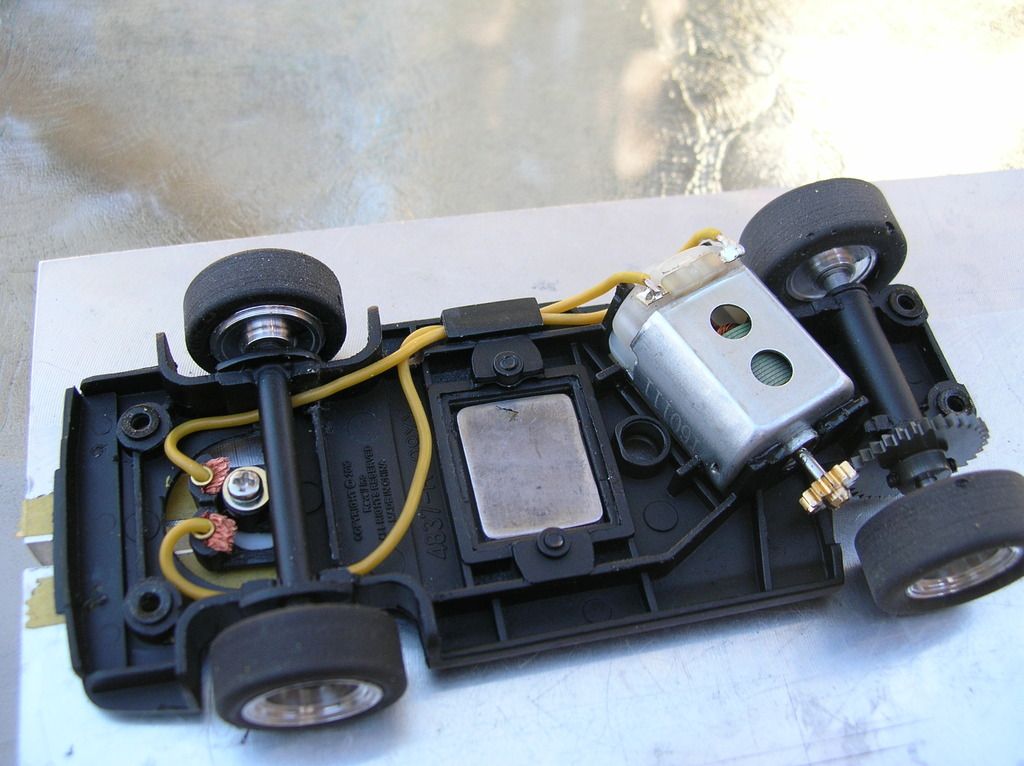
The body mounts were trimmed to square and lower the body, BWA/Dart inserts were painted installed, and she is ready to go.
As it sits it handles very well and is quick, no doubt, as I was asked to install a Piranha motor.....to be honest, I think it would be better with a slightly milder motor. On my track (wood) it is very close to my well sorted Slot-it Chaparral/Alfa's...it is only when overdriven that the very short guide lead of the McLaren rears its ugly head. The McLaren has a guide lead some 3/8 shorter than the Slot-it Alfa (also a very short guide lead car), and this is not the hot ticket on my track, which is fairly fast/flowing.
Anyway, I really had fun with this...it was certainly worth the effort......
Cheers
Chris Walker
PS This post was originally done some time ago and the new owner is more than pleased.......I have sent off a couple more since then, with happy new owners.
Having done a few Monograms in the past (Lola and McLaren) and being very pleased with the way they turned out, I agreed to build one for him.
This may well be more (time and cost) than many of you wish to invest, but, may give some folks some ideas.
Unfortunately. I did not take pictures of every step. but, I should be able to describe them well enough.
The first pic. is of the bare chassis......it is in the process of being filed/sanded to clear the inside of the body, and allow some body movement. It is important to file/sand off the raised "cups" on the chassis body mounts, to allow the body posts free movement on the chassis posts....in the pic, you can see where this has been mostly finished....it still needs a final clean up.
On the rear axle mounts, you can see where I have temporarily inserted a brass tube (3/16" id.) which will hold some 3/16" od. single flange oilites. By positioning the tube at a slightly higher position in the rear axle uprights, It will raise the position of the rear axle, effectively reducing the ride height, and lowering the cg. (The bottom of the stock chassis bushing cups has not been touched....this will let the axle tube sit higher in the chassis, and therefore reduce the ride height/cg.
The motor mount locating holes were also filed/sanded a few thou. on their bottom edges, to allow the motor to sit slightly lower in the chassis (the bottom edge of the motor now protrudes just below the bottom surface of the chassis)......not much, but, "everything counts..in small amounts" !!
The second photo, shows the axle tube from a side profile.....I have enlarged the rear axle cups to accept the tube, but, have tried to maintain a "C" shape to the cups, which holds the tube from moving upwards...this really helps hold the tube in place. Try to achieve a very small tolerance between the mating surfaces as most CA glues are terrible gap fillers..(read weak!!)
I have slightly enlarged the front axle bushing holders to accept a 1/8" od. tube. "U" shaped cutouts are just fine here as the tube will be held with styrene plates glued to the outside of the chassis and the tube. (I used some 30 thou. styrene with a 1/8 hole drilled into it for the side plates).
When securing both the front and rear axle tubes, I used a jig with set up blocks to ensure that both axles will be parallel, and, on the same horizontal plane.......this is critical for a good handling car, and by doing this you eliminate any small variances in the depth of the bushing cups. and negate any minor chassis twists. (You can "bake" the chassis, but, the Monogram chassis is very thick and difficult to straighten, and, most chassis' made of plastic do have a memory, and over time minor twists can reoccur. As well, you are then relying on the bushing cups to be identical in height left to right........this is where the adjustable front ride height systems (slot-its set screw etc.) are worth their weight in gold, as these systems permit minor left to right adjustments to overcome these issues.
(the following pic. is not the Rev/Mono chassis, but, it illustrates the use of a jig/blocks to set axle tubes.....by using blocks/gears/wheels that are just large enough to lift the chassis off the block, then securing the front axle tube, you will eliminate any chassis twist.
A new guide was installed, and a small piece of square styrene tubing was glued in to route the lead wires through.
In this shot, you can see the styrene bits I have cut/drilled and glued to the outside of the chassis to reinforce the front axle tube.
The finished rolling chassis........a 7.5mm NSR pinion and an 18mm Slot-it spur fit perfectly, meshed very well, and allowed good clearance for the spur/track.....(the 7.5mm pinion/18mm spur is a very good option for any folks looking to improve these cars......it lets you use a slightly smaller rear tire diameter and still allows reasonable spur/track clearance).
A quick coat of Tamiya flat black spray made it purdy!!, and small urethane washers were glued to the tops of the chassis body mount tabs...these really help eliminate vibration/noise.
A chunk of lead was added to the pocket where the magnet originally lived.
The body mounts were trimmed to square and lower the body, BWA/Dart inserts were painted installed, and she is ready to go.
As it sits it handles very well and is quick, no doubt, as I was asked to install a Piranha motor.....to be honest, I think it would be better with a slightly milder motor. On my track (wood) it is very close to my well sorted Slot-it Chaparral/Alfa's...it is only when overdriven that the very short guide lead of the McLaren rears its ugly head. The McLaren has a guide lead some 3/8 shorter than the Slot-it Alfa (also a very short guide lead car), and this is not the hot ticket on my track, which is fairly fast/flowing.
Anyway, I really had fun with this...it was certainly worth the effort......
Cheers
Chris Walker
PS This post was originally done some time ago and the new owner is more than pleased.......I have sent off a couple more since then, with happy new owners.
- chrisguyw
- HRW SlotCar Veteran!
- Posts: 619
- Joined: Wed Dec 17, 2014 12:50 pm
- Location: Toronto, Canada
Re: Taking an old car and making it work
![]() by dreinecke » Wed Feb 13, 2019 3:43 pm
by dreinecke » Wed Feb 13, 2019 3:43 pm
Chris, Thanks for showing such an in-depth guide to these cars. That is the bees knees, but probably a little more than I want to do. I'm sure it would kick the heck out of what I've done.
-
dreinecke - King of the Dum-Dums!
- Posts: 7360
- Joined: Wed Aug 08, 2012 5:39 pm
- Location: Colorado
Re: Taking an old car and making it work
![]() by WB2 » Wed Feb 13, 2019 5:23 pm
by WB2 » Wed Feb 13, 2019 5:23 pm
I remember Chris’ article well.
I’ve never used them, but I always wonder how offset bushings would help these cars.
I’ve never used them, but I always wonder how offset bushings would help these cars.
- WB2
- HRW SlotCar Veteran!
- Posts: 582
- Joined: Tue Nov 27, 2012 10:35 am
11 posts
• Page 1 of 1
Who is online
Users browsing this forum: No registered users and 7 guests

Powered by phpBB® Forum Software © phpBB Group