I like to use the interior tub from the kit. most of them are great right out of the box for overall stance on the finished project, some don't work quite as well, and I will cover that in another post. Starting with your chassis, set the wheel base for your body of choice, and trim the excess bolt that sticks through the nut as close as you can. This keeps you from having to clearance the floor pan of your tub for bolts. I solder mine, and remove the bolts, but its not needed. Next I set the tub down on the chassis and see where the motor will touch. Dremel out an area just big enough for the motor and rear support, leaving just enough for any body float you may want. You can see how I trimmed mine.

when you get that done, do a test fit on the tub and body to see if it all lines up with your wheel wells. Then turn it over and see how nicely you have a flat mounting for your chassis.

Don't drill your holes yet, as you may need to adjust later on in the build.
Once that is done, I bend up an old playing card to make a motor cover. I don't always do this, sometimes I just paint the visible part of the motor black. But these need some detail for the concourse event.

I then bend up a roll bar using sprues or trees from the model kit. Lighter or small torch will heat the plastic enough for nice bends. I superglue the bars in place to hold till I can epoxy them.

When the glue dries a bit, I use cheapo clear two part epoxy, dabbed to each joint and mounting location. this adds a ton of strength, and also blends the rollbar joints for a nice painted finish. I do this because nothing sucks worse than having your cage come loose in a race, and having to tear apart a great car for a fix.

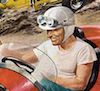
Then just paint up the tub to your liking, add driver figure and details like shifter, fire ext. etc.
Hope this helps, and if you have any questions, ill try and answer them. See ya at the race!!!
Bob