
06/13/2014
06/13/2014

Tuning the Slot.it GT40 Classic Series
For Home Racing
Let me emphasize the Tuning for HOME racing part. If you are looking for all the secrets to be a winner at the big club or commercial track, they are not here. I am just sharing with you the few things I like to do to increase the action and performance that suits my preference on our smaller track. Here is a link to our track build if you are interested.
The Slot.it GT40 series of models is close to one of my favorite slot cars for road racing. One of the main reasons is that it has what I look for most in a slot car: BALANCE. Balance of scale detail, performance, & price. Of course the car and people behind it that created a legend in motorsports history doesn't hurt.
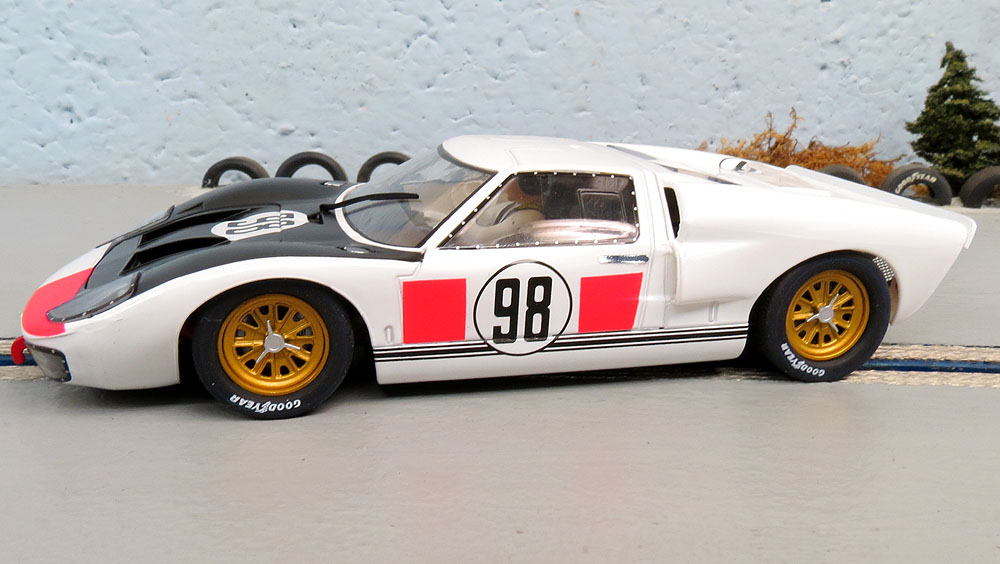
Ford MKII - 1st Daytona 1966 - #CA20b (New EVO6 Pod & Chassis Change for guide)
This is my latest addition. The article will focus mostly with this car although we will touch on the older versions.
Ch-Ch-Changes
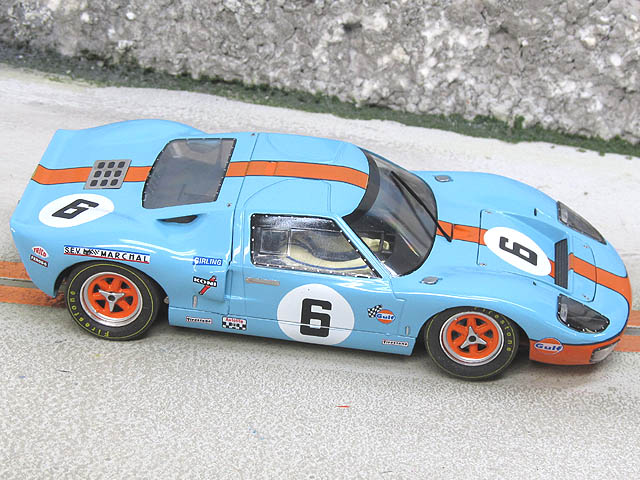
GT40 MKI - 1st LeMans 1969 - #CW09 (Old Pod)
Slot.it has made quite a few offerings in both MK I and MK II versions. The series has been with us for a few years and that means it has evolved over time. The models initially came with standard motor #CH44 pod shown below. Today the EVO 6 design is implemented on all new models and you have a different pod #CH67. The chassis was also slightly changed in the guide area. The mold was shifted up and a few thousandths forward.

Old

New
Coulda Been A Contender?
So you might wonder if your older GT40 models will be competitive. The answer for our track? Yes. The newer chassis might be a touch quicker but not enough to guarantee a podium. Main reasons? Track size for one, not utilizing the EVO6 pod is the other. And of course the one big variable we seem to dismiss: The Driver. Instead of buying new pods for the older models I simply leave the new ones with the screws mounted in the box stock locations. With all the other high quality components already installed that are the same, racing is very close.
For your track? I can't answer that. Only your own testing can make that conclusion.
Cherry Picking Season
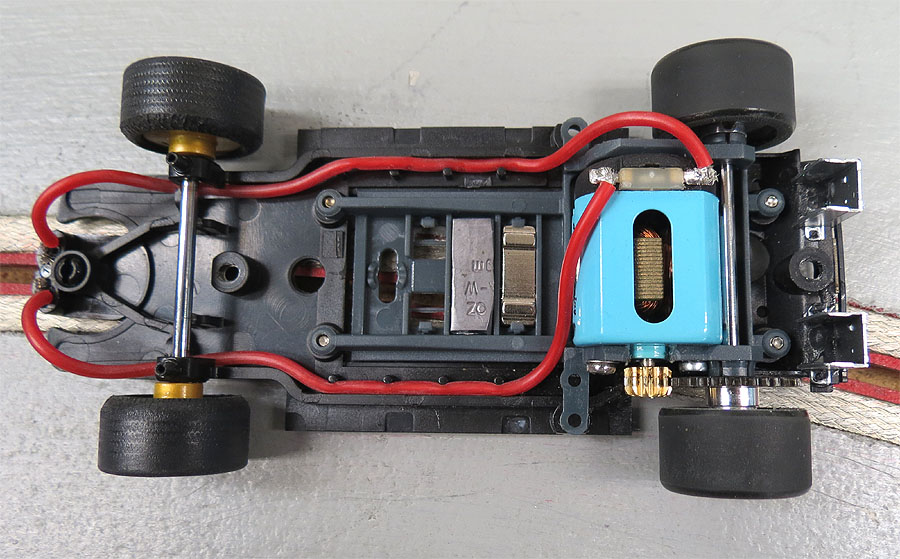
The first item I will address is the motor. After removing the body my first goal is to do a motor swap. Why? Because although the stock motor might be fine for larger tracks, it is simply too much for ours. The motor has more torque and RPM than our little track needs and the action is not as smooth as I like. Because it is so "punchy" we found better lap times using a milder motor.
Enter the H&R Hawk motor. In the last few years many clubs have started to use this as an option. It has good brakes and plenty of speed, plus it is budget friendly compared to other options.
I remove the stock pinion from the Slot.it motor and install it on the Hawk. Of course the end which I install it depends on the pod.
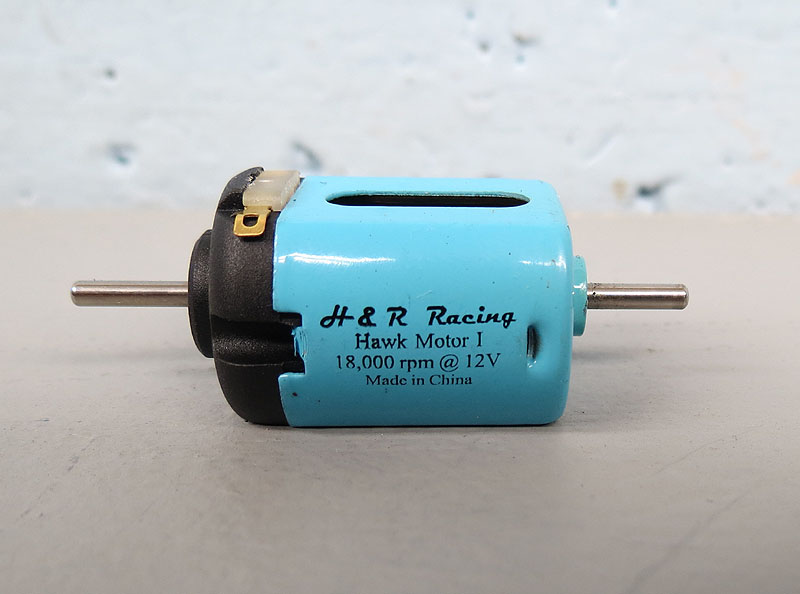
Extended motor shafts on each end make it compatible with either pod system.

The above shows the motor in stock form. Snaps in easily enough.
Don't Get Shafted
Although having the dual shafts is great for compatibility, the excess length can cause issues as you see on the stock motor. I trim the ends of the motor shafts as the clearance between it and the tires is a little close for my liking.
![]()
As you can see there is not much clearance between the tire and shaft in stock form. Gluing your tires helps prevent expansion but I trim the shaft regardless. You also might want to do this if you are using slightly oversize tires as they will likely make contact.

Another reason I trim it is that it makes it easier to fit into my press to install the pinion. I use the common Dremel cut off wheel shown above.
Don't worry about any heat build up that would harm anything. It only takes a few seconds to slice through. I have performed this on countless motors over the years and never has this adversely effected the motor. You create more heat actually racing it than you do performing this modification.

Once the pinion is installed I trim the end flush.


Then use sandpaper at an angle to the pinion to bevel it. We have been doing this for years and like the results. Again this is not required, but as stated the clearance between the tire and gear/shaft is very close.
Mythbusting?
There are some people that feel doing this modification reduces the weight and rotating mass of the motor and therefore actually increases the speed and braking action. I have no proof of this. I do it only to solve the tire clearance issue and to simplify pinion installation.

After I install the motor I use screws to secure it in place. A washer won't fit on the right but it isn't really needed. I feel securing the motor this way is one of the most important things you can do. It prevents the motor from rocking in the mount and possibly causing gear damage.
Onward To The Front!
Setting the front wheel/axle height is simple enough but I do a little tuning with the wheels and tires first. My first step is to true the front wheels. Since the wheels on Slot.it models are pretty much straight and true, they do not need a lot of work. Just twist and pull one side and the wheel will come off. The fit of these wheels is tight enough so you usually need no glue when you re-install. If you do need it, just try a LIGHT drop of Testors model glue or even a quick brush of clear nail polish. I do not like fast setting adhesives like super glue. I want time to adjust the wheels right where I want them.
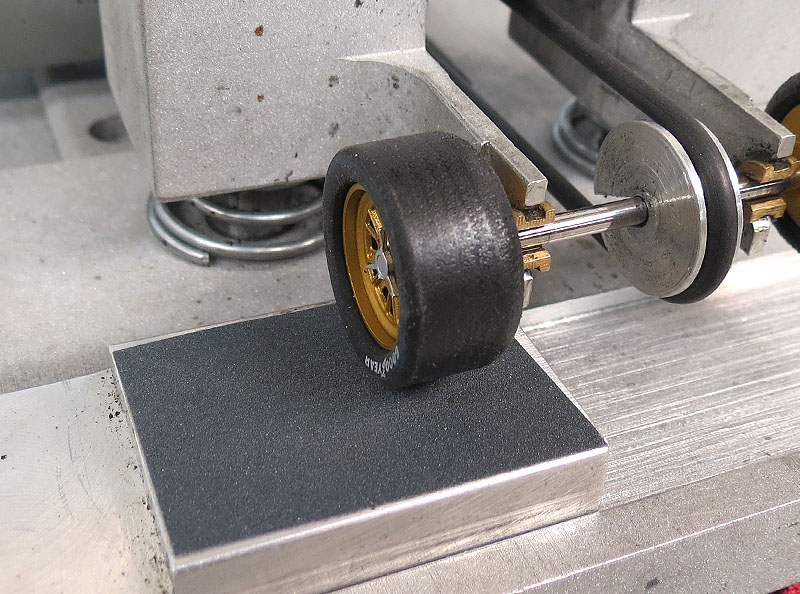
I install the assembly on the Tire Razor and give the wheels a clean up, then glue on the tires and perform another session.

A light sheen is all that is seen using Future (Pledge FloorCare)
I just sand the tire until it is round and most of the tread is removed. I then contour the inside sidewall as shown. The outside sidewall gets a little as well, just not as much. Only enough to make sure there are no hard edges.
Saved by Zero?
Zero grip on the front? Many enthusiasts like this as it does help performance in many cases. And there are ways to make it happen by either coating the front tires or just purchasing Slot.it zero-grip fronts. I do not like coating the tires with nail polish. Not only does it take away from the looks, it makes the car sound very annoying. Imagine a couple marbles rolling down your track, that about describes it for me.
I See The Future...

On my cars I sand the stock fronts and just doing that helps. The tires will dry and glaze over time and work just as well. If you are in a hurry you can try a couple coats of Pledge FloorCare (Future) floor wax. No matter the name change most of us will always call it Future. I brushed the tires 2 or 3 coats. It soaks into the stock rubber and really helps reduce the grip but does not effect the looks. It also is a much quieter option and that means a lot for me.

When I remove the front axle I also remove the axle tabs that are inside the bulkheads on each side. I prefer to use set screws top and bottom which allows me to fine tune the height and minimize vertical free-play. As we show in the McLaren Review Here I remove these because they sometimes cause binding.
I set the axle the closest I can get to a perfect tri-pod. The front tires are just barely touching the track and they roll under power.
I'm So Wired

Your models come with excess length wire. This is good as it allows you to trim and adjust them. Out of the box the wires usually rub the front tires when the car rotates in the slot as shown above.
Just a simple matter of trimming it will solve that.

Remove the set screw that holds the wire into the guide. I usually start with just trimming about half of the existing exposed wire and then the matching distance on the coating. You only need a little to accomplish a lot.

Now check it again. You are checking two things: Clearance of the wire from the tire and on the other side for distance travel. When you rotate the guide you don't want the wire to stop the travel of the guide. This would lead (get it?) to possibly the wire being pulled from the guide. The wires are coated with a very durable silicone based coating and can withstand a fair amount of rubbing. When the body is installed, you might see some rubbing. Just adjust the wire lengths to find that sweet spot. With the low nose of this model you will likely always have some rubbing. Just swivel the guide to make sure the contact is not preventing smooth travel.
Baby Needs A New Pair of Shoes
On our track we prefer Paul Gage urethane based tires. Your track and preference will be different so simply use what you like. With PG tires I choose a size slightly larger in width than the car came with.
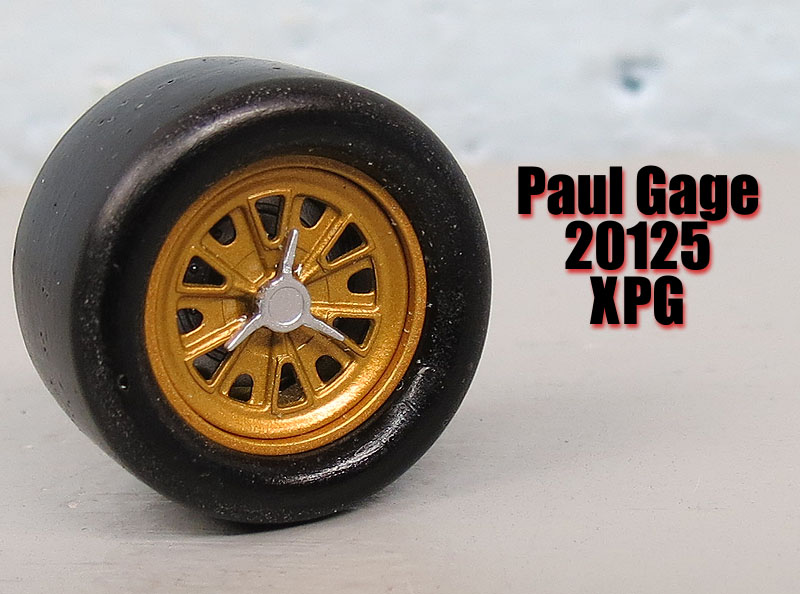
I like the slightly added sidewall width on the outside. It fills the fender up nicely and still has scale appeal.

The inside sidewall will need a little sanding for it to clear the chassis. I do this on the Tire Razor but you can do it on the car easily enough. In fact, I prefer doing it while on the car for faster results. Just back the wheel out enough for a sheet of sandpaper to fit. Tighten the wheel and put power to the car. In no time you will have the sidewall sanded true. Now loosen the wheel and set it where it needs to be and check clearance. Install the body and check clearance there as well to make sure the outside is not rubbing the fender.

The photo above shows what you are trying to accomplish. This is what I like the most about these tires. The grip level is excellent but the ability to shape and adjust them to suit my taste seals the deal.
![]()
You just sand enough to make sure the tire does not rub the chassis. Once this is done I will mount the assembly in the Tire Razor and true them. In the case of Slot.it models that have excellent quality wheels, you can get by without a truing machine. I like using 320 grit to start the sanding and then finish with 1000 grit or finer to get a very smooth finish on the tire.
Rubbing You The Wrong Way?
One issue that may or may not be present is the spur gear rubbing the chassis. This usually happens when you loosen the screws on the motor pod to achieve float. When you do this, the pod obviously has movement and could allow the inside of the gear to make contact with the chassis edge.
![]()
The fix is simple. Slot Car Corner has some very thin spacers that are made for such issues. Usually just one is enough but you can stack them if needed.
We Have Clearance Clarence.
![]()
This is it?
So we are finally finished. It seems like a lot and some of you are likely in a reading coma by now. Truth is, it is not a lot. In a couple hours you can start from scratch and be on the track enjoying it.
What about more about tuning with weight? I hesitate on giving that kind of advice because each driver has their own personal taste. You could weight this down a fair amount if you like or just a little in a few strategic places. This is just something YOU will have to experiment with. Besides, isn't that part of the FUN? In the photo above you can see the small section where I added some lead and I left the magnet in place. This is a pretty basic approach but it works well for me.
Times They Are A-Changin'
A little bit goes a long way. Here is a comparison of before and after lap times.


As you can see, there is an improvement. These slight time changes mean a lot come race day.

So now I have a car that is much smoother and therefore more enjoyable for me. My stable has a variety of models that I can choose that will all run pretty much the same and that was my goal.
Tuning is a lot of fun. It is how I spend a lot of my time as racing solo is mostly what I do. Trying different approaches and seeing what works and what doesn't is a great way to spend a day home racing. I hope this article will help some of you just starting out with these models.
- Harry
Parts Links *Many enthusiasts ask for this data for convenience/reference. Please support your local/favorite dealer :)
Paul Gage XPG Tire Series Many dealers are now carrying this brand or you can order direct from him here.