That is going to make for one sweet looking entry!
(Always like that body style!)
:D
CanAm - Build Thread
Re: CanAm - Build Thread
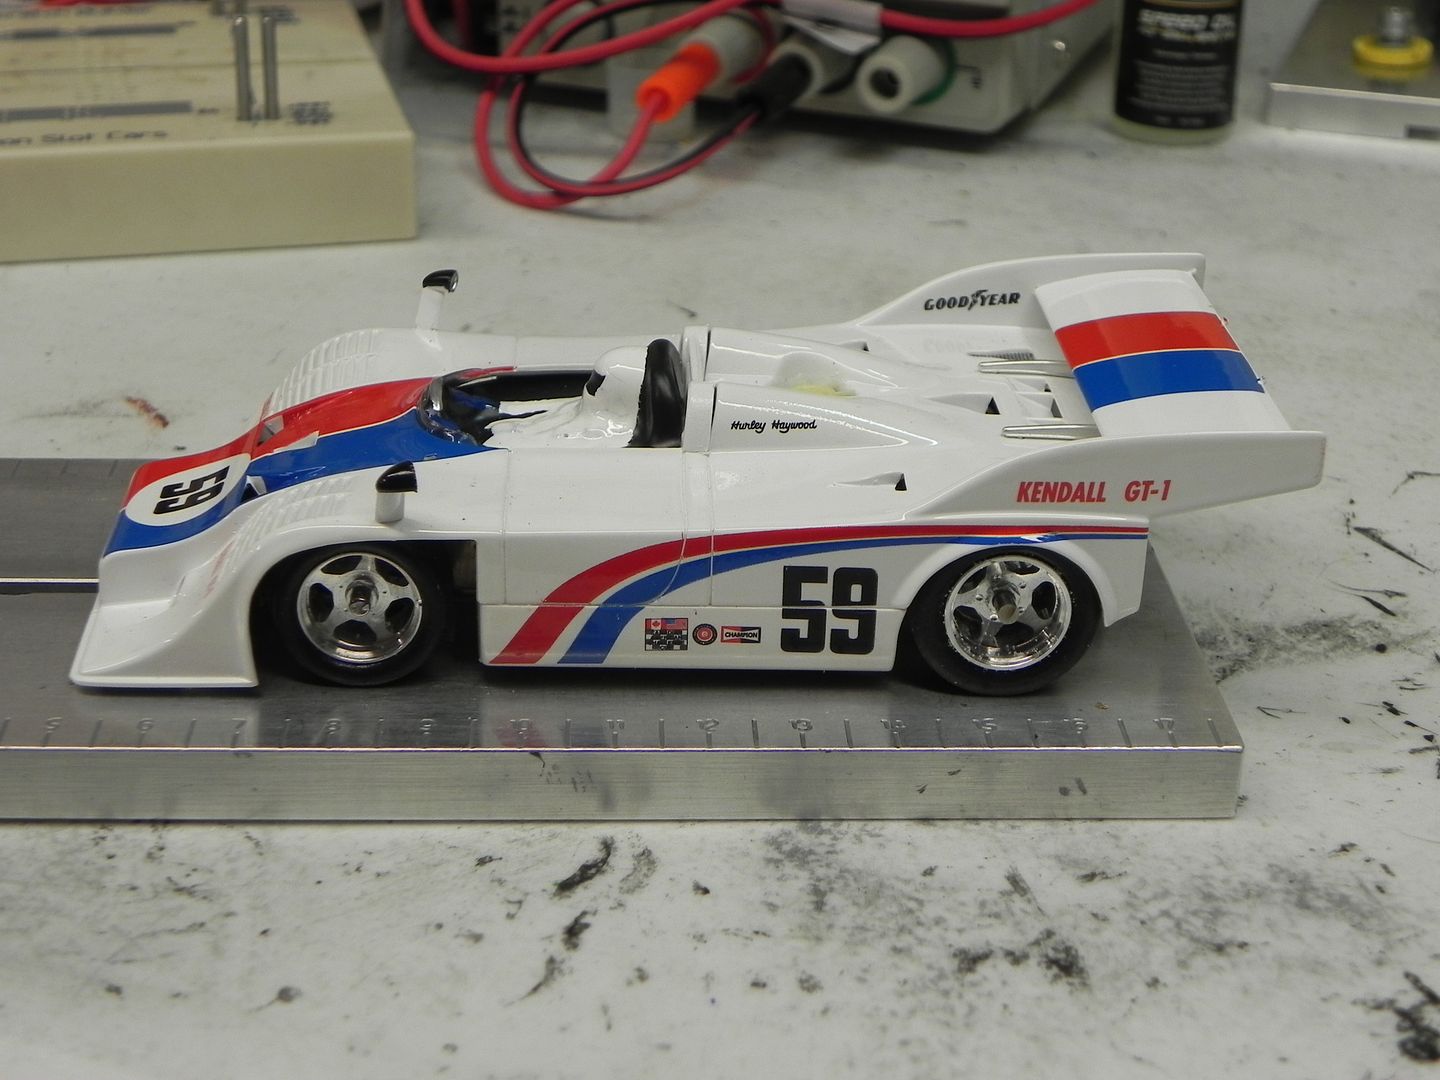
![]() by TuscoTodd » Tue Feb 09, 2016 11:10 pm
by TuscoTodd » Tue Feb 09, 2016 11:10 pm
-

TuscoTodd - HRW Bouncer
- Posts: 7145
- Joined: Sat Aug 17, 2013 11:25 am
- Location: Rural Ohio
Re: CanAm - Build Thread
![]() by Audi1 » Wed Feb 10, 2016 5:40 am
by Audi1 » Wed Feb 10, 2016 5:40 am
-

Audi1 - HRW SlotCar Veteran!
- Posts: 4223
- Joined: Fri Nov 01, 2013 7:25 am
- Location: Merrimac, MA
Re: CanAm - Build Thread
![]() by urbanwarrior » Wed Feb 10, 2016 6:13 am
by urbanwarrior » Wed Feb 10, 2016 6:13 am
I'm not too sure about the Piranha or orange end bell motors in these cars, they seem a bit too much in these type of cars for my taste, but we'll see how it goes.
John
John
- urbanwarrior
- HRW SlotCar Veteran!
- Posts: 167
- Joined: Mon Apr 28, 2014 9:29 am
- Location: Maryland
Re: CanAm - Build Thread
![]() by Ky.Slot Racer » Wed Feb 10, 2016 6:32 am
by Ky.Slot Racer » Wed Feb 10, 2016 6:32 am
- Ky.Slot Racer
- HRW Master Modeler
- Posts: 918
- Joined: Sun Feb 09, 2014 7:18 am
Re: CanAm - Build Thread
![]() by Audi1 » Wed Feb 10, 2016 4:26 pm
by Audi1 » Wed Feb 10, 2016 4:26 pm
A little more progress today. Not done yet, but barring any unforeseeable accidents, I think I can see the end now.........
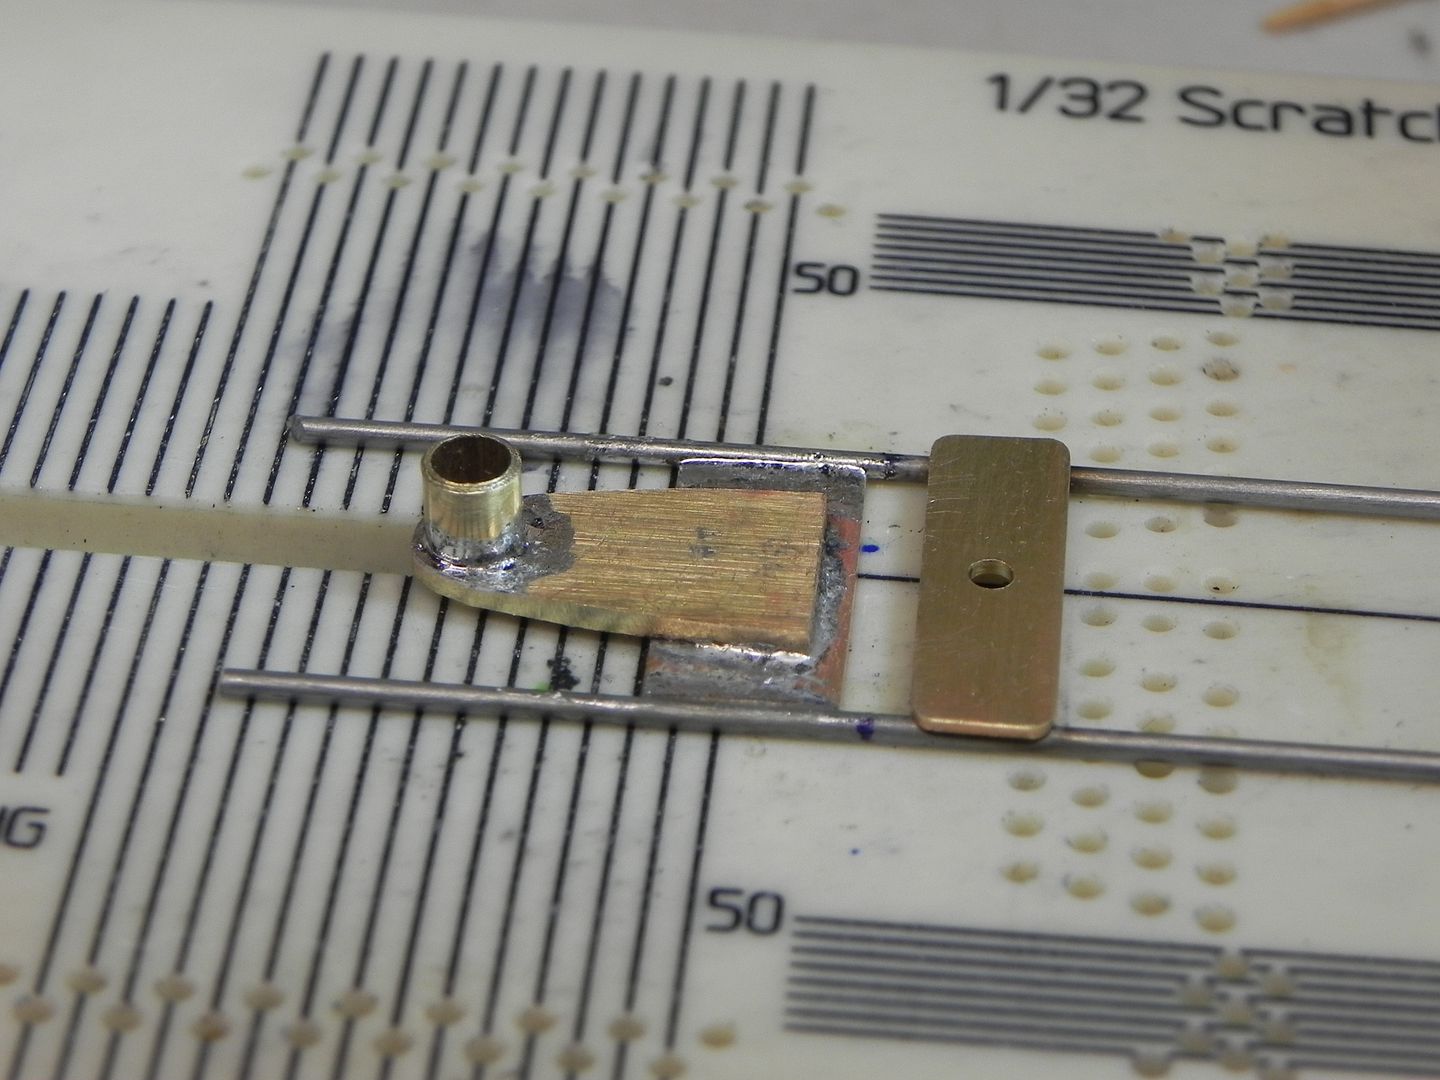
Fabricated and soldered up the guide tongue:
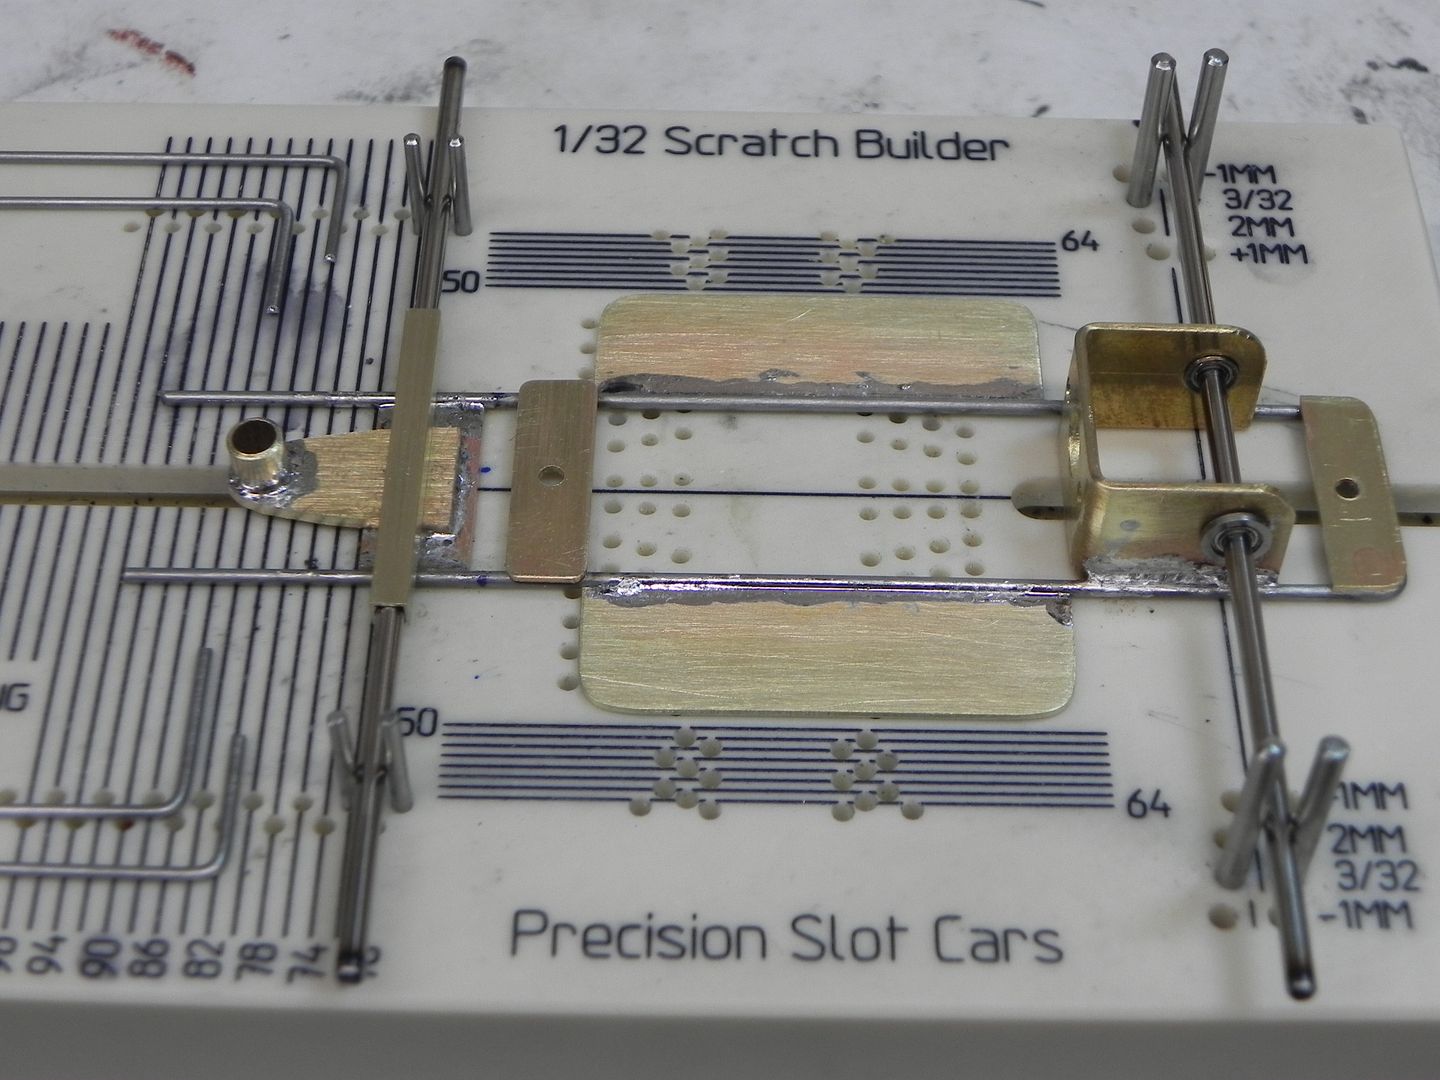
And added the side pans; soldered directly to the main frame:
Tomorrow will be the attachment of the front axle. The parts are cut out; now I have to get the placement right. Whereas with many of today's RTR cars, you have an adjustable front axle height, with brass chassis building, it seems to be one-shot at getting it right. Also, with a plastic RTR car, you can true the tires down to where you think that right ride height will be, on a brass chassis build, you need all of the tires trued and mounted on the wheels, before you can work with the ride height; particularly the height of the front axle.
The most critical things I've found so far are: 1. get everything straight and flat, 2. pay a lot of attention to the guide tongue (particularly with respect to the guide that you plan to use), and 3. get the front axle height right.
We'll see if I can finish it up tomorrow............... still a physically ugly mess, but perhaps it will function OK (?) I'll know when it hits the track this weekend.
Allan
Fabricated and soldered up the guide tongue:
And added the side pans; soldered directly to the main frame:
Tomorrow will be the attachment of the front axle. The parts are cut out; now I have to get the placement right. Whereas with many of today's RTR cars, you have an adjustable front axle height, with brass chassis building, it seems to be one-shot at getting it right. Also, with a plastic RTR car, you can true the tires down to where you think that right ride height will be, on a brass chassis build, you need all of the tires trued and mounted on the wheels, before you can work with the ride height; particularly the height of the front axle.
The most critical things I've found so far are: 1. get everything straight and flat, 2. pay a lot of attention to the guide tongue (particularly with respect to the guide that you plan to use), and 3. get the front axle height right.
We'll see if I can finish it up tomorrow............... still a physically ugly mess, but perhaps it will function OK (?) I'll know when it hits the track this weekend.
Allan
-
Audi1 - HRW SlotCar Veteran!
- Posts: 4223
- Joined: Fri Nov 01, 2013 7:25 am
- Location: Merrimac, MA
Re: CanAm - Build Thread
![]() by Ky.Slot Racer » Wed Feb 10, 2016 5:30 pm
by Ky.Slot Racer » Wed Feb 10, 2016 5:30 pm
Progressing along nicely, just to throw another curve into your equation. Leave a little wiggle room for tire wear, especially where urethane's are used. There has been very noticeable natural tire truing (wear) on these proxy cars. That will defiantly cause problems down the line when many wood tracks are in the roster.
- Ky.Slot Racer
- HRW Master Modeler
- Posts: 918
- Joined: Sun Feb 09, 2014 7:18 am
Re: CanAm - Build Thread
![]() by Brumos RSR » Wed Feb 10, 2016 8:03 pm
by Brumos RSR » Wed Feb 10, 2016 8:03 pm
Wow Allan that is truly a piece of art you have there..... 19 days to go till deadline, it's like watching one of those made up reality car shows without the last minute drama. Cool
The other Tony
The other Tony
- Brumos RSR
- HRW SlotCar Veteran!
- Posts: 1117
- Joined: Sun Aug 03, 2014 2:58 pm
Re: CanAm - Build Thread
![]() by Audi1 » Thu Feb 11, 2016 5:53 am
by Audi1 » Thu Feb 11, 2016 5:53 am
Hi Tony, Well, maybe if you're into Munch, it's art....................but even that's a stretch..................... :lol:

Perhaps ugly is fast..........we'll see..............
Allan
Perhaps ugly is fast..........we'll see..............
Allan
-
Audi1 - HRW SlotCar Veteran!
- Posts: 4223
- Joined: Fri Nov 01, 2013 7:25 am
- Location: Merrimac, MA
Re: CanAm - Build Thread
![]() by bill from nh » Thu Feb 11, 2016 7:43 am
by bill from nh » Thu Feb 11, 2016 7:43 am
Allan, your chassis is progressing nicely. When it's complete, use scouring powder & an old toothbrush to give it a scrub under a running faucet. You'll be surprised how great it'll look. To easily set your axle heights on future builds, get some jig wheels. You can use crown gears, but Precision makes some Corian ones that will give different four different axle heights.
- bill from nh
- HRW SlotCar Veteran!
- Posts: 373
- Joined: Wed Sep 05, 2012 5:32 pm
- Location: New Boston, NH
Re: CanAm - Build Thread
![]() by TuscoTodd » Thu Feb 11, 2016 9:57 am
by TuscoTodd » Thu Feb 11, 2016 9:57 am
Allan - I like the build so far - and that art reference is hilarious!
"Hopefully"... I will be able to post some pics of my build this weekend - but I can tell you this much - you are ahead of me already! :o
"Hopefully"... I will be able to post some pics of my build this weekend - but I can tell you this much - you are ahead of me already! :o
-
TuscoTodd - HRW Bouncer
- Posts: 7145
- Joined: Sat Aug 17, 2013 11:25 am
- Location: Rural Ohio
Re: CanAm - Build Thread
![]() by Audi1 » Thu Feb 11, 2016 12:07 pm
by Audi1 » Thu Feb 11, 2016 12:07 pm
Well, today was front axle day and the rest of the way to the goal line.
I forgot to mention yesterday, when I was fabricating the guide tongue I found that the 3/16" brass tube that I was using for the vertical holder was not quite a snug fit; it has a little slop to it. So, rather than cutting the tube with a dremel or saw blade, I used a circular pressure pipe cutter (K+S sells the in a size that works well for small diameter soft metals); reasoning that the pressure from the circular cut would pinch the tube in slightly at the point of the cuts. And, sometimes you get lucky.............it worked, a nice snug fit with easy rotation and no slop. So, at least for the guide that I'm using, this is a way to improve the tolerance of the fit.
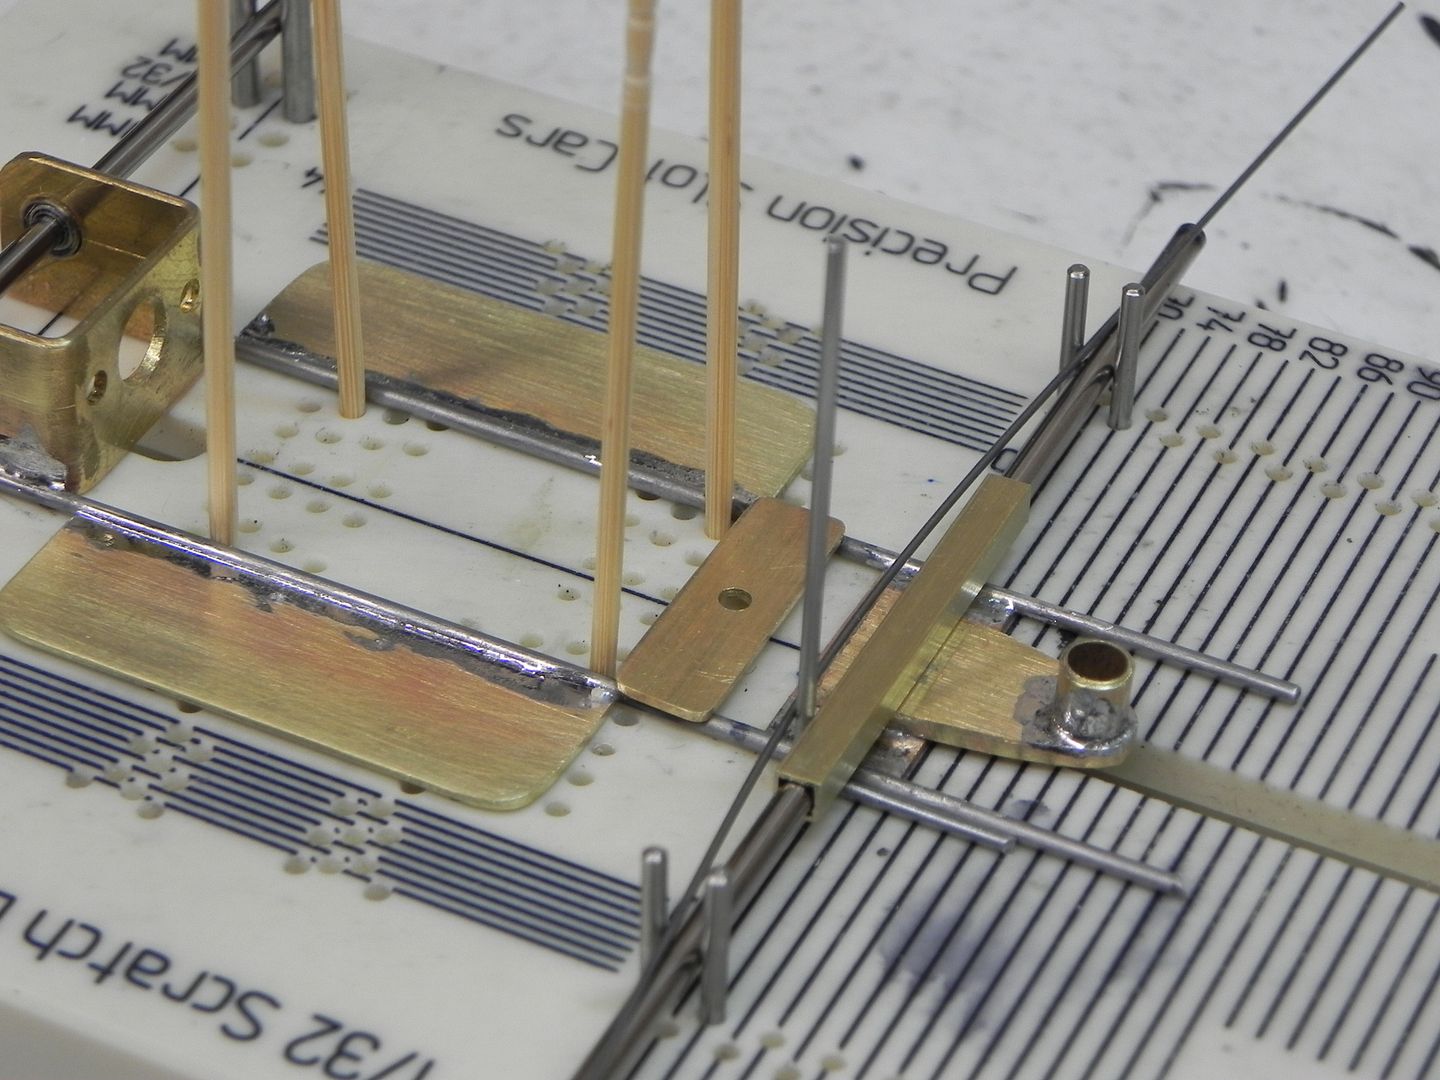
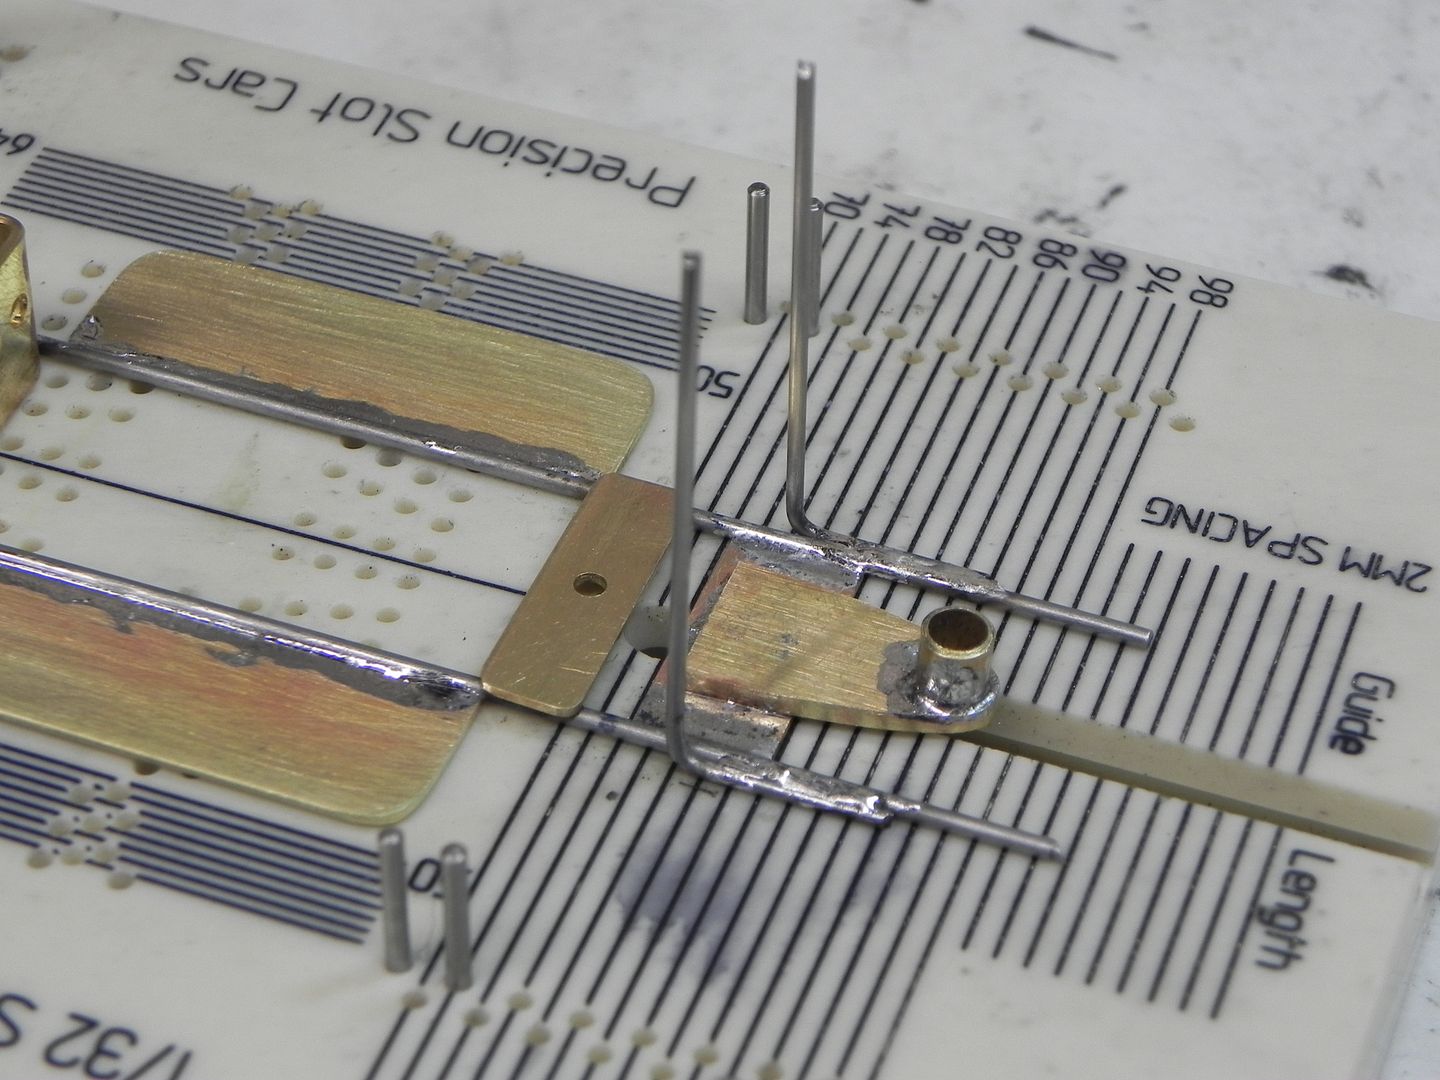
I decided to use vertical wire bracing on both sides, so after the bending, I put them on the jig. I used a piece of 0.025" piano wire as a tension brace to hold them vertical while I soldered them in:
Overkill on solder........yup, guilty as charged........... :dance: :
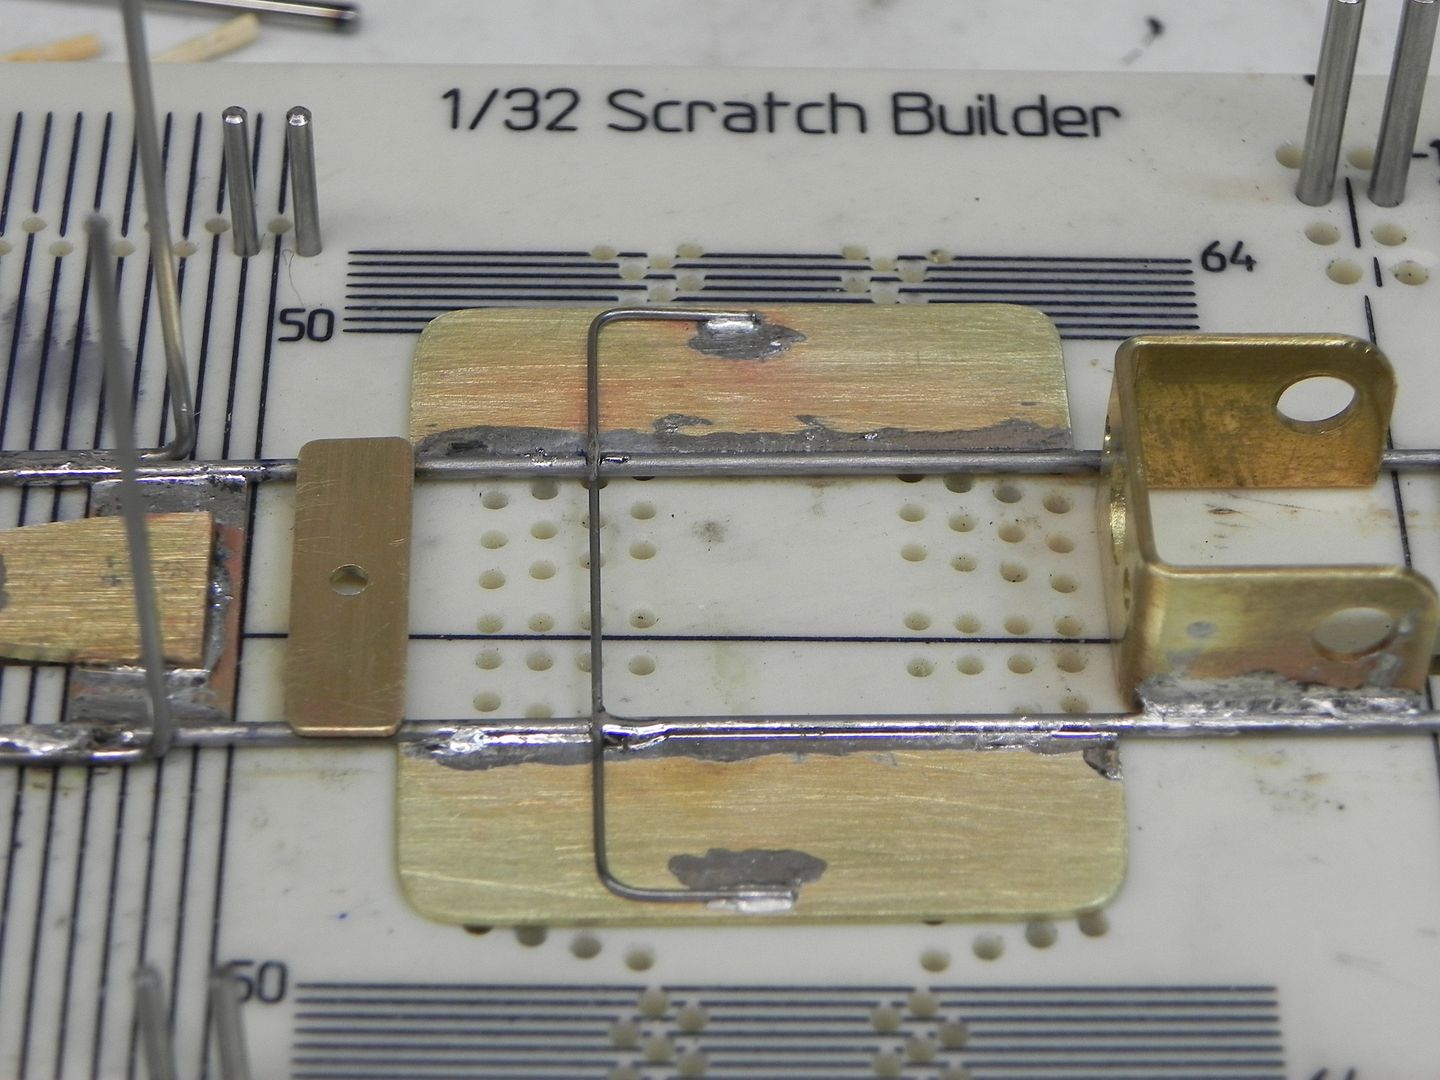
I decided that since I will likely be adding weight to the chassis, I would use a tension cross bar to give the pans a little more stability; this is 0.032" piano wire:
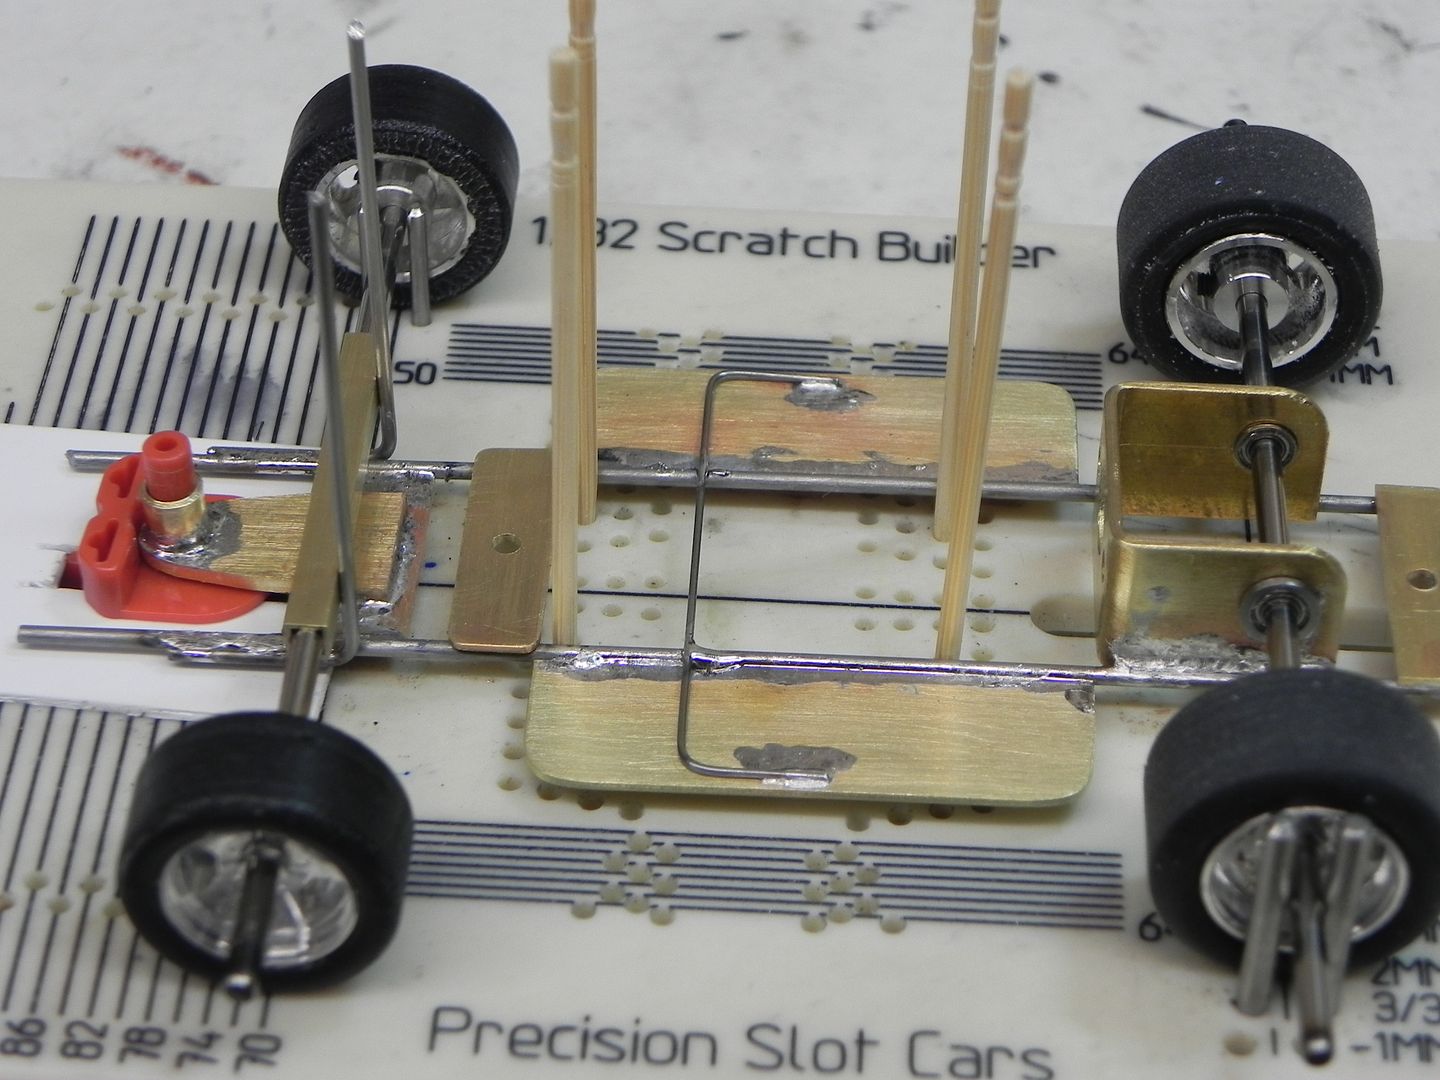
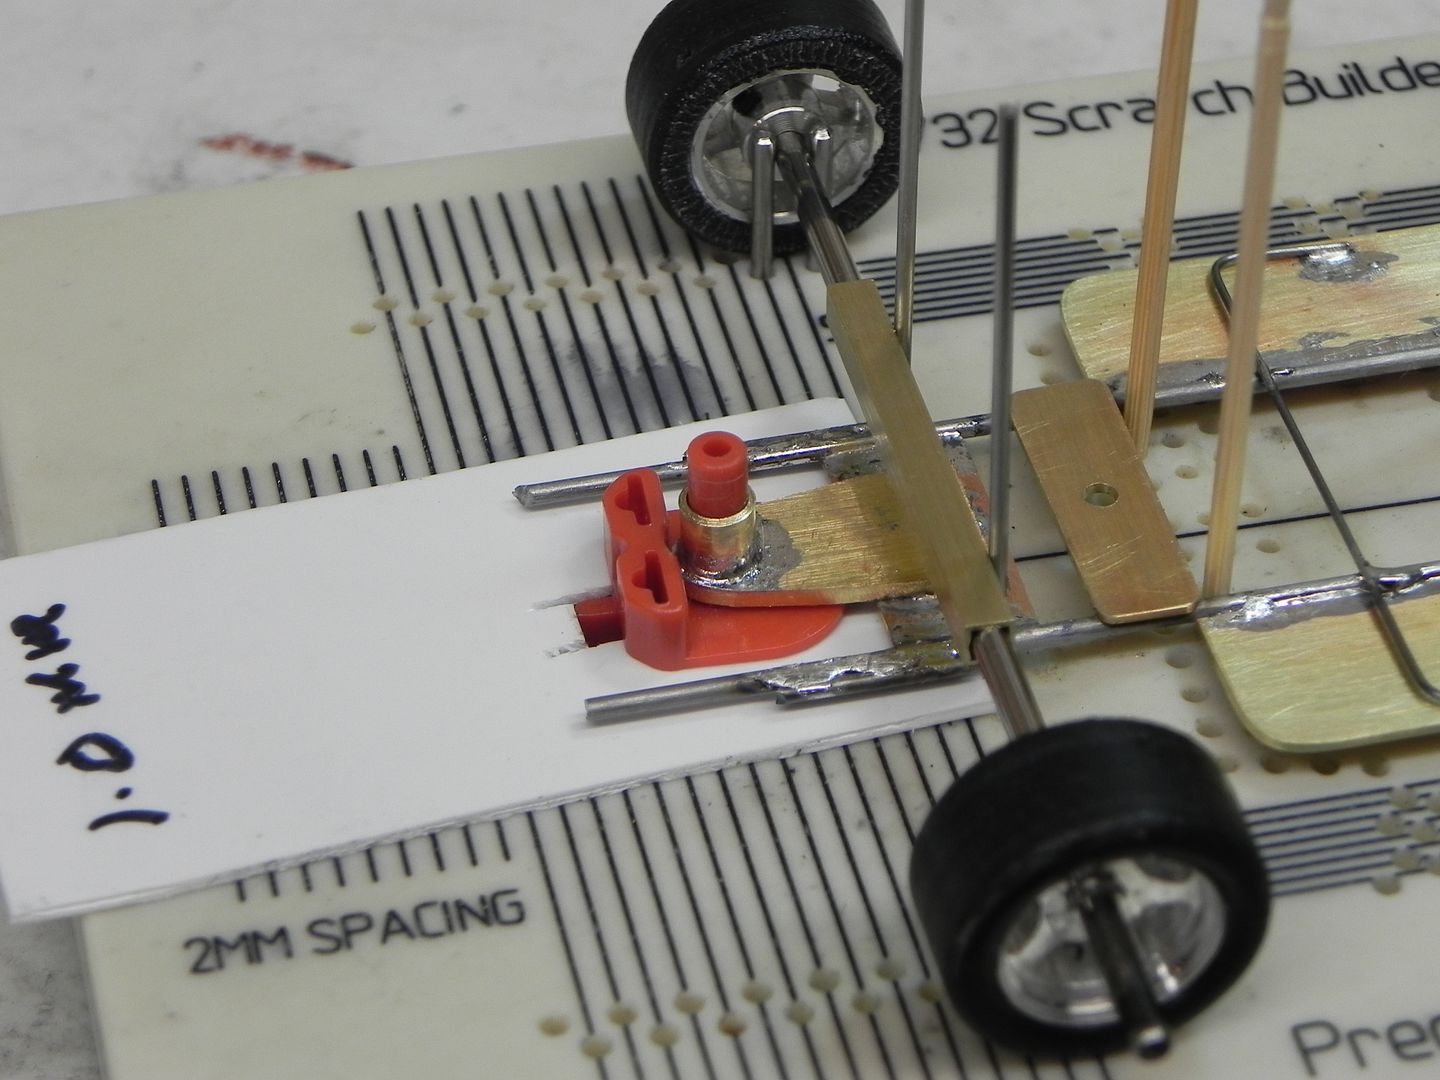
Next, time to set the front axle ride height. I decided to use the actual wheels to do this, since even though I have the set-up height adjusters, they aren't in increments that are small enough to be useful to me in this build. So, since the mounted tires are exact, I used them. I'm using the Scaleauto 1603 guide (which will need the blade filed down from the stock 8.3mm) and I usually allow about 1.0mm of space between the bottom of the guide plate and the track. So, I used a piece of 1.0mm styrene as a spacer to get my ride height. If the guide needs to go lower, then fine, I can do that with guide spacers, but you can't go up without a re-build of the guide tongue (which I don't want to have to do - ever):
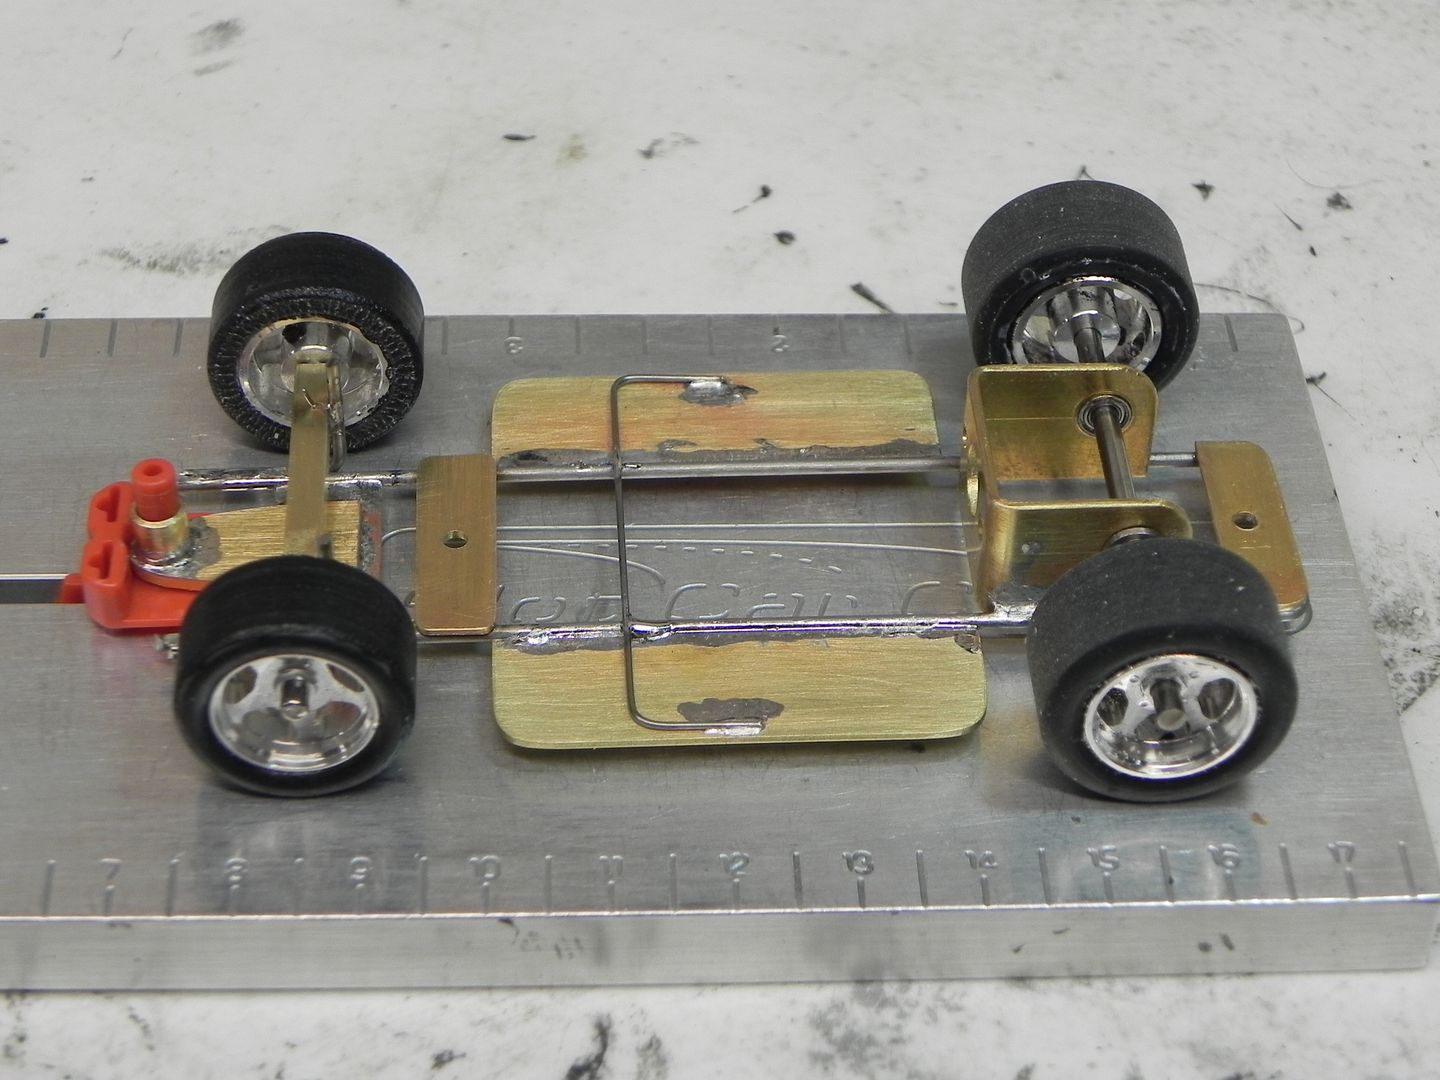
And with some solder on the front axle 1/8" square stock, I was done:

A few cuts with the dermel to clean up the main chassis rails and the front axle verticals...............I had to put it on the set-up block to see how it looks:
And a quick, body-on shot to get ready for the next step - testing on the track:
I'm glad this part is over..............we'll see how the first testing goes tomorrow................. :pray:
Allan
I forgot to mention yesterday, when I was fabricating the guide tongue I found that the 3/16" brass tube that I was using for the vertical holder was not quite a snug fit; it has a little slop to it. So, rather than cutting the tube with a dremel or saw blade, I used a circular pressure pipe cutter (K+S sells the in a size that works well for small diameter soft metals); reasoning that the pressure from the circular cut would pinch the tube in slightly at the point of the cuts. And, sometimes you get lucky.............it worked, a nice snug fit with easy rotation and no slop. So, at least for the guide that I'm using, this is a way to improve the tolerance of the fit.
I decided to use vertical wire bracing on both sides, so after the bending, I put them on the jig. I used a piece of 0.025" piano wire as a tension brace to hold them vertical while I soldered them in:
Overkill on solder........yup, guilty as charged........... :dance: :
I decided that since I will likely be adding weight to the chassis, I would use a tension cross bar to give the pans a little more stability; this is 0.032" piano wire:
Next, time to set the front axle ride height. I decided to use the actual wheels to do this, since even though I have the set-up height adjusters, they aren't in increments that are small enough to be useful to me in this build. So, since the mounted tires are exact, I used them. I'm using the Scaleauto 1603 guide (which will need the blade filed down from the stock 8.3mm) and I usually allow about 1.0mm of space between the bottom of the guide plate and the track. So, I used a piece of 1.0mm styrene as a spacer to get my ride height. If the guide needs to go lower, then fine, I can do that with guide spacers, but you can't go up without a re-build of the guide tongue (which I don't want to have to do - ever):
And with some solder on the front axle 1/8" square stock, I was done:
A few cuts with the dermel to clean up the main chassis rails and the front axle verticals...............I had to put it on the set-up block to see how it looks:
And a quick, body-on shot to get ready for the next step - testing on the track:
I'm glad this part is over..............we'll see how the first testing goes tomorrow................. :pray:
Allan
-
Audi1 - HRW SlotCar Veteran!
- Posts: 4223
- Joined: Fri Nov 01, 2013 7:25 am
- Location: Merrimac, MA
Re: CanAm - Build Thread
![]() by TuscoTodd » Thu Feb 11, 2016 12:28 pm
by TuscoTodd » Thu Feb 11, 2016 12:28 pm
Allan - that is a slick idea on the styrene spacer! I have been using brass, which makes a REALLY good heat sink when you are trying to solder. :oops:
Will have to see about trying that!
Thanks for sharing the progress shots and details!
:text-bravo:
Will have to see about trying that!
Thanks for sharing the progress shots and details!
:text-bravo:
-
TuscoTodd - HRW Bouncer
- Posts: 7145
- Joined: Sat Aug 17, 2013 11:25 am
- Location: Rural Ohio
Re: CanAm - Build Thread
![]() by bill from nh » Thu Feb 11, 2016 12:40 pm
by bill from nh » Thu Feb 11, 2016 12:40 pm
- bill from nh
- HRW SlotCar Veteran!
- Posts: 373
- Joined: Wed Sep 05, 2012 5:32 pm
- Location: New Boston, NH
Re: CanAm - Build Thread
![]() by chrisguyw » Thu Feb 11, 2016 1:30 pm
by chrisguyw » Thu Feb 11, 2016 1:30 pm
Lookin good Allan!!!!
I see that even after our discussion, you opted to place the front axle supports on the outside of the main rails!!..........chicken :lol:
It would not hurt to trim the excess chassis rails/axle supports even with the leading edge of your guide tongue cross brace.
One of the best first attempts I have seen :text-bravo:
Cheers
Chris Walker
- chrisguyw
- HRW SlotCar Veteran!
- Posts: 619
- Joined: Wed Dec 17, 2014 12:50 pm
- Location: Toronto, Canada
Re: CanAm - Build Thread
![]() by Changing-Gearz » Thu Feb 11, 2016 2:46 pm
by Changing-Gearz » Thu Feb 11, 2016 2:46 pm
19 Days!!!!!!!!!!! Great googly moogly I better get moving.
I need to find some rear wheels...... and make an fc130 can fit......
maybe a steering wheel.........

I need to find some rear wheels...... and make an fc130 can fit......
maybe a steering wheel.........
- Changing-Gearz
- HRW SlotCar Veteran!
- Posts: 217
- Joined: Mon Mar 04, 2013 2:09 pm
- Location: West Newbury, MA
Return to The HRW Proxy Forum!
Who is online
Users browsing this forum: No registered users and 12 guests

Powered by phpBB® Forum Software © phpBB Group