If you can figure out a way to get a runner out of a Marcos without making it a sidewinder, you have really accomplished something. What kind of coffee are you drinking!?!
I lowered my L88s without screwing up the lights, but I set the limit of the lowering specifically to clear the lights. It doesn't really need much lowering, and as Harry said, its mostly for looks, anyway.
I find that one of my favorite things to do is set a constant speed for all 4 lanes and just watch the cars go by. Leftovers from my model railroad days, I guess. We used to have a really good guy here called "The Lee Marvin of Slot Cars". His signature was something like, "leaning over to get my eyeball down on the track to see them go by". Yup. That's me all over. Probably why I like lights so much.
FMD Project L88
45 posts
• Page 3 of 3 • 1, 2, 3
Re: FMD Project L88
![]() by waaytoomuchintothis » Wed Sep 09, 2015 2:52 pm
by waaytoomuchintothis » Wed Sep 09, 2015 2:52 pm
-

waaytoomuchintothis - "Seasoned SlotRacer"
- Posts: 7576
- Joined: Wed Aug 29, 2012 7:16 pm
- Location: Chesterfield, Virginia
Re: FMD Project L88
![]() by HomeRacingWorld » Wed Sep 09, 2015 3:15 pm
by HomeRacingWorld » Wed Sep 09, 2015 3:15 pm
Fly front motor? Oh yeah...mine run ok. You have deep pockets right? :)
This project is rearing it's "tinkering" head. :) Why can't we just leave things alone?
This project is rearing it's "tinkering" head. :) Why can't we just leave things alone?
-

HomeRacingWorld - HRW Janitor
- Posts: 15569
- Joined: Wed Aug 08, 2012 2:05 pm
- Location: HRW Skunkworks
Re: FMD Project L88
![]() by waaytoomuchintothis » Wed Sep 09, 2015 3:22 pm
by waaytoomuchintothis » Wed Sep 09, 2015 3:22 pm
Or, as my wife claims... its what we do to get out of yard work.
-
waaytoomuchintothis - "Seasoned SlotRacer"
- Posts: 7576
- Joined: Wed Aug 29, 2012 7:16 pm
- Location: Chesterfield, Virginia
Re: FMD Project L88
![]() by Ky.Slot Racer » Wed Sep 09, 2015 8:14 pm
by Ky.Slot Racer » Wed Sep 09, 2015 8:14 pm
looks like a job for Pauls special tires to get it close to the sample picture.

- Ky.Slot Racer
- HRW Master Modeler
- Posts: 918
- Joined: Sun Feb 09, 2014 7:18 am
Re: FMD Project L88
![]() by HomeRacingWorld » Wed Sep 09, 2015 8:49 pm
by HomeRacingWorld » Wed Sep 09, 2015 8:49 pm
Yes, those SE's are nice for this. Good call.
-
HomeRacingWorld - HRW Janitor
- Posts: 15569
- Joined: Wed Aug 08, 2012 2:05 pm
- Location: HRW Skunkworks
Re: FMD Project L88
![]() by Gameover » Wed Sep 09, 2015 9:12 pm
by Gameover » Wed Sep 09, 2015 9:12 pm
You are making want to find one of these harry!
-

Gameover - Mr. Hubcaps
- Posts: 2998
- Joined: Thu Mar 06, 2014 9:23 pm
- Location: Magless in Minnesota
Re: FMD Project L88
![]() by dreinecke » Wed Sep 09, 2015 10:18 pm
by dreinecke » Wed Sep 09, 2015 10:18 pm
Really turning out good! I'd lower it slightly myself.
-

dreinecke - King of the Dum-Dums!
- Posts: 7360
- Joined: Wed Aug 08, 2012 5:39 pm
- Location: Colorado
Re: FMD Project L88
![]() by HomeRacingWorld » Thu Sep 10, 2015 8:40 pm
by HomeRacingWorld » Thu Sep 10, 2015 8:40 pm
-
HomeRacingWorld - HRW Janitor
- Posts: 15569
- Joined: Wed Aug 08, 2012 2:05 pm
- Location: HRW Skunkworks
Re: FMD Project L88
![]() by loosewheel » Fri Sep 11, 2015 8:24 am
by loosewheel » Fri Sep 11, 2015 8:24 am
Are you going to keep the stock plastic rear bushings?
- loosewheel
- HRW SlotCar Veteran!
- Posts: 312
- Joined: Fri Dec 05, 2014 1:32 pm
Re: FMD Project L88
![]() by HomeRacingWorld » Fri Sep 11, 2015 3:13 pm
by HomeRacingWorld » Fri Sep 11, 2015 3:13 pm
Yes, trying to keep/utilize as much stock as possible.
-
HomeRacingWorld - HRW Janitor
- Posts: 15569
- Joined: Wed Aug 08, 2012 2:05 pm
- Location: HRW Skunkworks
Re: FMD Project L88
![]() by dreinecke » Fri Sep 11, 2015 8:16 pm
by dreinecke » Fri Sep 11, 2015 8:16 pm
I am going to have to get going on mine now. This is a great tutorial!
-
dreinecke - King of the Dum-Dums!
- Posts: 7360
- Joined: Wed Aug 08, 2012 5:39 pm
- Location: Colorado
Re: FMD Project L88
![]() by HomeRacingWorld » Wed Sep 16, 2015 8:35 am
by HomeRacingWorld » Wed Sep 16, 2015 8:35 am
Lot of things going on, but I finished the project finally.
To make sure everything cleared when I lowered the car, I sanded/cut the bottom of the interior. It's not that glaring when it's all put together so I did not bother with making new pans.
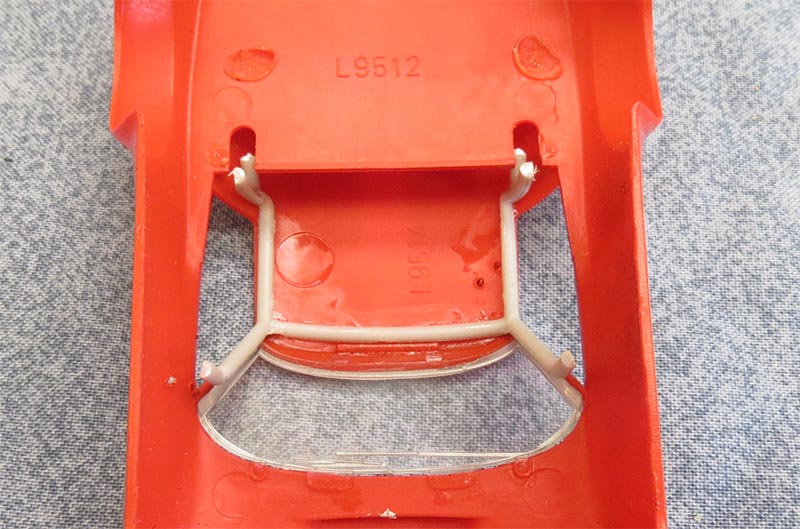
I am glad I did this mod to the bars. I did not like how the bars and driver looked before. I cut and sanded the bars so they would fit cleanly inside the body and glued them in place.
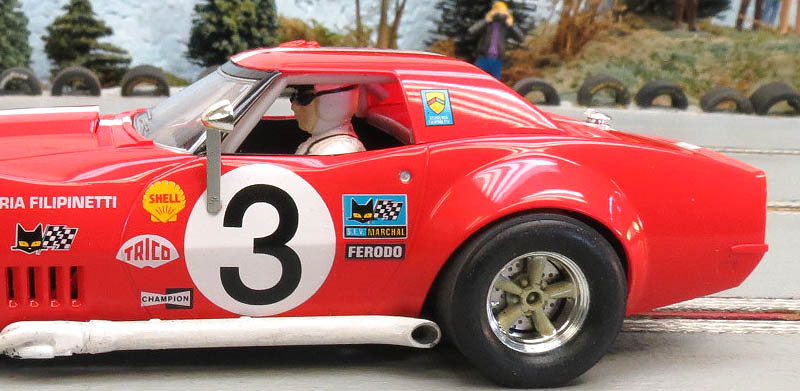
Once this was completed I glued the driver figure back into the interior. I adjusted him to where I thought it looks best and let the hot glue flow.
That photo will also show you the lowering accomplished. Again, to do so will take some work and not sure if it's something you will want to do...but I had fun grinding :)
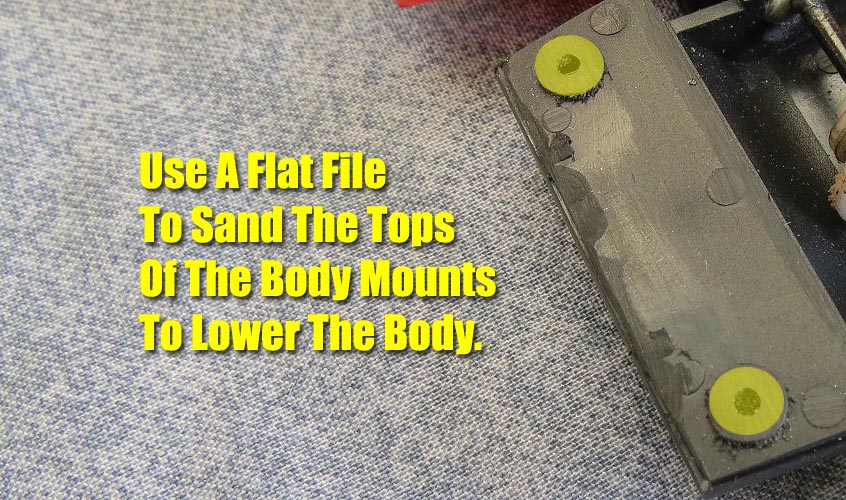
The rear of the chassis is where I sanded. I just used a flat file and reduced these areas slightly. You do not need a lot to get a better stance.
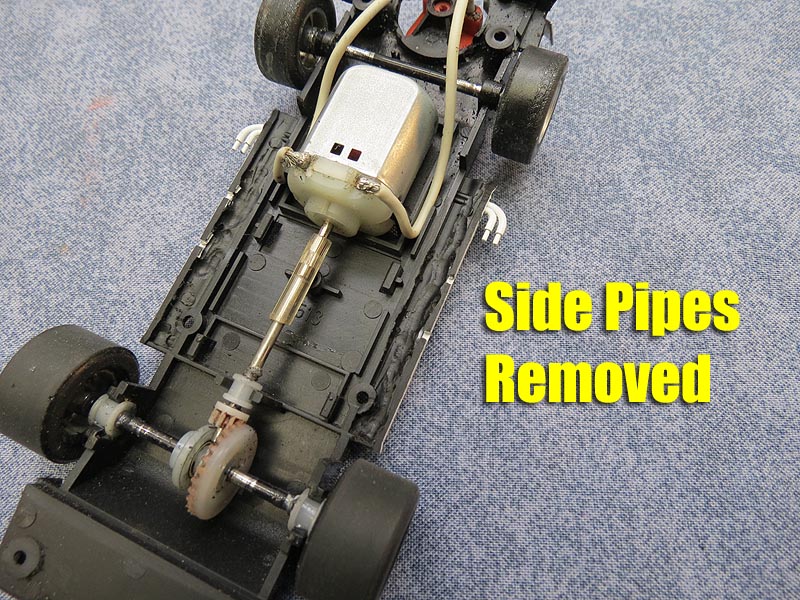
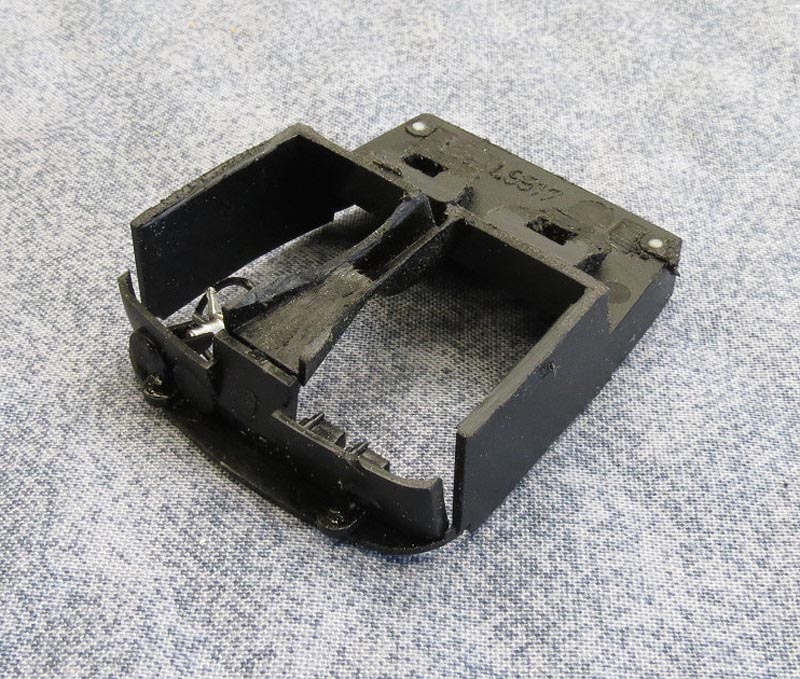
I removed the big pipes using a milling bit in my Dremel. Messy, but necessary. You will likely lose the "T" shaed mounts but the pipe can still be glued back on with the leftover material.

You need to remove more of the material on the sides to allow the body to sit lower. You simply have to sand until you get the look you are after.

Now you can see the interior back in place and also the lights. I soldered and shrink tubed the old wires together after removing the RF capacitor. Then each light board was installed and hot glued in place. I mounted them in the body and bypassed the original mounts obviously. I did this as it just makes it easier for me to remove the body and work on the car if needed. The wires curl nicely and form into the hood, out of the way.

All finished. I think it turned out ok.
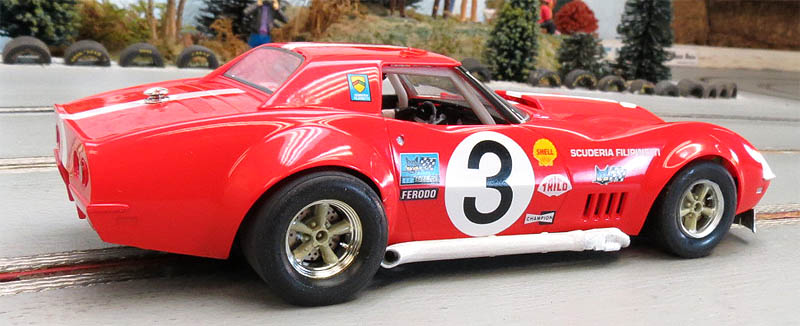
And it runs wondefully. Lap times tell me I am right with some TA models in our series. In fact it was neck and neck with my fastest Scalextric Mustang with 3.7 second lap times.
Overall a fun project and happy with the results. Considering my goal was to keep as much stock as possible, the performance is pleasing.
To make sure everything cleared when I lowered the car, I sanded/cut the bottom of the interior. It's not that glaring when it's all put together so I did not bother with making new pans.
I am glad I did this mod to the bars. I did not like how the bars and driver looked before. I cut and sanded the bars so they would fit cleanly inside the body and glued them in place.
Once this was completed I glued the driver figure back into the interior. I adjusted him to where I thought it looks best and let the hot glue flow.
That photo will also show you the lowering accomplished. Again, to do so will take some work and not sure if it's something you will want to do...but I had fun grinding :)
The rear of the chassis is where I sanded. I just used a flat file and reduced these areas slightly. You do not need a lot to get a better stance.
I removed the big pipes using a milling bit in my Dremel. Messy, but necessary. You will likely lose the "T" shaed mounts but the pipe can still be glued back on with the leftover material.
You need to remove more of the material on the sides to allow the body to sit lower. You simply have to sand until you get the look you are after.
Now you can see the interior back in place and also the lights. I soldered and shrink tubed the old wires together after removing the RF capacitor. Then each light board was installed and hot glued in place. I mounted them in the body and bypassed the original mounts obviously. I did this as it just makes it easier for me to remove the body and work on the car if needed. The wires curl nicely and form into the hood, out of the way.
All finished. I think it turned out ok.
And it runs wondefully. Lap times tell me I am right with some TA models in our series. In fact it was neck and neck with my fastest Scalextric Mustang with 3.7 second lap times.
Overall a fun project and happy with the results. Considering my goal was to keep as much stock as possible, the performance is pleasing.
-
HomeRacingWorld - HRW Janitor
- Posts: 15569
- Joined: Wed Aug 08, 2012 2:05 pm
- Location: HRW Skunkworks
Re: FMD Project L88
![]() by btaylor » Wed Sep 16, 2015 8:45 am
by btaylor » Wed Sep 16, 2015 8:45 am
Been following along on this, as mine needed work too. Did you add any weight when you re-assembled? mine seems a bit light in the corners. I also had a crooked pinion on mine that I replaced with a brass unit.
This is a great car, and a very helpful tutorial!
Thank Harry
Bob
This is a great car, and a very helpful tutorial!
Thank Harry
Bob
-

btaylor - Uncle Bob
- Posts: 4519
- Joined: Mon Mar 24, 2014 3:50 am
Re: FMD Project L88
![]() by HomeRacingWorld » Wed Sep 16, 2015 9:11 am
by HomeRacingWorld » Wed Sep 16, 2015 9:11 am
Hey Bob. Yes, added some lead sheet on bottom. Helped it a great deal. Before the lead, like you said, very light and traction was not the best.
I started trimming the lead sheet and ended up with a slab that fills the underside between the wheels.
I started trimming the lead sheet and ended up with a slab that fills the underside between the wheels.
-
HomeRacingWorld - HRW Janitor
- Posts: 15569
- Joined: Wed Aug 08, 2012 2:05 pm
- Location: HRW Skunkworks
Re: FMD Project L88
![]() by Audi1 » Wed Sep 16, 2015 10:57 am
by Audi1 » Wed Sep 16, 2015 10:57 am
Very nice tuning step-by-step; thanks! And the car looks great, too!
Allan
Allan
-

Audi1 - HRW SlotCar Veteran!
- Posts: 4223
- Joined: Fri Nov 01, 2013 7:25 am
- Location: Merrimac, MA
45 posts
• Page 3 of 3 • 1, 2, 3
Who is online
Users browsing this forum: No registered users and 0 guests

Powered by phpBB® Forum Software © phpBB Group