Looks like a great start Harry. I'm curious as to the Brass rod coming back from axle to motor mount.
Is this for holding everything in line? Rigidity? Looks?
Will you be able to answer these questions before the next episode?
BTW, Pattos makes those decals for the Batman scheme.
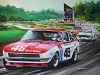
#94 - Thnderbat-McDnalds - Bill Elliott - 1995
1/32 90's NASCAR - "Project: Thunderbat" WIP
19 posts
• Page 1 of 2 • 1, 2
1/32 90's NASCAR - "Project: Thunderbat" WIP
![]() by HomeRacingWorld » Tue Apr 26, 2016 1:58 pm
by HomeRacingWorld » Tue Apr 26, 2016 1:58 pm
-

HomeRacingWorld - HRW Janitor
- Posts: 15569
- Joined: Wed Aug 08, 2012 2:05 pm
- Location: HRW Skunkworks
Re: 1/32 90's NASCAR - "Project: Thunderbat" WIP
![]() by Z-carfan » Tue Apr 26, 2016 2:23 pm
by Z-carfan » Tue Apr 26, 2016 2:23 pm
-
Z-carfan - HRW SlotCar Veteran!
- Posts: 1961
- Joined: Tue Mar 24, 2015 9:10 pm
- Location: Galena, Oh USA
Re: 1/32 90's NASCAR - "Project: Thunderbat" WIP
![]() by HomeRacingWorld » Tue Apr 26, 2016 2:50 pm
by HomeRacingWorld » Tue Apr 26, 2016 2:50 pm
Thanks Mike.
Just to add a little strength. You may not think so but even the brass rod helps. With our milder motors it's more than strong enough and easier to work with in some cases than piano wire.
Yes, saw that at Pattos. You are making me wish I ordered them :) Oh well, we shall see how these come out. In any event, it's going to be a racer.
-
HomeRacingWorld - HRW Janitor
- Posts: 15569
- Joined: Wed Aug 08, 2012 2:05 pm
- Location: HRW Skunkworks
Re: 1/32 90's NASCAR - "Project: Thunderbat" WIP
![]() by bill from nh » Tue Apr 26, 2016 3:50 pm
by bill from nh » Tue Apr 26, 2016 3:50 pm
Harry, the chassis offset should really help the handling on an oval, even a flat one. I'll reserve judgement on the brass rod motor bracket brace. As you get further into the build, you can also offset the guide to keep the car centered in the slots. If you use pans, add a solid brass one on the left, make a pan outline using piano wire or brass rod for use on the right side. I'll be watching this build with some future interest.:)
- bill from nh
- HRW SlotCar Veteran!
- Posts: 373
- Joined: Wed Sep 05, 2012 5:32 pm
- Location: New Boston, NH
Re: 1/32 90's NASCAR - "Project: Thunderbat" WIP
![]() by dge467 » Tue Apr 26, 2016 5:09 pm
by dge467 » Tue Apr 26, 2016 5:09 pm
Cool build Harry! I have clear coated over those peel and sticks with out a problem.
-

dge467 - The King of Foil
- Posts: 3636
- Joined: Tue Sep 04, 2012 9:07 pm
- Location: N.E. Massachusetts
Re: 1/32 90's NASCAR - "Project: Thunderbat" WIP
![]() by HomeRacingWorld » Tue Apr 26, 2016 6:02 pm
by HomeRacingWorld » Tue Apr 26, 2016 6:02 pm
Have made offset before and the guide is off center, yet model sits evenly on the track.


Does the weight shift make a big difference? Not a lot. It's been talked about before, and yes it does help a little of course. But my fastest car is straight inline with the lead added in the right spots.
Not by much though, this Ford with a motor swap to Piranha is HARD to beat. In fact I'd say the difference is all driver now, and that's how I like them :)
I was hoping to clear over with success. We shall see. :dance:
-
HomeRacingWorld - HRW Janitor
- Posts: 15569
- Joined: Wed Aug 08, 2012 2:05 pm
- Location: HRW Skunkworks
Re: 1/32 90's NASCAR - "Project: Thunderbat" WIP
![]() by bill from nh » Tue Apr 26, 2016 7:48 pm
by bill from nh » Tue Apr 26, 2016 7:48 pm
"Bill, does offsetting the guide affect handling? In terms of how the weight is aligned against the slot Harry is centred, but offsetting the guide shifts more mass to the inside? And it handles better?"
Johnny, I mentioned offsetting the guide, not for better handling, but with some track's lane spacing, you need to have the car's center centered on the slots, or else you'll have clearance problems when trying to pass other cars. If the guide was centered on an offset chassis this condition might occur. But Harry has posted a photo showing us an offset car he has built where he provided an offset (off-centered) guide, so my mentioning it is a point not needed.
For better handling on a oval, it usually is better to have as much mass shifted to the car's inside side as possible. More of this weight occurs on a slot car's rear wheels than the front. I think that the actual left-right position of a guide flag has very little effect on a car's handling. I once had a car set up neutral for a then local tri-oval that was a killer! At other times, things that should have worked, didn't work. So none of this is cast in concrete.
- bill from nh
- HRW SlotCar Veteran!
- Posts: 373
- Joined: Wed Sep 05, 2012 5:32 pm
- Location: New Boston, NH
Re: 1/32 90's NASCAR - "Project: Thunderbat" WIP
![]() by Broman62 » Wed Apr 27, 2016 10:19 am
by Broman62 » Wed Apr 27, 2016 10:19 am
Another awesome informative how to thread!! Looking forward to final build!!
-

Broman62 - HRW SlotCar Veteran!
- Posts: 1780
- Joined: Wed Sep 05, 2012 6:29 pm
- Location: NE Ohio
Re: 1/32 90's NASCAR - "Project: Thunderbat" WIP
![]() by HomeRacingWorld » Fri Apr 29, 2016 9:16 pm
by HomeRacingWorld » Fri Apr 29, 2016 9:16 pm
-
HomeRacingWorld - HRW Janitor
- Posts: 15569
- Joined: Wed Aug 08, 2012 2:05 pm
- Location: HRW Skunkworks
Re: 1/32 90's NASCAR - "Project: Thunderbat" WIP
![]() by CrockettNZ » Fri Apr 29, 2016 11:19 pm
by CrockettNZ » Fri Apr 29, 2016 11:19 pm
I like that one
very nicely done I will have to give that ago myself
cheers
very nicely done I will have to give that ago myself
cheers
-

CrockettNZ - HRW SlotCar Veteran!
- Posts: 475
- Joined: Sat Oct 17, 2015 2:11 pm
- Location: Napier New Zealand
Re: 1/32 90's NASCAR - "Project: Thunderbat" WIP
![]() by HomeRacingWorld » Sat Apr 30, 2016 8:52 pm
by HomeRacingWorld » Sat Apr 30, 2016 8:52 pm
Thanks guys.
Back to the chassis. I simply "pin out" the chassis as most do on the HoneyComb Kids board.


I have drawn lines on mine using a square. Since this is slightly offset motor, I use some 1/8" wire and use the wheels to make sure I have centered and even alignment.
Well here is my own take on an old stand by. I like to do things a bit different so I created "shaker" pans incorporating the next size larger square tubing to sleeve over the original frame rails. This isn't anything new to veteran builders but thought some might get a kick out of it.

http://www.ovalracingworld.com/Garage/9 ... t/bat8.jpg
The rear bracket stops the pans that direction, and I installed a front bar that includes a square tubing section for guide wires that stops the pans from going forward. You may not think so, but the few thousandths freeplay of the fit of the tubing creates a very nice "Shaker" pan that gives decent float.

I mount the chassis on the setup block with body. This way I can center my guide tongue so the car tracks centered. Body isn't needed if you simply measure from the outer edges, but this worked fine.
So let me present the "Shaky H" chassis :)


Ok...time for body work.
Back to the chassis. I simply "pin out" the chassis as most do on the HoneyComb Kids board.
I have drawn lines on mine using a square. Since this is slightly offset motor, I use some 1/8" wire and use the wheels to make sure I have centered and even alignment.
Well here is my own take on an old stand by. I like to do things a bit different so I created "shaker" pans incorporating the next size larger square tubing to sleeve over the original frame rails. This isn't anything new to veteran builders but thought some might get a kick out of it.
http://www.ovalracingworld.com/Garage/9 ... t/bat8.jpg
The rear bracket stops the pans that direction, and I installed a front bar that includes a square tubing section for guide wires that stops the pans from going forward. You may not think so, but the few thousandths freeplay of the fit of the tubing creates a very nice "Shaker" pan that gives decent float.
I mount the chassis on the setup block with body. This way I can center my guide tongue so the car tracks centered. Body isn't needed if you simply measure from the outer edges, but this worked fine.
So let me present the "Shaky H" chassis :)
Ok...time for body work.
-
HomeRacingWorld - HRW Janitor
- Posts: 15569
- Joined: Wed Aug 08, 2012 2:05 pm
- Location: HRW Skunkworks
Re: 1/32 90's NASCAR - "Project: Thunderbat" WIP
![]() by Ky.Slot Racer » Sun May 01, 2016 7:29 am
by Ky.Slot Racer » Sun May 01, 2016 7:29 am
Awesome idea on the side shaker pans H, I dig seeing these new ideas on the old build techniques. In a few I have built recently, seems the shaker pans work very efficiently on the smaller cars, as long as they are not tied together with the body, (allowed to move freely between themselves) on the road coarse that is... beings this particular body is a bit under scale, should be a great combo. Where the flop pans do good on the larger wheel base. then there`s the SHAKER FLOP pans, they are the tops so far on the tracks here. I will give this a go on a build myself, and see how it goes.
- Ky.Slot Racer
- HRW Master Modeler
- Posts: 918
- Joined: Sun Feb 09, 2014 7:18 am
Re: 1/32 90's NASCAR - "Project: Thunderbat" WIP
![]() by HomeRacingWorld » Sun May 01, 2016 10:20 am
by HomeRacingWorld » Sun May 01, 2016 10:20 am
Thanks Mark.
It is fun trying new things, or trying a new approach to old methods. So far it runs pretty good. But my cars are usually the slowpokes of the field, so maybe not a good test :)
It is fun trying new things, or trying a new approach to old methods. So far it runs pretty good. But my cars are usually the slowpokes of the field, so maybe not a good test :)
-
HomeRacingWorld - HRW Janitor
- Posts: 15569
- Joined: Wed Aug 08, 2012 2:05 pm
- Location: HRW Skunkworks
Re: 1/32 90's NASCAR - "Project: Thunderbat" WIP
![]() by woodman » Sun May 01, 2016 5:54 pm
by woodman » Sun May 01, 2016 5:54 pm
Ah, another option to the so called flexi. .....good job.... :text-bravo:
-

woodman - HRW SlotCar Veteran!
- Posts: 421
- Joined: Tue Feb 04, 2014 4:34 pm
- Location: Kansas City Mo.
Re: 1/32 90's NASCAR - "Project: Thunderbat" WIP
![]() by dreinecke » Sun May 01, 2016 9:34 pm
by dreinecke » Sun May 01, 2016 9:34 pm
Super looking chassis. The I think I even saw my reflection in it from here!
-

dreinecke - King of the Dum-Dums!
- Posts: 7360
- Joined: Wed Aug 08, 2012 5:39 pm
- Location: Colorado
19 posts
• Page 1 of 2 • 1, 2
Who is online
Users browsing this forum: No registered users and 7 guests

Powered by phpBB® Forum Software © phpBB Group