Well I got out the razor saw and other tools last night I went to work on the new Sacley Cougar.
No pics yet but with a few cuts here another there the Cougar on Stilts received a formal grounding.
Magnut removed and the front tires replaces with a set from a Scaley Mustang, she runs really well
and looks much better.
First I sawed the front and rear valence panels off the chassis and glued then to the body. Next I
trimmed bits and pieces from the bottom of the interior and chassis. Shaved the front body post,
shimmed the rear axle, trued the tires and hit the track for a few laps. Much better and looks the
part as well.
Cougar Slice'n dice...
45 posts
• Page 1 of 3 • 1, 2, 3
Cougar Slice'n dice...
![]() by Jesla » Sun Dec 22, 2013 8:53 am
by Jesla » Sun Dec 22, 2013 8:53 am
-

Jesla - HRW SlotCar Veteran!
- Posts: 892
- Joined: Wed Sep 05, 2012 6:45 pm
- Location: East TN
Re: Cougar Slice'n dice...
![]() by HomeRacingWorld » Sun Dec 22, 2013 9:55 am
by HomeRacingWorld » Sun Dec 22, 2013 9:55 am
Sounds like I copied you :)
-

HomeRacingWorld - HRW Janitor
- Posts: 15569
- Joined: Wed Aug 08, 2012 2:05 pm
- Location: HRW Skunkworks
Re: Cougar Slice'n dice...
![]() by Jesla » Sun Dec 22, 2013 10:18 am
by Jesla » Sun Dec 22, 2013 10:18 am
Was easy to do also......way easier than the Mustang or Camaro.
-
Jesla - HRW SlotCar Veteran!
- Posts: 892
- Joined: Wed Sep 05, 2012 6:45 pm
- Location: East TN
Re: Cougar Slice'n dice...
![]() by 4424ever » Sun Dec 22, 2013 11:25 am
by 4424ever » Sun Dec 22, 2013 11:25 am
:banana-gotpics: :banana-gotpics: :banana-gotpics: :banana-gotpics: sure would like to see some :text-thankyouyellow:
-

4424ever - HRW SlotCar Veteran!
- Posts: 741
- Joined: Thu Sep 06, 2012 10:26 am
- Location: Peterborough Ontario CANADA
Re: Cougar Slice'n dice...
![]() by HomeRacingWorld » Sun Dec 22, 2013 11:55 am
by HomeRacingWorld » Sun Dec 22, 2013 11:55 am
Mine is not finished yet, had my grandbabies to help bake cookies and THAT takes priority.
But here goes.
Simple slice on each end, clean up with a sander and glue to the body.
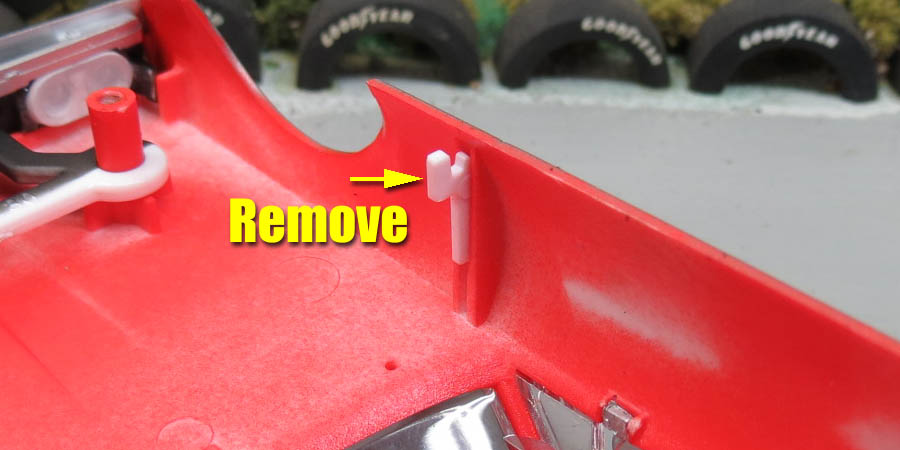
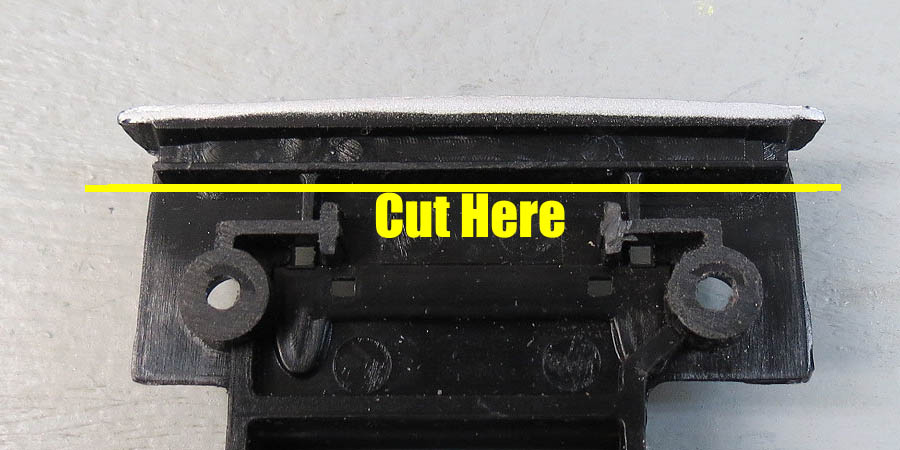
To lower the car, you have to remove these "hooks". They rest on the chassis edges. You will also need to sand the body posts, more on that later.

My bare chassis thus far. It has been sanded all around the outside for clearance. You can compare your chassis to this one and Jesla's and pretty much figure out what we are doing.

Sand the lips off these and file smooth. Then use a small rat tail file and open the holes a little. TEST as you go.
I am working on it still, so no complete photos yet.
Hope it helps.
But here goes.
Simple slice on each end, clean up with a sander and glue to the body.
To lower the car, you have to remove these "hooks". They rest on the chassis edges. You will also need to sand the body posts, more on that later.
My bare chassis thus far. It has been sanded all around the outside for clearance. You can compare your chassis to this one and Jesla's and pretty much figure out what we are doing.
Sand the lips off these and file smooth. Then use a small rat tail file and open the holes a little. TEST as you go.
I am working on it still, so no complete photos yet.
Hope it helps.
-
HomeRacingWorld - HRW Janitor
- Posts: 15569
- Joined: Wed Aug 08, 2012 2:05 pm
- Location: HRW Skunkworks
Re: Cougar Slice'n dice...
![]() by Jesla » Sun Dec 22, 2013 12:01 pm
by Jesla » Sun Dec 22, 2013 12:01 pm
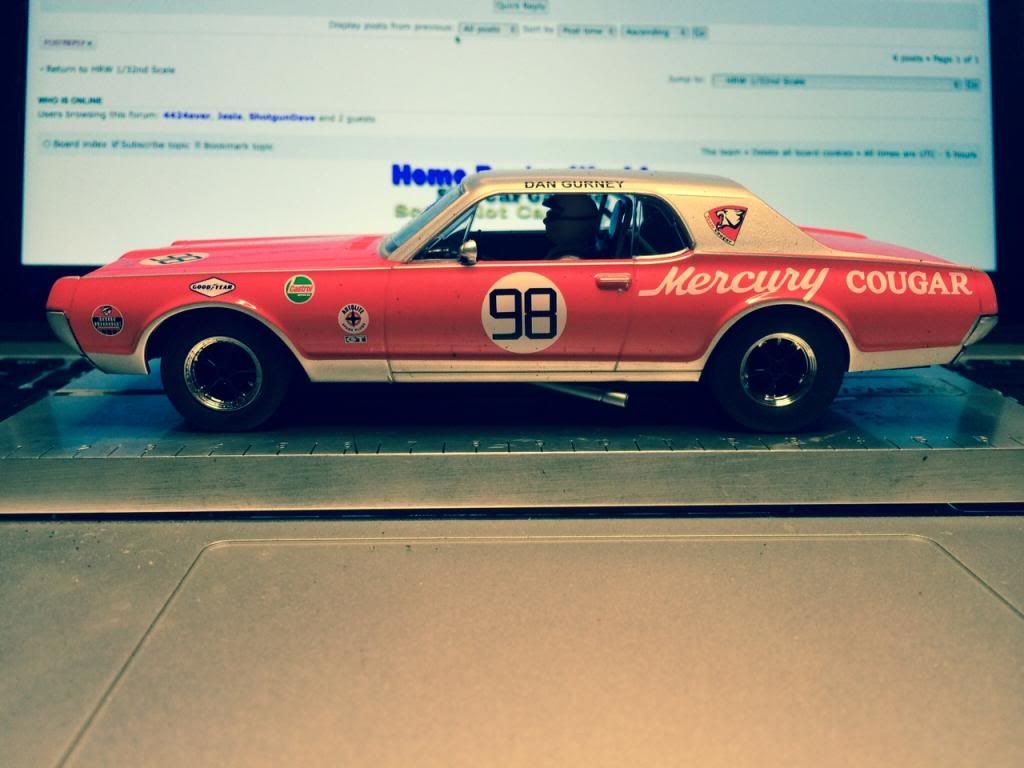
Yup that's what I did however it looks like your going lower than I went with mine.
Last edited by Jesla on Sun Dec 22, 2013 12:15 pm, edited 1 time in total.
-
Jesla - HRW SlotCar Veteran!
- Posts: 892
- Joined: Wed Sep 05, 2012 6:45 pm
- Location: East TN
Re: Cougar Slice'n dice...
![]() by HomeRacingWorld » Sun Dec 22, 2013 12:09 pm
by HomeRacingWorld » Sun Dec 22, 2013 12:09 pm
Not by much. I am using the stock fronts, but I did turn them down a bit in the truer. You approach with the other tires is a easier way and would look just right. I just wanted to try and use these to see how it would turn out.
That is what this weekend is all about, having fun chopping up innocent models :)
That is what this weekend is all about, having fun chopping up innocent models :)
-
HomeRacingWorld - HRW Janitor
- Posts: 15569
- Joined: Wed Aug 08, 2012 2:05 pm
- Location: HRW Skunkworks
Re: Cougar Slice'n dice...
![]() by Jesla » Sun Dec 22, 2013 12:16 pm
by Jesla » Sun Dec 22, 2013 12:16 pm
Also should mention that the exhaust pipes need to be lowered to clear the body.
-
Jesla - HRW SlotCar Veteran!
- Posts: 892
- Joined: Wed Sep 05, 2012 6:45 pm
- Location: East TN
Re: Cougar Slice'n dice...
![]() by HomeRacingWorld » Sun Dec 22, 2013 12:23 pm
by HomeRacingWorld » Sun Dec 22, 2013 12:23 pm
Hey, nice pic, that looks great. And yes sir, have to lower the pipes.
I am glad your wheels worked out. Mine were pretty bad so I am swapping.
I am glad your wheels worked out. Mine were pretty bad so I am swapping.
-
HomeRacingWorld - HRW Janitor
- Posts: 15569
- Joined: Wed Aug 08, 2012 2:05 pm
- Location: HRW Skunkworks
Re: Cougar Slice'n dice...
![]() by 4424ever » Sun Dec 22, 2013 1:25 pm
by 4424ever » Sun Dec 22, 2013 1:25 pm
A+'s on both they look great guys :text-bravo: Jesla your car is sitting just right! and I'm sure we'll see Harrys soon :text-thankyouyellow: Just waiting for mine Bruce ships pretty quick so it wont be long I'm almost drooling!
-
4424ever - HRW SlotCar Veteran!
- Posts: 741
- Joined: Thu Sep 06, 2012 10:26 am
- Location: Peterborough Ontario CANADA
Re: Cougar Slice'n dice...
![]() by Cheater » Sun Dec 22, 2013 2:06 pm
by Cheater » Sun Dec 22, 2013 2:06 pm
And you guy's call me "cheater"! :angry-tappingfoot: I'm so proud :lol: :clap:
Man,i just kill myself :laughing-rolling: :mrgreen:
Merry Christmas.
Cheater
Man,i just kill myself :laughing-rolling: :mrgreen:
Merry Christmas.
Cheater
- Cheater
- I've got Major Medical
- Posts: 112
- Joined: Fri Aug 31, 2012 10:17 pm
Re: Cougar Slice'n dice...
![]() by MoparGreg » Sun Dec 22, 2013 2:56 pm
by MoparGreg » Sun Dec 22, 2013 2:56 pm
I havent got the cougar yet but I have the Dodge. I dont lik,e how the front sits up either. On the dodge I have cut & glued valances, trimmed chassis & under interior. I have not trimmed the body posts as I thought that the interior will stop the body geting lower on the chassis. It didnt seem like there was much clearence between chassis & interior? So you can lower the car by trimming body posts?
-
MoparGreg - HRW SlotCar Veteran!
- Posts: 757
- Joined: Tue Sep 04, 2012 10:00 pm
- Location: Australia
Re: Cougar Slice'n dice...
![]() by HomeRacingWorld » Sun Dec 22, 2013 3:13 pm
by HomeRacingWorld » Sun Dec 22, 2013 3:13 pm
Sand the bottom of the interior smooth and it will give you a little more room sir.
-
HomeRacingWorld - HRW Janitor
- Posts: 15569
- Joined: Wed Aug 08, 2012 2:05 pm
- Location: HRW Skunkworks
Re: Cougar Slice'n dice...
![]() by HomeRacingWorld » Sun Dec 22, 2013 3:16 pm
by HomeRacingWorld » Sun Dec 22, 2013 3:16 pm
Using the Cb Design 15x8 racing wheel, I cut down the original wheels for inserts. I made a mistake and cut a little much on the backside so I lost the lug flange detail. BUT the hub center on the wheel made up for it.
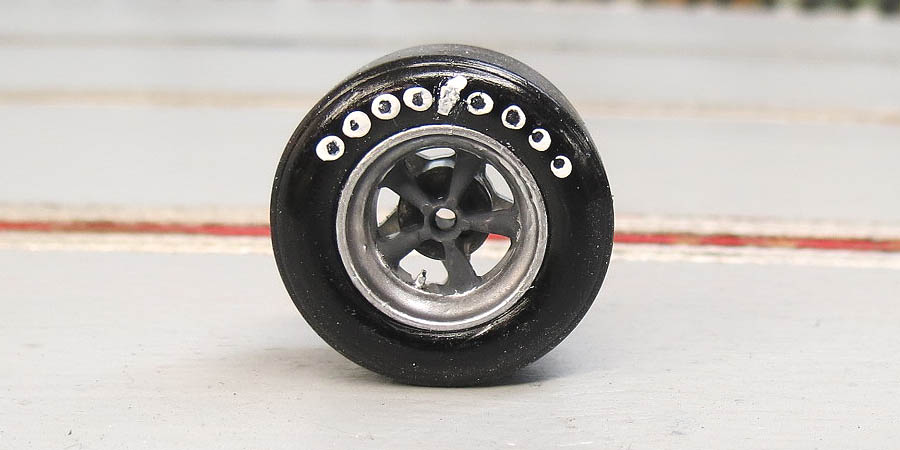
Then I mixed some paint and brushed the spokes. Then a final brush with silver. Not perfect, but close enough for me.
Then I mixed some paint and brushed the spokes. Then a final brush with silver. Not perfect, but close enough for me.
-
HomeRacingWorld - HRW Janitor
- Posts: 15569
- Joined: Wed Aug 08, 2012 2:05 pm
- Location: HRW Skunkworks
45 posts
• Page 1 of 3 • 1, 2, 3
Who is online
Users browsing this forum: No registered users and 1 guest

Powered by phpBB® Forum Software © phpBB Group