I have a Fly Porsche 917k (Shell livery) and I want to upgrade the disc magnet that comes standard with the car; and that is housed in the motor pod, with a Scalextric bar magnet. I've seen the below how-to (October 7, 2008, the Electric Dream Team) and I'd like to perform it. But, I can't figure out how they use the Dremel tool to route the channel in the front of the motor pod:
-------------------------------------------------------------------------------------------------------------------------------------------------------------------------------------------------------------
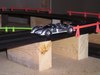
Our project for this week is to adapt the Fly pod to accept a Scalextric bar magnet, adding both grip and drivability to our project car, a Fly A2007 10th Anniversary Lola T70 coupe, modeled after Penske Racing’s 1969 Daytona endurance race winner. For this project you will need a Phillips screwdriver, a Dremel Moto-tool or any of its equivalents from other manufacturers, a hobby knife, and some tape (almost any kind will do). The magnet we will be installing is the Scalextric W8475-2. This is the standard equipment Scalextric bar magnet, so you may already have one or more of them in your parts box or on a junk Scalextric car. There are stronger magnets of the same size and shape, but with a stock motor and power supply the standard Scalextric magnet will give you all the downforce you can actually use, more in some cases. We’re also going to add even more grip with a pair of Indy Grips IG3003 silicone tires or, if you prefer, the equivalent tires from Maxxtrac or Ortmann.
Start by removing the four body mounting screws and taking the body off the chassis. Next, snap the rear axle assembly and motor out of the chassis. Then remove the screw at the rear of the pod and lift the pod off the chassis. You can leave the lead wires attached to the guide. Remove the disc magnet from the pod. It should just fall out by itself.
With everything removed from the pod, use your Moto-tool to cut a groove, 8 mm wide and 3 mm deep, in the bottom of the pod as shown below. Use your hobby knife to clean up any rough edges.
The magnet is 2.5 mm thick, and the extra half millimeter will allow you to place shims (for our project just layers of tape) above or below the magnet to move it up or down. This will let you adjust the amount of magnetic downforce to meet limits in the racing rules, equalize your car with another, or give you increased grip in the corners without excessive magnet drag on the straights. Some experimentation will yield the best balance. With the Scalextric magnet all the way down against the top surface of the chassis our Lola actually had more magnet drag than the stock motor could handle, and the car was slow on the straights. Shimming the magnet up a bit freed the car up on the straights while still delivering lots of grip in the corners. Be sure you use enough shims so that when the pod is screwed down in place it holds the magnet tightly in its proper position. If you want to leave the pod slightly loose you may want to anchor the magnet into the pod with a drop of CA glue. Be sure the magnet is centered in the chassis, not on the pod. The pod is offset slightly to the right because the spur gear goes to the left of it and the pod plus the gear as a unit need to be centered. The socket for the old disc magnet is on the car’s centerline, so use it as a guide for positioning the magnet.
---------------------------------------------------------------------------------------------------------------------------------------------------------------------------------------------------------------------
Here's a link to the full article:
http://www.electricdreams.com/Slot-Car- ... upgrade-2/
Do they use the plastic cutting disc to cut the material and then clean it out with an xacto knife? Do they use a sanding barrel to route the entire front of the pod? I'm not sure where to begin on this project.
Any help would be greatly appreciated. I don't want to end up with a useless motor pod, so I need to know how to do this right. Thanks.
Audi1
Magnet replacement - How do they do this?
8 posts
• Page 1 of 1
Magnet replacement - How do they do this?
![]() by Audi1 » Sun Mar 30, 2014 5:03 pm
by Audi1 » Sun Mar 30, 2014 5:03 pm
-

Audi1 - HRW SlotCar Veteran!
- Posts: 4223
- Joined: Fri Nov 01, 2013 7:25 am
- Location: Merrimac, MA
Re: Magnet replacement - How do they do this?
![]() by Florida_Slotter » Mon Mar 31, 2014 6:14 am
by Florida_Slotter » Mon Mar 31, 2014 6:14 am
Audi1,
Obviously, this can be done as the photos show it.
From looking at the photos, I believe that they are actually using the Dremel as a mini router to make the cuts in the stock chassis.
Now, I have a question for you: Does your club have a rule that nothing can be added to the underside of the chassis?
The reason I am asking is that I have seen many folks remove one of the 'ribs' under the motor and Super Glue one of the Professor Motor flat magnets in that location. The PM magnet is about the same thickness as the 'rib' so it will not protrude down and cause clearance issues.
Just one more way of skinning that feline.
-

Florida_Slotter - Scratch Build Guru
- Posts: 1941
- Joined: Wed Sep 05, 2012 4:08 pm
- Location: Florida
Re: Magnet replacement - How do they do this?
![]() by Audi1 » Mon Mar 31, 2014 6:47 am
by Audi1 » Mon Mar 31, 2014 6:47 am
We can add weight to the underside of the chassis for some classes, but no magnets.
I agree, it looks like they used the Dremel as a router, but do you think it was done by hand or do you think they put the dremel upside down in some sort of jig to get such a straight cut across the front of the motor pod?
Audi1
I agree, it looks like they used the Dremel as a router, but do you think it was done by hand or do you think they put the dremel upside down in some sort of jig to get such a straight cut across the front of the motor pod?
Audi1
-
Audi1 - HRW SlotCar Veteran!
- Posts: 4223
- Joined: Fri Nov 01, 2013 7:25 am
- Location: Merrimac, MA
Re: Magnet replacement - How do they do this?
![]() by Florida_Slotter » Mon Mar 31, 2014 7:33 am
by Florida_Slotter » Mon Mar 31, 2014 7:33 am
Well if I were doing the job, I would have to use a mill. I'm kind of persnickety when it comes to the kind of work I turn out.
Another way of making a Fly into a great running slot car is the remove the body from the chassis and slide an HRS2 chassis under that Fly body. M/T Resins makes some Lola wheel inserts that will allow you to put C.B. Design wheels on all 4 corners in 15 by xx size or Slot.It 15 inch wheels. Just a thought.
Something else to peruse . . . . . if you were to get the magnet closer to the track's surface, you might have all the magnet you need. I'm sure with the .040 of chassis to track and .032 of additional plastic under the magnet that you are losing a lot of the magnetism. Just one more avenue.
-
Florida_Slotter - Scratch Build Guru
- Posts: 1941
- Joined: Wed Sep 05, 2012 4:08 pm
- Location: Florida
Re: Magnet replacement - How do they do this?
![]() by Audi1 » Tue Apr 01, 2014 4:57 am
by Audi1 » Tue Apr 01, 2014 4:57 am
We can't do a chassis replacement or an HRS2 chassis would already be underneath the body.
Good idea on lowering the magnet, but, for me, the big disadvantage of the old Fly circular magnet set-up is that you have magnetism when you don't really need it and you don't have it when you do. The circular magnet is strong, but it's totally centered in the car, so you have max magnetic effect when you're traveling in a straight line, which, for me, is when I want minimum magnetic effect. When you start to drift the rear end out a little,, you lose magnetic effect abruptly, which is when I want max magnetic effect.
I'm thinking about using one of the Slot.It C-shaped Scalextric-type replacement bar magnets for this modification; getting less magnetic effect in a straight line and more when the rear starts to drift out in the turns.
I now plan to use a fine-toothed coping saw to cut two lines in the bottom of the pod; at the outer edges of the bar magnet, then use a Dremel tool to route out the material between the saw cuts. We'll see how it goes..................
Audi1
-
Audi1 - HRW SlotCar Veteran!
- Posts: 4223
- Joined: Fri Nov 01, 2013 7:25 am
- Location: Merrimac, MA
Re: Magnet replacement - How do they do this?
![]() by Dodgefarmer » Tue Apr 01, 2014 10:04 am
by Dodgefarmer » Tue Apr 01, 2014 10:04 am
That coping saw sounds like a good idea and should be fairly quick. Just a thought, (if that saw cut works out) why not make 3 or 4 cuts in between. That way you could use the saw cuts as a depth gauge.
Randy
Randy
-
Dodgefarmer - HRW SlotCar Veteran!
- Posts: 818
- Joined: Thu Sep 06, 2012 10:11 am
- Location: Grindrod B.C. Canada
Re: Magnet replacement - How do they do this?
![]() by Audi1 » Wed Apr 02, 2014 6:53 pm
by Audi1 » Wed Apr 02, 2014 6:53 pm
I like that idea, Dodgefarmer; thanks, I'll give it a try.......
Audi1
Audi1
-
Audi1 - HRW SlotCar Veteran!
- Posts: 4223
- Joined: Fri Nov 01, 2013 7:25 am
- Location: Merrimac, MA
Re: Magnet replacement - How do they do this?
![]() by Audi1 » Sun Apr 06, 2014 4:11 am
by Audi1 » Sun Apr 06, 2014 4:11 am
The two vertical coping saw cuts made the work much easier. I routed out the material between the cuts as shown in the article and finished it off with horizontal coping saw cuts and fine sandpaper to smooth everything up.
I can say from lap times this weekend, that if you're going to run a Fly car with this type of motor pod, then this magnet upgrade is definitely worth it.
For a good choice of magnets (in addition to the stock Scalextric magnet and the Scalextric replacement C-bar magnet that Slot.It sells), in both 42 and 52 strength, I used K&J Magnets, Inc. and was very happy with both the products and the service.
http://www.kjmagnetics.com/products.asp?cat=11
I sense that magnet racing is a very poor country cousin on this forum, but I have to say that although I prefer non-mag racing by a considerable margin, it is fun to adhesion-tune a mag car for some tracks; primarily balancing out magnetic downforce with frictional drag on the motor/drivetrain.................
Audi1
-
Audi1 - HRW SlotCar Veteran!
- Posts: 4223
- Joined: Fri Nov 01, 2013 7:25 am
- Location: Merrimac, MA
8 posts
• Page 1 of 1
Who is online
Users browsing this forum: No registered users and 3 guests

Powered by phpBB® Forum Software © phpBB Group